

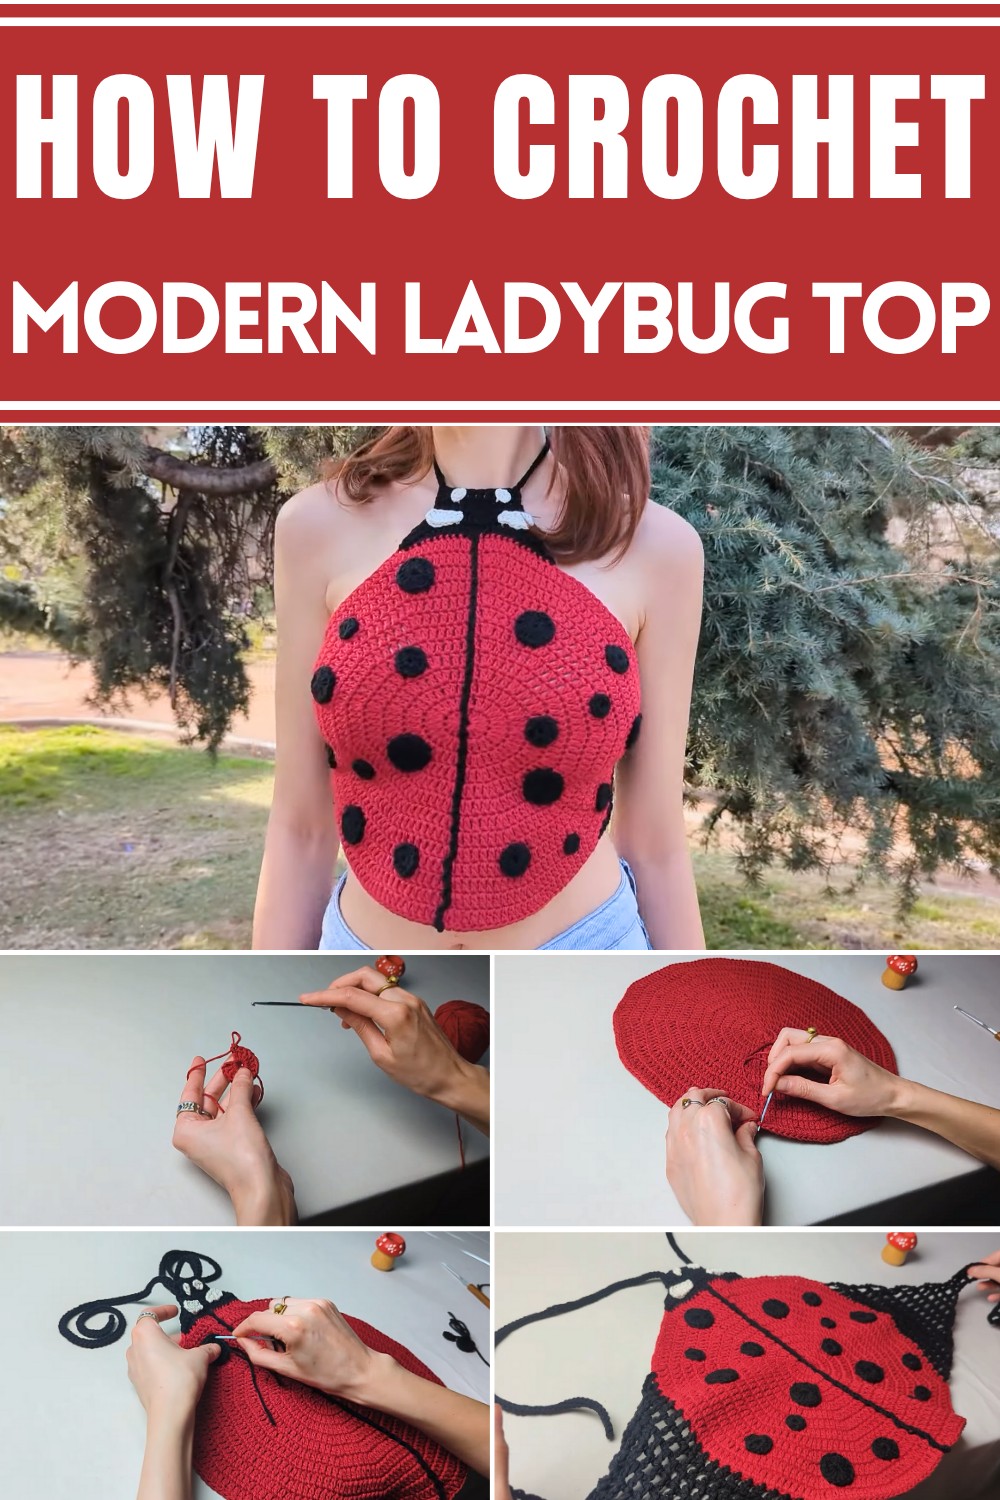
Improve your connection to nature and creativity with this elegant crochet ladybug top pattern, a perfect blend of skill, style, and inspiration.
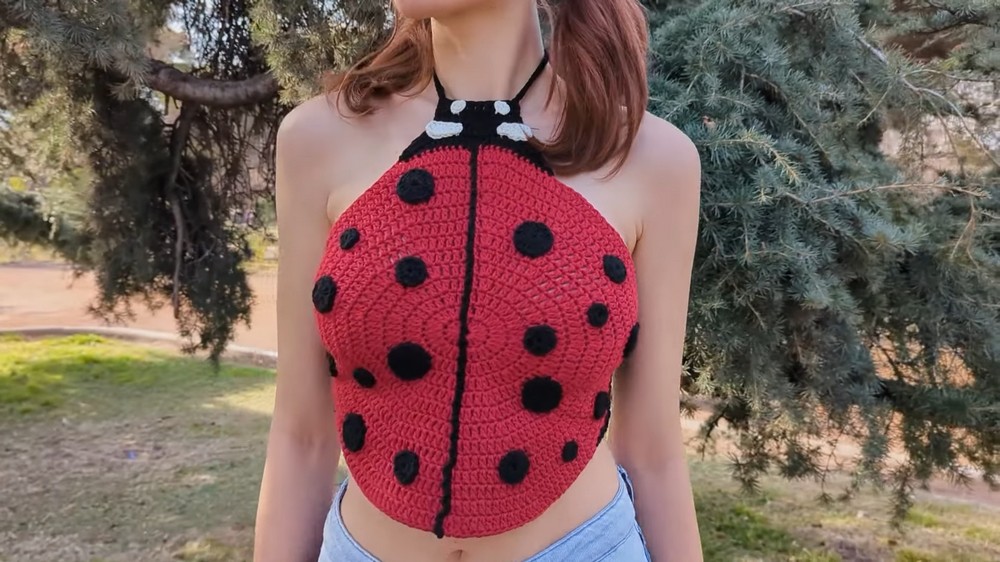
Ladybugs are symbols of luck and nature’s beauty, and this crochet ladybug top pattern transforms their charm into a stylish top for those who appreciate the outdoors. Built to suit crocheters of all skill levels, this pattern combines practicality with creativity, offering a wearable piece that showcases artistic talent and a love for nature. The ladybug motif adds a playful yet elegant touch, making this top ideal for casual outings, garden gatherings, or gifts for someone who treasures unique handmade items.
Whimsical Ladybug Top Crochet Pattern – Step-by-Step
The lightweight design ensures comfort, while the intricate pattern highlights attention to detail that elevates your crochet skills. This top stands out as a conversation piece, allowing wearers to express their passion for the environment and artistic pursuits. Beyond its aesthetic appeal, the project encourages a calming and rewarding pastime, contributing to mental well-being through slow handiwork.
Whether paired with jeans for a casual look or layered for added flair, this crochet top brings versatility to your wardrobe. The thoughtful instructions ensure you can achieve stunning results, even as you hone your skills. For nature lovers, this ladybug-inspired top is more than just clothing it’s a celebration of the small wonders that brighten life.
Introduction:
This pattern walks you through the step-by-step process to create a vibrant and adorable crochet ladybug top, perfect for any handmade wardrobe. Using simple tools and techniques, you'll crochet a design that stands out. Whether you're an experienced crocheter or a beginner, this pattern is approachable and customizable to fit your style. In this guide, we'll cover how to crochet the top, add details like spots, straps, and antennae, and assemble the piece for the final look.
Step 1: Materials and Tools
- Cotton Yarn (specific weight as desired)
- Crochet hook suitable for your yarn (e.g., 5mm for some straps)
Step-by-Step Guide to Crochet the Ladybug Top
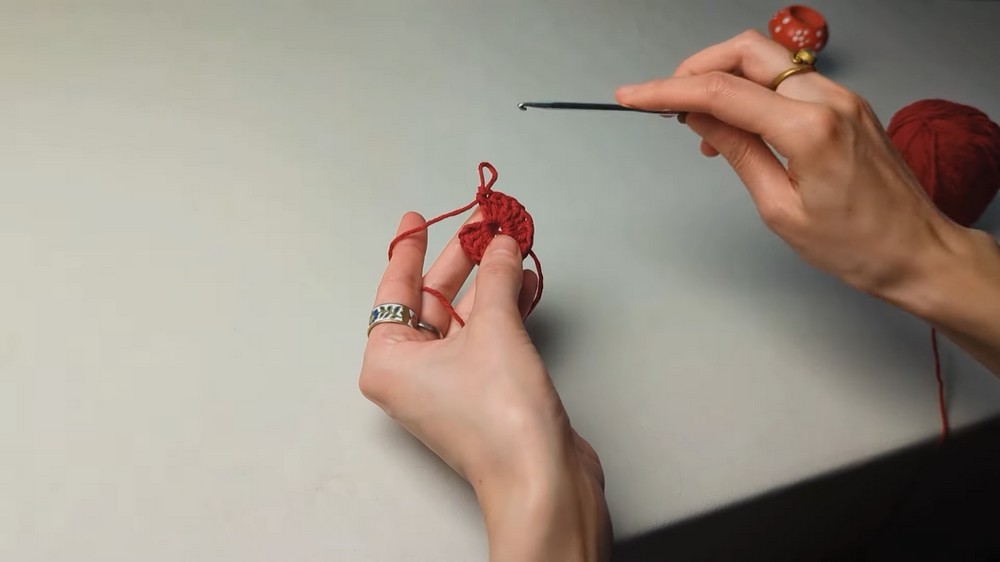
Step 2: Crocheting the Circle Base
- Start with the Magic Ring:
- Begin with a magic ring.
- Chain 2 and work 14 double crochets into the magic ring.
- Close the ring and slip stitch at the top of the chain 3 to join.
- Increasing Rounds:
- Round 2: Chain 3, work two double crochets in each stitch around. Maintain 14 increases per round.
- Round 3: Double crochet into the first stitch, then work increases every other stitch.
- Round 4: Double crochet in the first two stitches; increase in the third stitch.
- Round 5 Onward: Continue increasing by one extra stitch between the increases in each subsequent round.
- Sizing the Circle:
- Make the circle large enough to cover the front of your torso. This tutorial uses 11 rounds.
- Weave in the loose ends upon completion.
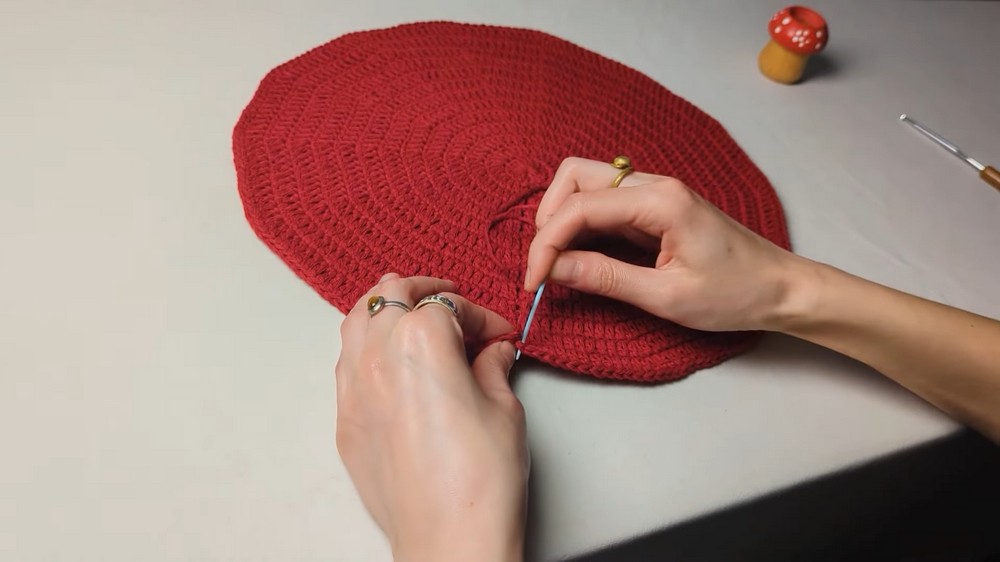
Step 3: Adding the Ladybug Line
- Attach Black Yarn:
- Find the visible line on the circle.
- Insert the hook, chain 2, and slip stitch along the line.
- For the middle, chain 4, then slip stitch at the center, as there’s no anchor point.
- Continue Downward:
- Finish the line by alternating chain 2 and slip stitches to the bottom.
Step 4: Crocheting the Ladybug’s Face
- Defining the Face Shape:
- Identify an increase stitch and insert your hook 3 stitches to the left.
- Chain, then work stitches as follows:
- Single crochet (SC) for 2 stitches.
- Half double crochet (HDC) for 2 stitches.
- Double crochet (DC) until the center.
- Mirror this process for the other side.
- Add Layers:
- Chain 1, turn the work, skip the first stitch, and repeat similar stitches, ensuring symmetry.
- For rounding off, make a half double crochet at the end.

Step 5: Crafting the Antennae
- Create Chains:
- Attach yarn at the top of the face.
- Chain 100 to form the first antenna.
- Work Back:
- Slip stitch along the entire chain for structure.
- Repeat:
- Mirror the process for the second antenna.
Step 6: Creating the Eyes and Spots
- Eyes:
- Create a slip knot.
- Chain 3, work a single crochet in the second stitch from the hook, then a slip stitch.
- Leave long tails for sewing.
- Spots:
- Use a magic ring.
- For small spots, work 9 single crochets.
- For medium spots, work 12 half double crochets.
- For large spots, work 14 double crochets.
Step 7: Adding the Straps
- Locate Placement:
- Find the fifth increase on either side of the circle.
- Attach yarn here to form straps.
- Crochet Straps:
- Chain 4, skip one stitch, and double crochet into the next.
- Continue this chain-and-double-crochet sequence until achieving the desired width for the straps.
- Build Length:
- Turn your work. Repeat the pattern for each row until the strap reaches your preferred length (e.g., 12 rows).
- Finish by decreasing near the edges for natural shaping.
Step 8: Assemble and Complete the Top
- Sewing the Details:
- Attach the spots, face elements, eyes, and antennae using their loose tails. Adjust placements as desired.
- Weave in Ends:
- Secure all loose ends and trim excess yarn to finalize your project.

Conclusion
Congratulations, you’ve completed the crochet ladybug top! This charming creation is both playful and eye-catching, making it a perfect addition to your collection. The project allows for personalization, whether it’s adjusting strap lengths or altering spot arrangements.
Leave a Reply