

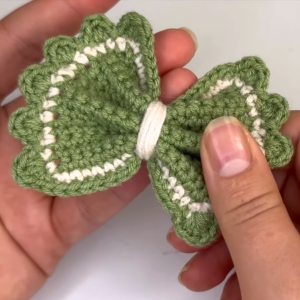
Elevate your look with a crochet hair bow, offering a blend of charm and style, perfect for adding flair to any hairstyle and occasion.
Hair accessories have been a timeless way to enhance personal style, and crochet hair bows stand out as a charming choice. These handmade pieces combine skillful technique with a flair for design, making them both beautiful and functional. Ideal for everyday wear or special occasions, crochet hair bows provide a delicate touch that can instantly elevate any hairstyle.
One of their primary benefits is their gentle nature. Made from soft yarn, they are lightweight and hair-friendly, reducing the risk of tangles or breakage. Their snug yet comfortable hold ensures they can secure hair in place without causing discomfort. Available in a range of patterns, sizes, and colors, crochet hair bows offer flexibility to match any look, from playful and casual to chic and elegant.
Charming Crochet Hair Bow pattern for Everyday Wear

Additionally, they serve as a thoughtful gift option due to their handmade detailing, adding a personal touch to any present. Practical and fashionable, these bows can be used to accessorize ponytails, buns, or loose waves effortlessly. Whether highlighting an outfit or adding a pop of color, crochet hair bows prove their versatility time and time again.
Thanks to their classic appeal and durability, they remain a favorite accessory for all ages, blending style with everyday usability in the most delightful way.
Materials Needed
Before starting, gather the following supplies:
- A hook (2 mm)
- Scissors
- Yarn (300 meters per 50 grams, approximately)
- A scrunchie
- Needle and thread (for assembly)

1. Creating the First Crochet Piece (Bow Tail)
The first part of the bow involves creating the main tail. Follow these steps:
- Form the Center Ring
- Begin by forming a ring at the center as demonstrated in the tutorial.
- Chain three stitches (counts as the first double crochet).
- First Row
- Continue with double crochets into the center of the ring.
- Create three chains at the end and turn your work.
- Second and Subsequent Rows (Increasing Pattern)
- For each row:
- Start with three chains, which count as your first double crochet.
- Double crochet into the same stitch, then chain one.
- Work double crochets into the spaces between stitches in the previous row.
- Always increase by adding two double crochets (one at each end of the row).
- For each row:
- Continue Until Desired Width
- Repeat the pattern until the bow's tail has a width of 6 cm.
- Stop increasing at this point and alternate two specific rows to maintain the shape.
- Decreasing the Tail
- To taper the tail, reduce stitches by:
- Working two double crochets together at the start and end of each row.
- Repeat decreases until you have three stitches remaining, then finish with a half-double crochet.
- Fasten off the piece.
- To taper the tail, reduce stitches by:


2. Creating the Second Crochet Piece (Main Bow Section)
For the second section, you will shape the main bow itself.
- Foundation Chain
- Calculate the stitches based on the first piece made. For example, if the first piece had 35 stitches, chain 34 + 3 turning chains for a total of 35.
- Follow Initial Row Pattern
- Begin as you did with the second row of the first piece:
- Chain three and double crochet into the next stitch, followed by chains and skips.
- Work to maintain an even, flat, rectangular shape without increasing or tapering.
- Begin as you did with the second row of the first piece:
- Join Edges
- Once the rectangle reaches your desired length:
- Use slip stitches to join the two edges of the rectangle together, creating a loop-like piece.
- Once the rectangle reaches your desired length:
- Add Edging (Optional)
- The bow’s edge can be decorated with slip stitches and a decorative pico pattern:
- Work three slip stitches and, on the third, add a chain 3. Join it back to form the “pico.”
- Continue this pattern around the entire edge.
- The bow’s edge can be decorated with slip stitches and a decorative pico pattern:

3. Creating the Connecting Piece
This third portion brings all parts of the bow together:
- Foundation Chain
- Chain enough stitches to match the width you want, for example, nine stitches.
- Single Crochet Rows
- Work rows of single crochet stitches back and forth until the piece is long enough to wrap around the bow.
- Attach to Scrunchie
- Slide this strip around a hair tie or scrunchie.
- Use slip stitches to join the edges of the strip, forming a neat loop.
4. Assembly
- Shape the Individual Pieces
- For the first piece (tail), fold it in half and sew along the center to shape it.
- Repeat the process with the second piece (bow section).
- Combine Bow Pieces
- Layer the first (tail) and second (main bow section) pieces.
- Sew and wrap thread tightly around the middle to secure both parts together.
- Attach Connecting Piece
- Wrap the third piece (the strip with the scrunchie) around the center of the bow.
- Sew it securely in place, ensuring any loose ends are woven in neatly.

Conclusion
Creating this adorable crochet bow is a simple yet rewarding project for beginners. With basic supplies and techniques, you’ve crochet a personalized accessory that can be styled in various ways. Whether attached to a scrunchie or worn as a standalone piece, this bow makes for an elegant touch to any outfit.
Leave a Reply