

Attach a burst of color to your decor with this vibrant crochet flower coaster pattern easy to make and perfect for brightening any space!
A colorful touch to home decor, a crochet flower coaster blends charm and functionality in a simple yet artistic design. This coaster protects your furniture from moisture while adding a cheerful vibe to your space. Ideal for various settings, it fits seamlessly onto a coffee table, dining area, or even as an accent piece for an outdoor gathering spot. Its flower-inspired design serves as both a practical tool and a delightful decoration for maintaining clean and polished surfaces.
Upgrade Your Table Setting with Crochet Flower Coaster Pattern
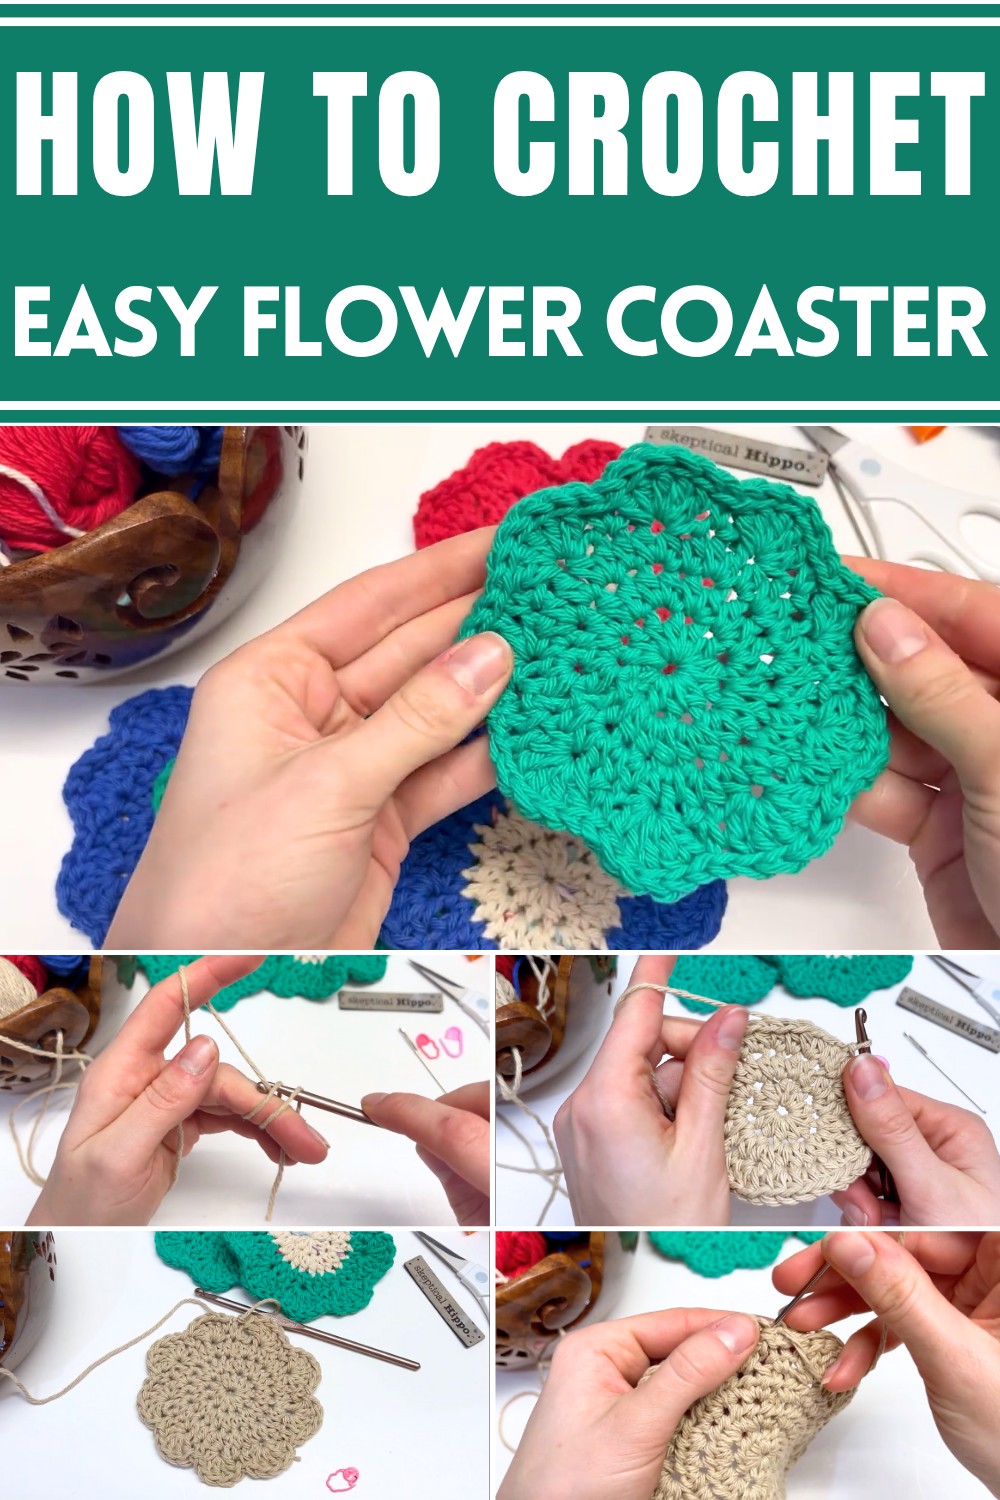
Perfect for crocheters of all skill levels, this pattern gives you the flexibility to choose colors, sizes, and textures that complement your style. Whether you prefer muted tones or bold shades, the coaster offers a chance to showcase handmade artistry while enhancing your surroundings.
Lightweight and easy to store, it’s excellent for everyday use or special occasions, making it both functional and visually captivating. A crochet flower coaster is not just a practical addition to your decor but also a subtle yet impactful way to brighten up your space with individuality and charm.
Introduction
In this pattern, we will guide you through creating a beautiful crochet flower coaster a quick and beginner-friendly project that only takes 10–15 minutes to complete! Using simple stitches and basic tools, this pattern produces an elegant design perfect for adding a handmade charm to your home decor or gifting to others. The pattern features options for working in a single color or adding color changes for a multi-tonal effect.
Tools and Materials
Before diving into the pattern, gather the items you'll need:
- Worsted weight cotton yarn (100% cotton or cotton blend; avoid acrylic for better coaster quality).
- 5mm crochet hook.
- Stitch markers (optional but recommended for beginners).
- Yarn needle for weaving in ends.
- Scissors.

Step-by-Step Instructions
Round 1: Magic Ring and Half Double Crochets
- Create a magic ring: Wrap the yarn around your middle finger, insert your hook under both loops, grab the working yarn, and pull through. Chain 1 (does not count as a stitch).
- Work 12 half double crochets into the magic ring:
- Yarn over, insert hook into the ring, yarn over and pull up a loop (3 loops on hook). Yarn over and pull through all three loops.
- Use a stitch marker to mark the first stitch for better visibility.
- Close the round with a slip stitch into the first half double crochet. Pull the tail of the magic ring tight to close the center.

Round 2: Half Double Crochet Increases
- Begin with a chain 1 (does not count as a stitch).
- Work two half double crochets into each stitch from the previous round (a half double crochet increase), ensuring a total of 24 stitches. Use stitch markers to mark the first and last stitches for easier navigation.
- Finish the round with a slip stitch into the first stitch of the round.
Round 3: Alternating Single Half Double Crochet and Half Double Crochet Increases
- Chain 1 (does not count as a stitch).
- Work 1 half double crochet into the first stitch.
- Into the next stitch, work a half double crochet increase (2 half double crochets).
- Repeat the pattern of 1 half double crochet, then a half double crochet increase all the way around. You should end this round with 36 stitches.
- Finish with a slip stitch into the first stitch.

Round 4: Petals (Single Crochet and Double Crochets)
- Chain 1 (does not count as a stitch).
- Work a single crochet into the first stitch.
- Skip the next stitch. Into the following stitch, work 5 double crochets (this creates the petal shape):
- Yarn over, insert hook into the stitch, yarn over and pull up a loop (3 loops on hook). Yarn over, pull through 2 loops, yarn over, and pull through the remaining 2 loops. Repeat for a total of 5 double crochets into this same stitch.
- Skip the next stitch and work a single crochet into the following stitch. This completes one petal.
- Repeat the pattern (skip one stitch, work 5 double crochets, skip one stitch, work 1 single crochet) until the end of the round.
- Finish by skipping the last stitch and working a slip stitch into the first single crochet of the round.

Optional Round 5: Slip Stitch Border
- Add a border for a more defined edge.
- Work slip stitches into every single stitch around:
- Insert your hook into the stitch, yarn over, pull through the stitch, and pull through the loop on your hook.
- Finish the border with a slip stitch into the first slip stitch of the round.
Finishing the Coaster
- Weave in ends using a yarn needle:
- Pull the tail of the magic ring tight and weave it securely under the stitches.
- Weave in the other ends (ensure no visible yarn at the front). Clip excess yarn.
- (Optional) Block the coaster: Pin the coaster down to flatten it and spray with water or steam for better structure.

Conclusion
Congratulations! You've completed your crochet flower coaster. This quick and versatile project is a wonderful addition to your crocheting repertoire. You can make multiple coasters in varying colors and even create a holder for them. For a polished finish, remember to block the coaster for a sturdy and flat appearance.
Leave a Reply