

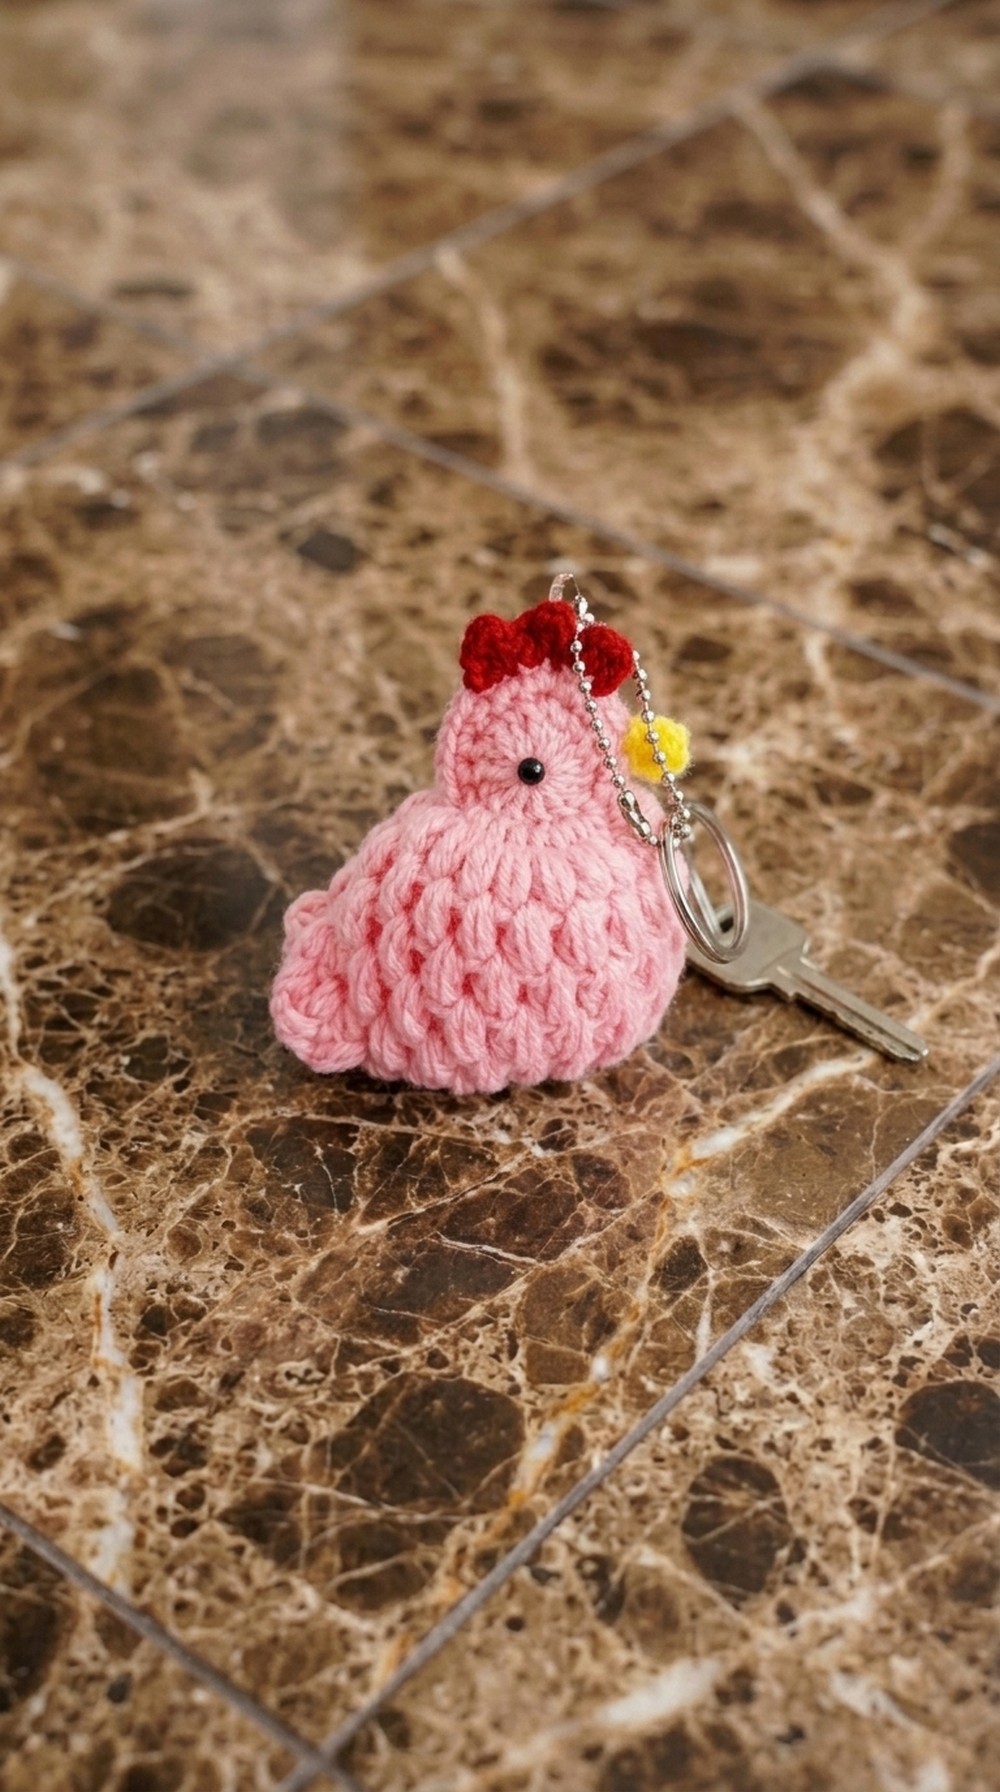
Brighten your everyday with a charming crochet chicken keychain that adds a cheerful and unique touch to your keys or bag while making a lovely gift.
Are you looking for a cute and fun accessory to brighten your keys or bags? This little crochet bird is full of charm and personality. It’s small and soft, perfect to carry with you or give as a handmade gift. Its bright colors and sweet details make it a lovely decoration or a fun collectible for anyone who loves crochet.
Easy Free Crochet Chicken Keychain Pattern for Bag Charm
The crochet chicken keychain is about a few inches tall with a round body and colorful comb and beak. Puff stitches add texture, making it extra cute and unique. It fits nicely in your hand and looks great hanging from your keys or backpack.
If you know basic crochet stitches like single crochet and magic ring, you’ll enjoy making this project. It’s great for beginners who want to try something a little different, using simple stitches combined with puff stitch for added detail.

Uses of the Crochet Chicken Keychain:
- Add a cheerful charm to your keys, making them easier to find.
- Decorate backpacks, purses, or lunch bags with a playful touch.
- Use it as a cute zipper pull for jackets or bags.
- Give it as a thoughtful handmade gift or party favor.
- Collect them in different colors to brighten up your space.
- Attach to pet collars for a fun accessory.
This project helps improve your crochet skills while creating a fun keepsake. Whether you want to keep it for yourself or make a special gift, this crochet chicken keychain is sure to bring smiles. Get your yarn and hook ready, and enjoy making this cheerful little friend!
Crochet Chicken Bird Pattern
- Crochet a cute, simple chicken bird suitable for beginners.
- Use as key ring, home decoration, or gift.
- Features colorful accents and textured puff stitches.
Pattern Notes
- Worked in rounds and joined flat pieces.
- Two flat circles for body front and back, joined by single crochet seam.
- Puff stitches add texture on legs and wings.
- Color changes done by fastening off and joining new yarn.
- Stuff lightly and sew closed neatly.
- Maintain consistent tension
Skill Level
Beginner to Intermediate
Materials & Abbreviations
- ch = chain
- sl st = slip stitch
- sc = single crochet
- hdc = half double crochet
- dc = double crochet
- puff st = puff stitch (see special stitches)
- Use medium weight yarn, hook size 3.5 mm or 4 mm
Measurements / Sizing
- Finished height approx. 4–5 inches (10-13 cm)
- Lightweight, keychain or ornament size
Gauge
- ~16 stitches and 20 rows = 4 inches (10 cm) in single crochet (sc)
- Gauge flexible for this project
Special Stitches
Puff Stitch (puff st):
- Yarn over, insert hook into stitch, yarn over and pull up a loop
- Repeat pulling up loops 3 times total in same stitch (7 loops on hook)
- Yarn over and pull through all loops
- Chain 1 to secure
Pattern Instructions
Body Circles (Make 2 identical pieces)
Round 1:
- Create a magic ring.
- Chain 3 (counts as 1st dc), work 15 dc into ring (total 16 dc).
- Join with sl st to top of beginning ch 3.
- Pull to close ring tightly.
Round 2:
- Chain 3 (counts as 1st dc).
- Work 15 dc in back loops of next 15 stitches (without increasing).
- End round.
- Fasten off and repeat rounds 1 and 2 to create second identical circle.
Joining Body Pieces
Joining Round:
- Place two circles with right sides facing out.
- Join yarn, chain 1.
- Work single crochet (sc) stitches through both layers, joining edges evenly by working:
- 2 sc in 2 stitches on one side matched with 2 sc in 2 stitches on the other side
- Continue joining for total of 20 sc stitches evenly around circle.
- Fasten off.

Colored Edging with Half Double Crochets (Using Red and Yellow Yarn)
Round 1 (Colored Edge):
- Join red or yellow yarn.
- In the edge stitches, work:
- 2 hdc in same stitch
- 1 hdc in the next stitch
- Repeat this sequence around the edge.
- End with slip stitch or join as preferred.
Legs and Wings with Puff Stitches
Round 1 (Puff Stitch Round):
- Chain 3 to begin.
- Work puff st in next stitch.
- Chain 1 in between puff stitches.
- Repeat:
- Puff st in next stitch, then chain 1, completing 9 puff stitches per leg/wings row spaced evenly.
- Some puff stitches may be worked twice in same stitch to shape legs.
Alternating Puff and Single Crochet Rounds to Build Texture
Rounds 2 to 5:
- Alternate between one round of puff stitches and one round of single crochet (sc) around legs and wings:
- Puff stitch round: as above (puff st with ch 1 spacing)
- Single crochet round: work sc in every stitch around
- Total 5 rounds alternating puff and sc.
Decreasing Puff Stitches Round
Round 6 (Decrease Round):
- Begin decreasing by combining puff stitches:
- Work 2 puff stitches together (decrease) to reduce total puff stitches by 5.
- This rounds shapes the legs and wings narrowing.
- Continue working around evenly.

Final Puff Stitch and Closure
Round 7 and Later:
- Continue working puff stitch rounds and decrease as needed to taper shape.
- Stuff the bird lightly with fiberfill before closing.
- Use yarn needle to sew last stitches closed neatly.

Beak and Crest
- Chain small lengths (ch 2–3) in red and yellow yarn.
- Work half double crochet (hdc), double crochet (dc), and slip stitch (sl st) for shaping.
- Attach these features with yarn needle to the head.
Optional Key Ring Loop
- Chain 10–15 for a hanging loop at the top of the head.
- Join ends with slip stitch to form loop.
- Attach key ring if desired.
Assembly & Finished Size
- Finished bird size: approx. 4–5 inches (10–13 cm) tall.
- Lightweight with soft stuffing.
- Textured puff stitch legs and wings.
- Decorative red and yellow edging on comb, beak, and tail.
- Key ring loop optional for hanging or carrying.

Summary
This crochet chicken bird uses simple stitch rounds: magic ring, dc rounds for body, sc joining round, colored hdc edging, then textured puff stitch and sc alternating rounds for legs and wings. Decreasing puff stitches shapes features. Small crochet details finish the beak and crest. Stuff and close; add loop for keychain usage. Perfect for beginners and fast to create!

Leave a Reply