

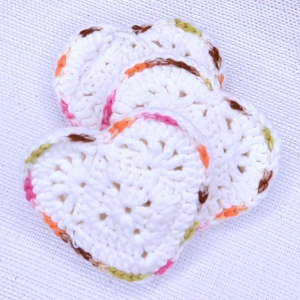
Add charm to your home with the crochet Rose Coaster Bouquet & Basket pattern—an elegant, functional, and eco-friendly DIY perfect for décor or gifting!
A cozy home deserves thoughtful touches, and nothing adds charm quite like the Crochet Rose Coaster Bouquet & Basket Pattern. This design combines practicality with a decorative flourish, perfect for sprucing up your living space. Soft, delicate roses are transformed into functional coasters, offering an elegant way to protect your surfaces from coffee cups or water rings. Paired with a lovely basket to hold these coasters, it's a delightful addition to any table or countertop.
Charming Crochet Rose Coasters and Basket Pattern for Loved Ones

The pattern not only enhances home décor but also offers a wonderful opportunity to make meaningful handmade gifts. Imagine presenting this set to a loved one it’s the kind of unique, heartfelt gift that becomes a cherished keepsake. Its versatility is a bonus, as the coasters work for a variety of events, from everyday use to special gatherings.
Beyond its aesthetic appeal, the project is great for all skill levels, whether you're new to crocheting or looking for a satisfying and creative way to relax. Plus, it’s an eco-friendly alternative to disposable coasters, helping you contribute to a more sustainable lifestyle. With every loop and stitch, this pattern brings artistry and purpose into your home while offering satisfaction and practicality in each piece.
Introduction
The rose coaster with a basket is a charming and functional crochet project perfect for adding a handmade touch to home decor or gifting. Combining a floral design and a practical basket holder, this pattern allows you to practice a range of crochet techniques, such as magic circles, slip stitches, and forming intricate leaf and rose patterns. Here's a step-by-step guide based on the video to help you recreate this project.
Step-by-Step Process
1. Materials Needed
- 4.5 mm and 4 mm crochet hooks
- Yarn in three colors: one for the base, one for the leaves, and one for the rose
- Scissors
- Sewing needle

2. Creating the Base
- Start with a Magic Circle: Use the 4.5 mm hook and your base color.
- Wrap the yarn around your fingers to form a circle.
- Insert the hook under the first loop and over the second loop, then pull through and secure.

- Chain 2 and Add 12 Double Crochets:
- Chain two (does not count as a double crochet).
- Add 12 double crochets into the magic circle.
- Pull Tight & Close the Round:
- Pull the tail end to tighten the circle, then slip stitch into the first stitch of the round.
- Increase in the Next Round:
- Chain 2. Work 2 double crochets into each stitch around (total: 24 stitches).
- Continue Increasing:
- Round 3: Do 1 double crochet in the first stitch and 2 in the next, repeating around (total: 36 stitches).
- Round 4: Do 1 double crochet in each of the next 2 stitches, then 2 in the following stitch, repeating around (total: 48 stitches).
- Stop here for a standard coaster size, or add additional rounds as needed (e.g., 1 double crochet in the next 3 stitches, then 2 in the fourth).

3. Adding Leaves
- Switch to Green Yarn: Use the 4 mm hook. Attach the yarn to the edge of your base where the previous round ends.
- Chain 5:
- Insert your hook into any stitch along the base, pull through, and chain 5.
- Form the Leaf Shape:
- In the 2nd chain from the hook, do a single crochet.
- In the 3rd chain, do a half-double crochet.
- In the 4th chain, do another half-double crochet.
- In the 5th chain, do a double crochet.
- Attach and Repeat:
- Skip 2 stitches on the base and slip stitch into the 3rd stitch.
- Repeat the leaf-making process all the way around the base.
- Secure the Leaves:
- After completing the last leaf, slip stitch and cut the yarn. Tie off to secure.
4. Crocheting the Rose
- Begin with a Slip Knot: Use the 4 mm hook with your chosen rose color.
- Chain 8:
- Insert your hook into the 2nd chain from the hook.

- Build the Petal Pattern:
- In the 2nd chain: Single crochet, half-double crochet, double crochet.
- In the next chain: Double crochet, half-double crochet, single crochet.
- Alternate between these two sequences all the way down the chain.
- Curl to Form the Rose:
- Roll the completed chain into a spiral to create the rose shape.
- Use a sewing needle to secure the base of the rose by stitching the coils together.
5. Attaching the Roses
- Sew a Rose to Each Leaf Group:
- Use the tail end of the rose to sew it cleanly onto the center of the leaves.
- Ensure the rose lays flat against the coaster base.
- Secure the Roses:
- Use the sewing needle to tie off and tidy up any loose ends underneath.

6. Making the Basket Holder
- Create the Basket Base:
- Start with a magic circle using the basket color yarn and a 4 mm hook.
- Chain 2, then work 10 double crochets into the circle.

- Increase Rounds:
- Round 2: Do 2 double crochets in each stitch (total: 20 stitches).
- Round 3: Alternate between 1 double crochet in one stitch and 2 in the next (total: 30 stitches).
- Form the Basket Walls:
- Round 4: Work double crochets into the back loops only for one round to create the base edge.
- Round 5-6: Continue regular double crochets in both loops for desired basket height.
- Finishing Touch:
- Slip stitch and tie off the yarn.
Conclusion
This rose coaster project offers a combination of creativity and functionality, resulting in a beautiful handmade piece that’s perfect for decor or as a thoughtful gift. The detailed steps ensure even beginners can confidently tackle this pattern, improving their crochet skills while adding a floral touch to everyday living. Assemble the coaster with its basket holder, and enjoy the practical yet aesthetic charm it brings to your space!

Leave a Reply