

Bring a cozy touch to your holiday season with handmade crochet Christmas ball ornaments, perfect for decorating or giving a special, personal gift.
Christmas decorations hold a special place in holiday traditions, and handmade items elevate their charm. A beautiful crochet Christmas ball pattern is a delightful way to add personality to your seasonal décor. These intricately designed ornaments are lightweight, reusable, and can be tailored to match any color scheme or theme. Whether used to adorn your Christmas tree, scatter across mantelpieces, or incorporated into garlands, they bring a cozy and heartfelt touch to your festive settings.
Unique Crochet Christmas Ball Pattern

The pattern provides clear guidance, making it easy to follow even for beginners, while offering room for creativity with different yarn types and embellishments like beads or sequins. Besides enhancing your space, crocheting these balls can be deeply fulfilling allowing for relaxation, improving your focus, and unlocking a sense of accomplishment.
Gifting crochet Christmas balls to loved ones adds a personal and memorable element to holiday giving. The versatility and handmade allure of these ornaments make them a standout choice for anyone seeking elegance and warmth in their holiday celebrations.
Introduction:
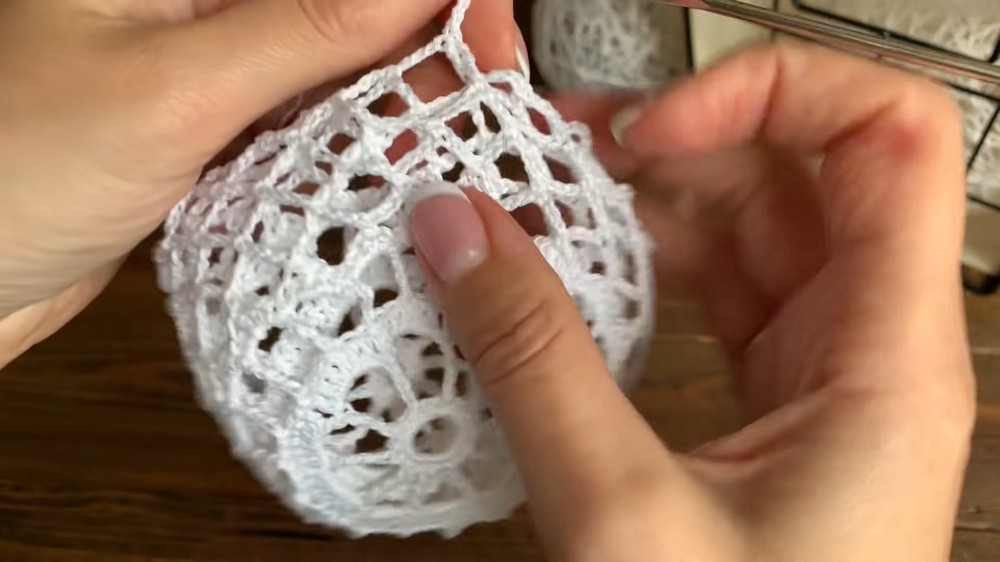
This easy-to-follow tutorial helps you create a stunning crochet Christmas ball that is both decorative and functional. Using Coco yarn, a small crochet hook, and a balloon for shaping, you'll create a festive piece perfect for your holiday decor. The detailed pattern ensures your project will be beautifully round while maintaining its structure.
Materials Needed
- Yarn: Coco yarn (50 grams = 240 meters)
- Hook Size: 1.5 mm
- Additional Supplies: Small balloon, PVA glue, sponge, drying board

Step 1: Start the Base
- Begin the Project:
- Start either with a chain stitch to create a circle or use the sliding stitch method for a smooth start.
- Crochet 20 single crochets, chaining 1 at the beginning.
- Start either with a chain stitch to create a circle or use the sliding stitch method for a smooth start.
- Closing the Round:
- Finish the round with a slip stitch, ensuring a neat base.

Step 2: Second Round
- Double Treble Crochet and Chains:
- Chain 5, then create double treble crochets into every second stitch of the round.
- Repeat the pattern: Chain 5 → Double Treble Crochet into every second stitch.
- Continue the Pattern:
- Repeat to finish the round with 10 double treble crochets.
- Final Connection:
- Chain 5 and join the round using a slip stitch into the fifth loop.
Step 3: Third Round
- Increasing Texture:
- Start with Chain 3 (acts as a single crochet).
- Crochet 5 double crochets into each chain section, followed by a double crochet into the double treble stitches from the previous round.
- Finish the Round:
- Continue repeating the pattern and finish the round with a slip stitch into the third loop.
Step 4: Fourth Round
- Treble Crochet and Chains:
- Crochet treble stitches into every 3rd stitch with Chain 4 spacing: Treble crochet → Chain 4.
- Repeat:
- Continue this sequence to the end of the round.
- Finalizing:
- Slip stitch into the fourth loop to finish the round neatly.

Step 5: Fifth Round
- Leaf Shapes Development:
- Work under each chain, crafting single crochet, half double crochet, double crochet, half double crochet, and single crochet.
- This sequence creates a "leaf" appearance and is repeated under each chain section.
- Connecting the Leaves:
- Finish the round by joining to the loop with a slip stitch.
Step 6: Sixth Round
- Chain Series:
- Chain 7 and join with a single crochet at the tip of each leaf.
- Continue chaining and joining to the top of leaves until the round is complete.
- Last Connection:
- End the round with Chain 3 → Treble crochet into the top, ensuring all points are connected.
Step 7: Expanding the Pattern
- Additional Rounds:
- To create a rounder shape, add three more rounds (similar to the sixth round).
- Ensure you finish the last round properly with chain stitches and treble connections.
Step 8: Joining Two Halves
- Attaching Front and Back Halves:
- Align the front and back sides of the crochet pieces.
- Use Chain 3 and single crochet to join the middle chain loops from each half.
- Secure Connections:
- Carefully join the pieces while ensuring they don't twist.
- Tighten stitches to avoid slippage during balloon inflation.
Step 9: Shaping the Ball
- Inflating the Balloon:
- Insert a small balloon inside the crochet sphere and inflate until round.
- Secure the balloon neck to maintain its shape.
- Applying Glue:
- Using a sponge, generously apply PVA glue to cover every millimeter of the yarn.
- Let the glue dry completely on a drying board.
Step 10: Finalizing the Ball
- Removing the Balloon:
- Once the crochet sphere is fully dry, detach the balloon from the yarn.
- Carefully puncture the balloon and remove it, ensuring the crocheted shape remains intact.
- Adding Decorative Elements:
- Use metallic thread to create a loop for hanging the finished ball as an ornament.

Conclusion
This crochet Christmas ball pattern is an elegant and creative holiday crochet project. By combining intricate stitches, shaping techniques, and the application of glue, you’ll create a durable and festive decoration. The final product is perfect for adorning your home or gifting to loved ones during the holiday season.
Leave a Reply