

Carry practicality and charm effortlessly with a crochet polka dot bag pattern—versatile, durable, and perfect for personal use or heartfelt gifting.
A creative twist on accessorizing can turn something ordinary into a standout piece, and that's exactly what a polka dot crochet bag does. Its playful design combines charm with practicality, making it a versatile accessory for a variety of purposes. Whether you need a bag for shopping, carrying personal items, or everyday errands, this pattern delivers functionality in style. With a lightweight yet durable structure, it’s easy to carry while still providing the sturdiness needed to hold your essentials.
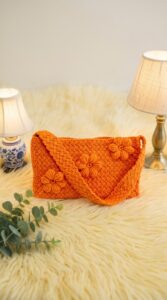
Charming Polka Dot Crochet Bag Pattern You'll Admire

What makes this bag truly special is its customizable design. The colors of the polka dots can be adjusted to match any outfit, mood, or occasion, allowing users to express their individuality effortlessly. Whether you opt for bold and vibrant combinations or subtle, muted tones, the bag becomes a reflection of personal taste. Its versatility ensures that it fits seamlessly into both casual outings and more artistic environments, making it more than just an accessory.
The unique appeal of this crochet bag also makes it a thoughtful gift. Handmade items carry a sense of care and creativity, and this design is no exception. Whether as a gift or a personal project, the crochet polka dot bag is a perfect blend of practicality and personality. It’s more than functional—it’s a statement piece that adds fun and charm to everyday life.
Materials Needed
- Crochet hook
- Yarn (color of choice; preferably soft yarn for easy handling)
- Tapestry needle
- Stitch markers

Step-by-Step Guide of crochet polka dot bag
This pattern provides detailed instructions for creating a crochet project, including making straps and a polka-dot pattern. The project is designed for beginners who wish to practice basic crochet techniques and gradually build confidence. Throughout the pattern, the creator offers suggestions and emphasizes important tips to ensure accuracy and a polished finish.
Key Steps in the Pattern
1. Beginning the Project: The Base
- Technique: Start with a slip knot and create a chain of stitches until reaching the desired length. In the example shown, 38 chains were created.
- Steps:
- Add two extra chains and begin double crocheting into the third chain.
- Double crochet into each stitch for the entire row, resulting in 37 double crochets.
- Special Notes:
- At the end of the row, perform 5 double crochets into the same stitch to automatically shift to the other side of the project.
- Continue with double crochets into each stitch until completing the opposite side.

2. Creating Rows for the Body
- Technique: Repeat the crochet pattern to build the body of the project.
- Steps:
- At the end of each row, add two chains and continue double crocheting into the next stitch.
- Use a stitch marker in the chain-two space to track progress and ensure symmetry.
- For beginners, skip any slip stitches from the previous row as they are not part of the crochet pattern.
- Tutor's Suggestions:
- Consistency is key: maintain even tension throughout the rows.
- Beginners should use stitch markers for ease and accuracy.

3. Completing the Body
- Details: Continue following the repeated patterns until achieving the desired length for the body of the project. In the example, the final length was 20 cm, and the width was 24.5 cm.
- Special Features: The pattern allows flexibility for customization, suggesting viewers use these measurements as a reference.

4. Making the Straps
- Technique: Create precise straps by counting stitches and repeating a single crochet pattern.
- Steps:
- Select an even number of stitches (e.g., 16, 18, or 20). In the video, 18 stitches were used.
- Attach the yarn at the starting point and begin single crocheting across the desired number of stitches.
- For each row, add a decrease at the beginning and end, using the "single crochet two together" technique.
- Continue reducing stitches until reaching 8 stitches, then crochet evenly without decreases until the strap reaches the desired length.
- Tutor’s Tips:
- Avoid visible sewing: One strap should be shorter to hide the sewing part and improve stability.
5. Assembling the Straps
- Technique: Sew the straps securely using a tapestry needle.
- Steps:
- Ensure straps are not twisted before sewing.
- Align the edges properly, sewing one side through the back loop and the other side through the front loop.
- For added security, perform stitching twice for each location and close any gaps.
- Final Touch: Weave the ends for a clean finish.

6. Polka Dot Pattern
- Technique: Use a magic ring to crochet decorative polka-dot accents.
- Steps:
- Start with a magic ring and chain one.
- Insert 8 double crochets into the ring, counting the initial chain as one crochet.
- Tighten the ring and perform slip stitches to close the round.
- For the second row, double crochet twice into each stitch, expanding the total count to 16 stitches.
- Complete the round with a slip stitch, chain one, and cast off the yarn.
- Special Features: The polka dots can be customized in color and size based on design preference.
Special Features
- Customization: The pattern emphasizes adaptability in measurements and design. You can adjust the size, strap length, and patterns to fit your preferences.
- User-Friendly: Clear instructions with helpful suggestions for beginners, including the use of stitch markers and repetition to build skills.
- Reusable Techniques: The skills learned, such as double crochet, single crochet, decreases, and sewing, can be applied to other projects.
Level of Difficulty
- Suggested Level: Beginner to Intermediate.
- The creator provides clear instructions on foundational techniques, ideal for building confidence in crocheting.
- Beginners should pay close attention to stitch markers and patterns for accuracy.
Tutor’s Suggestions
- Use even numbers for stitches when making straps to ensure symmetry and ease of sewing.
- Beginners should not crochet into slip stitches at the end of rows to avoid errors.
- For a clean and stable appearance, sew straps with extra care and ensure proper alignment.
Uses
- This crochet project can be repurposed as various items, such as small bags, decorative patches, or pouches, depending on the creator's vision.
- The polka-dot pattern adds a playful touch, making it versatile for personalization.
Tip
When working on straps, always double-check alignment to prevent twisting, as it can affect both the aesthetic and usability of the finished project.
Conclusion
This pattern empowers viewers to create a functional crochet project from start to finish. Through detailed instructions, the pattern introduces foundational techniques, encourages customization, and provides ample suggestions for success. With patience and practice, you can use this guide to elevate your crochet skills and experiment with new designs.


Leave a Reply