

Bring vibrant style to your everyday look with the Crochet Bubble Stitch Bag, offering bold textures and plenty of space for your essentials.
Bright and bold designs have always had a special way of catching attention, and the Crochet Colorful Bubble Stitch Bag is no exception. This bag features a playful bubble stitch pattern with vibrant colors, making it a standout accessory for anyone looking to make a cheerful statement. Its distinctive texture adds depth to the design while offering a durable construction that holds up to daily use.
Best Crochet Bubble Bag Pattern for Statement Accessories

Designed with practicality in mind, the bag offers ample space to store your belongings, whether it’s books, groceries, or personal essentials. Its sturdy handle provides comfortable carrying, while the handmade quality ensures a unique touch that’s hard to find in everyday accessories. The bubble stitch design not only catches the eye but also highlights a tactile element, making the bag enjoyable to carry and use.
Perfect for shopping trips, casual outings, or playful additions to your wardrobe, this Crochet Colorful Bubble Stitch Bag is a functional and fashionable choice. Easy to maintain and light enough for all-day use, it’s suitable for anyone who loves combining utility with vibrant charm. Whether dressed up or kept casual, this colorful bag can effortlessly complement a variety of styles while turning heads wherever you go.
Materials Needed
- 3 yarns
- Scissors
- Stitch markers
- Pins
- Keychain
- Chain for bag
- Hook for chain
- Magnetic clip
- 6 mm crochet needle

Step-by-Step Guide
Step 1: Begin Your Project
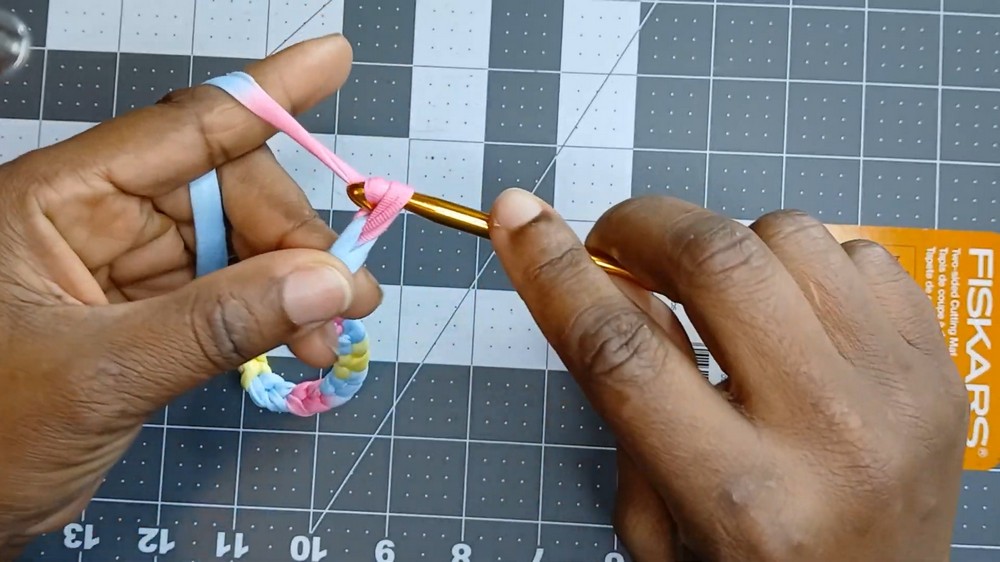
- Create Your Base Chain
- Make a slip knot and chain 65. This forms the foundation of your bag.
- Start the Second Row
- Work under the bumps of your chain starting with 8 slip stitches. Skip the first stitch and slip into the next eight stitches. Use a stitch marker to note the end of these slip stitches.
- Single Crochet for Texture
- Continue with 48 single crochets by picking up the loops of the stitches. Ensure you're careful in maintaining an even tension across your work.
- Finish the Row with a Slip Stitch
- Complete the row with another set of 8 slip stitches, marking the beginning and end with stitch markers.
Step 2: Build the Pattern
- Create a Turning Chain for Row Three
- Chain one, turn your work, and continue with 8 slip stitches, using only the back loop of your first stitch.
- Back Loop Single Crochet
- Execute the 48 single crochets using back loops, which offers a ribbed appearance, continuing until the work reaches approximately 31 cm or the desired length.
- Complete the Row Again with Slip Stitches
- Finalize the row with 8 back loop slip stitches.
Step 3: Shape the Bag
- Create Shape with Decreases
- Begin the corner shaping with 30 slip stitches, then execute 4 decrease stitches. These decreases are achieved by pulling yarn through each of four consecutive stitches, then yarning over to pull through all loops.
- Continue to Second Side
- After the decrease, continue with 30 slip stitches on the same row.
- Initiate the Last Row
- For the opposite side of the bag, begin with 28 slip stitches followed by 5 decrease stitches, then finish with 28 slip stitches.

Step 4: Assembly
- Join the Corners
- Leave a long yarn tail for sewing. Use a needle to join both sides with back loop stitching.
- Finishing Techniques
- Once corners are joined, hide any excess yarn by weaving it into the bag’s interior before trimming.

Step 5: Accessorize Your Bag
- Attach the Chain and Clip
- Fit the clip at the center of the bag using the chains and hook acquired from retailers such as Amazon.
- Add Decorative Elements
- Include embellishments like a 'Handmade' label to personalize the piece.

Conclusion
By following these steps, you can create a beautiful, handmade crochet bag suitable for personal use or gifting. This instructional guide serves as an overview to accompany the detailed pattern, ensuring that both the process and the product are as fulfilling as they are gorgeous.


Leave a Reply