

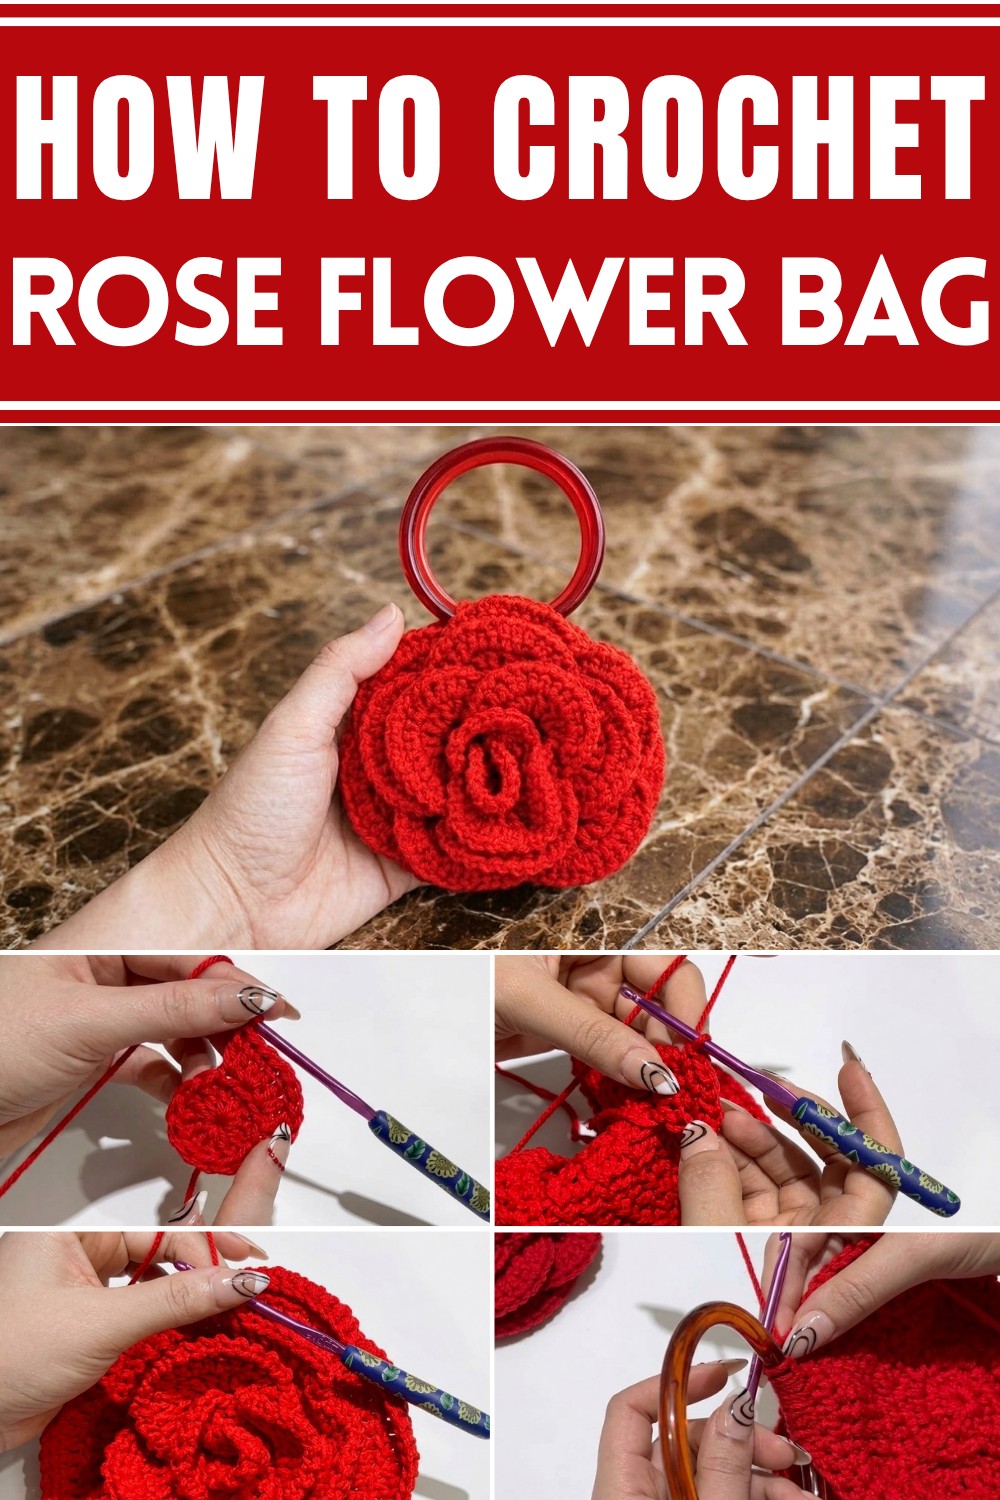
Learn how to make a stunning crochet rose flower bag with this easy-to-follow pattern that's for unique and stylish handmade accessories.
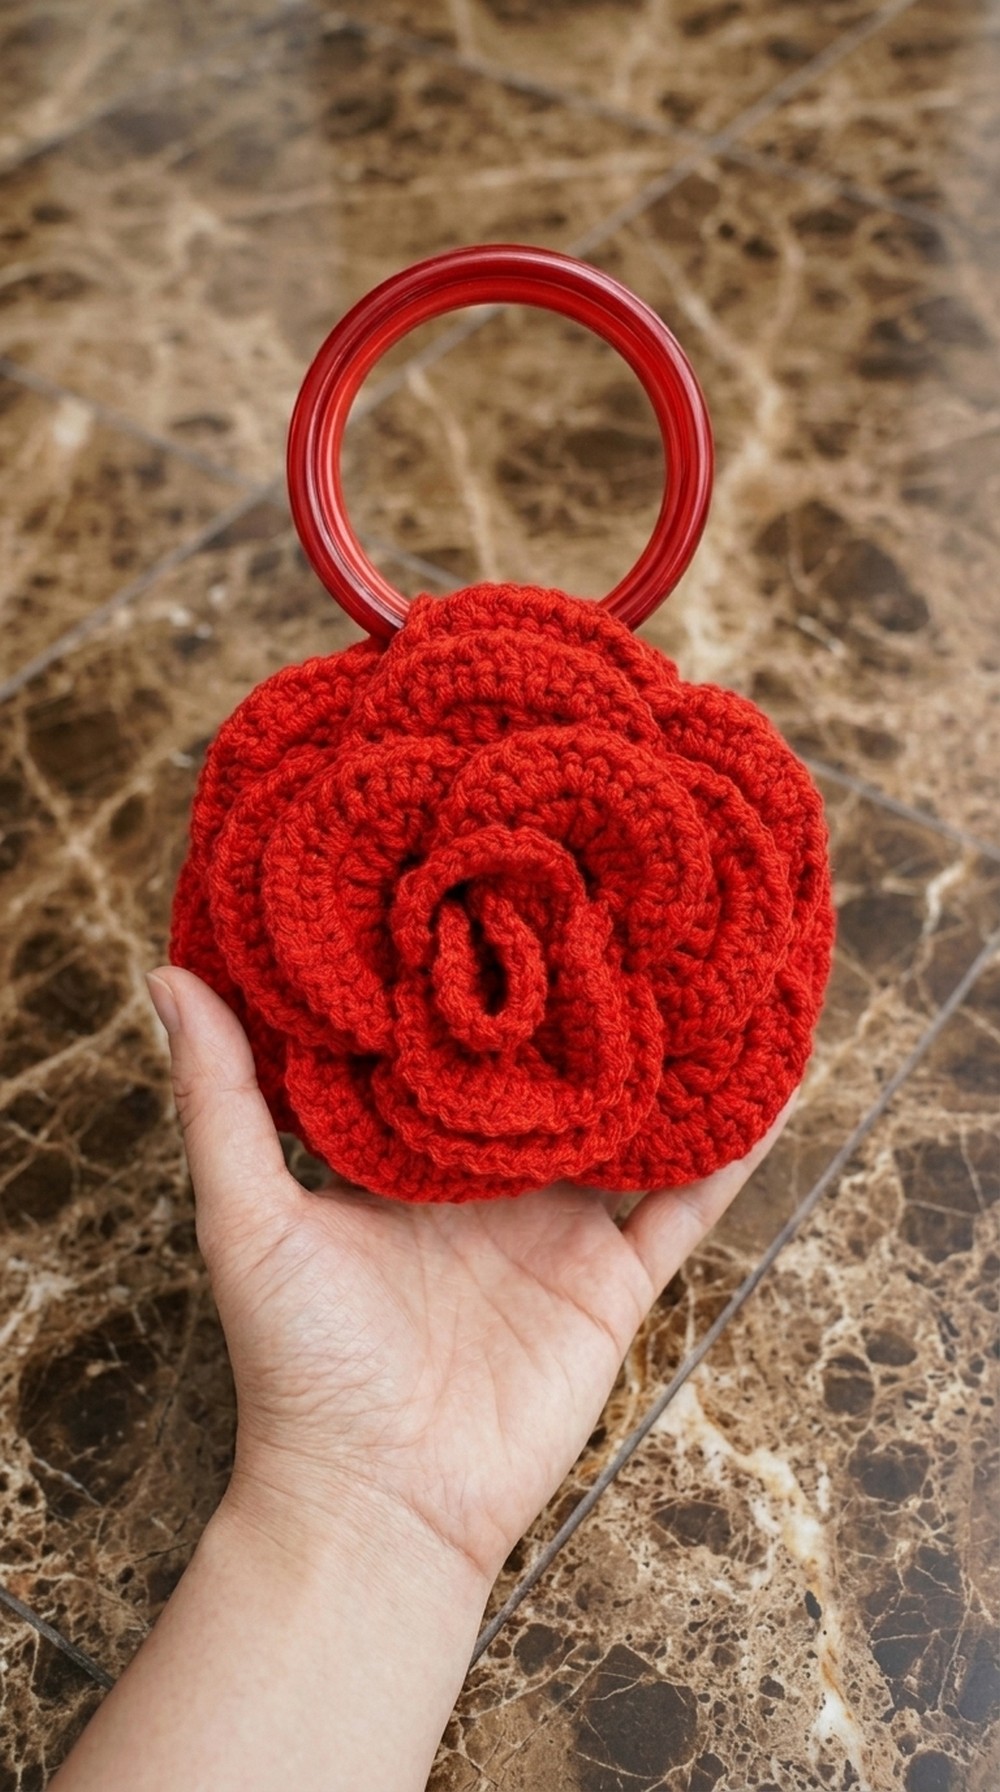
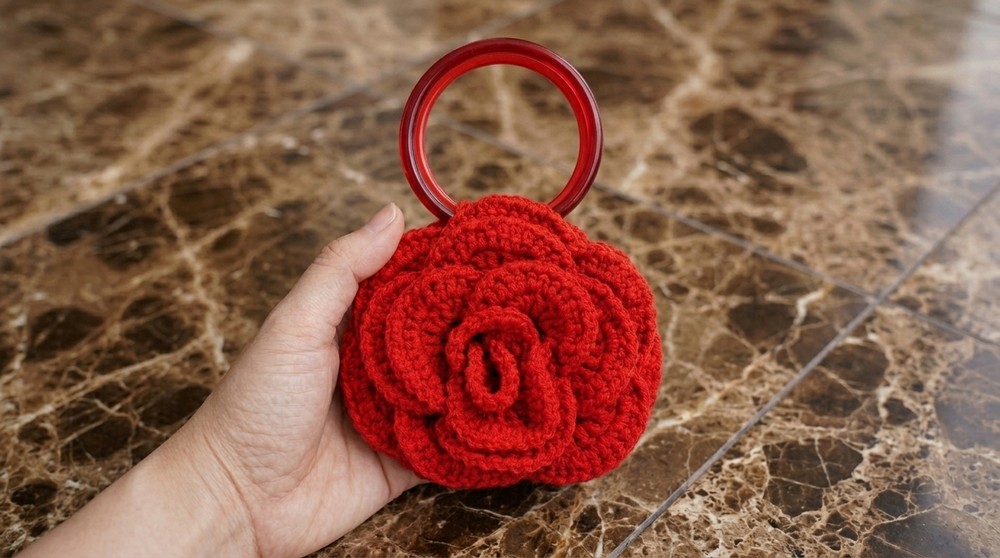
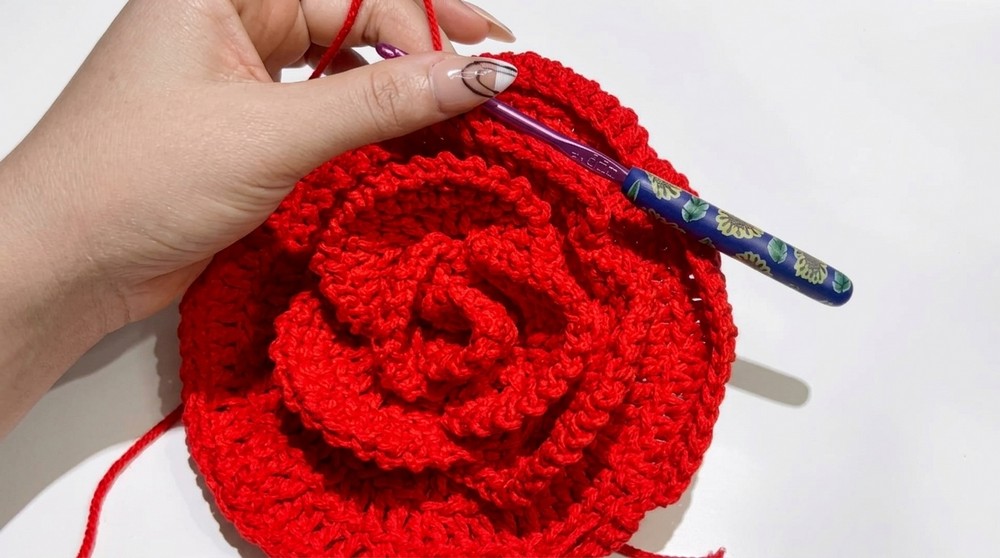
This beautiful little bag is sure to turn heads wherever you go. The Free Crochet Rose Flower Bag Pattern shines with a lovely rose motif that instantly catches the eye. The petals are layered softly, bringing texture and dimension, and making the flower look as if it’s blooming right from the heart of the bag.
The bag itself is round and perfectly sized for everyday items like a phone, keys, or a small wallet. Its firm, neat stitches create a strong structure, while the simple handle makes it easy and comfortable to carry. Everything about its shape and design feels charming and fresh.
Free Crochet Rose Flower Bag Pattern
Crocheters are sure to enjoy making this project, as the pattern uses simple stitches and clear steps. There’s something so satisfying about seeing the rose take shape as you work, petal by petal. If you want a new twist, it’s easy to make small changes, try making a rose coin purse or even a round mug cozy using the same basic steps.
This bag can be your go-to for a picnic, a walk in the park, or whenever you want a pop of floral style with your outfit. The cheerful rose on the front adds a handmade touch that feels special and unique. No matter where you use it, this sweet and sturdy bag is sure to brighten your day.
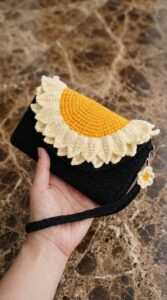
Flower Bag Crochet Pattern
This beautiful, textured flower bag features a unique floral motif and is fully customizable. The project blends classic techniques with decorative stitches for a whimsical and elegant accessory. Perfect for gifting or for yourself!
Skill Level & Terminology
Skill Level: Advanced Beginner to Intermediate
Terminology: Pattern uses US crochet terms
Materials & Tools
- Yarn: 3mm Polypropylene cord (PP cord)
- Crochet Hook: 4.5 mm
- Stitch Marker: For marking rounds
- Scissors: For cutting yarn
- Tape Measure: For checking size
- Bag Handles: Round rings or your preferred bag handle
Gauge
Gauge:
Make a circle as instructed in the main pattern. After completing the base rounds, your circle should measure approximately 7 inches (19 cm) in diameter.
If your circle is smaller/larger, adjust hook size or tension accordingly.
Abbreviations
| Abbreviation | Meaning |
|---|---|
| ch | chain |
| dc | double crochet |
| sc | single crochet |
| sl st | slip stitch |
| st(s) | stitch(es) |
| rep | repeat |
| inc | increase (2 stitches in one space) |
Special Stitches & Tips
- Magic Circle: Start with a loop, draw up a loop through it and continue as instructed.
- Back Loop Only (BLO): Work into the back loop of the stitch only.
- Front Loop Only (FLO): Use only the front loops for flower petals.
Finished Size
Bag base diameter: ~7 inches / 19 cm
Bag height and width can be adjusted as desired.
Pattern Instructions
Bag Base
Round 1: Magic Circle & Foundation
- Create a magic circle.
- Ch 3 (counts as 1 dc).
- 11 dc into the magic circle (total 12 dc including ch 3).
- Tighten the circle and sl st into top of ch 3 to close round.

After finishing this, you’ll have a neat circle with 12 double crochets – the foundation for your bag. Pull the tail to close the magic circle as tightly as you can.
Round 2: Increasing (BLO)
- Ch 3 (counts as 1 dc).
- 1 dc into same st (BLO).
- 2 dc in BLO of each st around.
- End with sl st in top of ch 3. (24 dc total)
You are now doubling the number of stitches using back loop only, creating a sturdy base.
Round 3: Increase Pattern (BLO)
- Ch 3 (counts as 1 dc).
- 1 dc into same st (BLO).
- 1 dc in BLO next st.
- Repeat: 2 dc in BLO next st, 1 dc in BLO next st around.
- Sl st to join. (36 dc total)
Follow this rhythm – increase in one stitch, single dc in the next. The circle will grow evenly.
Round 4: Further Increase (BLO)
- Ch 3 (counts as dc).
- 1 dc into same st (BLO).
- 1 dc in BLO into next 2 sts.
- Repeat: 2 dc in BLO next st, 1 dc in BLO next two sts.
- Sl st to join. (48 dc total)
You’re now spacing your increases every third stitch for expanding the base.
Round 5: Building Up Size (BLO)
- Ch 3 (counts as dc).
- 1 dc into same st (BLO).
- 1 dc in BLO next 3 sts.
- Repeat: 2 dc in BLO next st, 1 dc in BLO next 3 sts.
- Sl st to join. (60 dc total)
The bag base is growing. Keep increases spaced apart for a flat circle.
Round 6: Final Round (BLO)
- Ch 3 (counts as dc).
- 1 dc into same st (BLO).
- 1 dc in BLO next 4 sts.
- Repeat: 2 dc in BLO next st, 1 dc in BLO next 4 sts.
- Sl st to join. (72 dc total)
If you want a larger bag, continue this pattern (adding another dc between increases each round). For this design, stop at 72 dc.
Your base should now measure about 7 inches in diameter. If you want it bigger, continue increasing as shown.
Final Round: Single Crochet Edge
- Work 1 sc in each st around.
- Sl st to join.
This row tightens up the edge, making it easier to join and decorate.
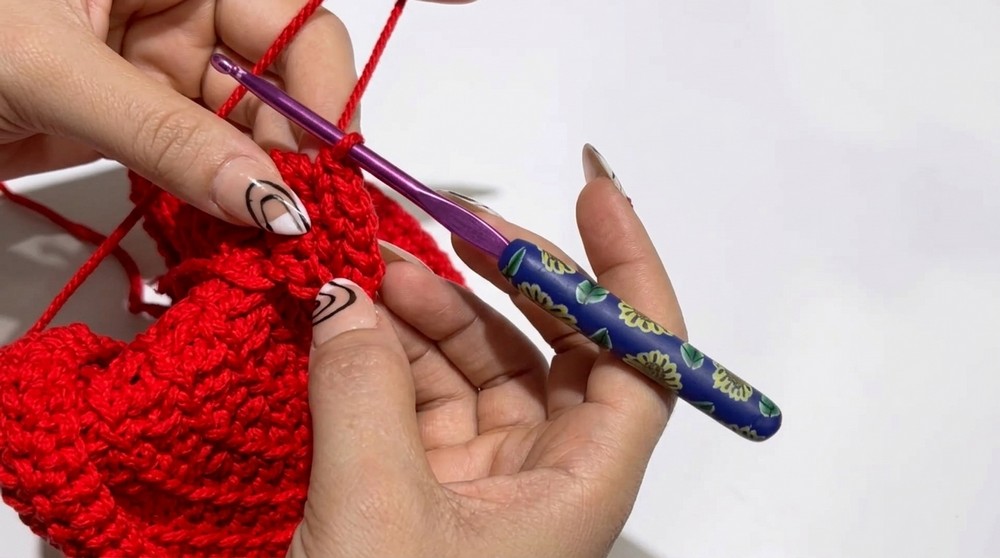
Flower Petals
Begin Flower Petals Using FLO (Front Loop Only):
- Insert hook into a front loop (where slip stitch ended).
- Join yarn, ch 3 (counts as dc).
- 2 dc in same st (3 dc total).
- 3 dc in next st.
- Ch 1, turn, 2 sc in each dc (12 sc total).
- Skip 4 sts on base, sl st into 5th st. Turn.
This creates a petal shape anchored to the bag base.
Petal Slip Stitch Row
- In each sc: sl st, ch 1, across (12 total).
- Skip 4 sts on base, sl st into 5th. Turn.
You add a decorative effect to the petal.
Repeating Petal
- Ch 3, 2 dc in same st (3 total).
- 3 dc each in next 2 sts (9 dc).
- Ch 1, turn, 2 sc in each dc (18 sc total).
- Skip 5 sts on base, sl st into 6th. Turn.
Each petal becomes larger and more pronounced. Repeat for each petal until you circle the base.
Petal Edging
- In each sc across: sl st, ch 1 (18 total).
- Skip 5 sts, sl st into 6th.
- Ch 3, repeat as for previous petals.
Continue until all petals are formed and attached.
Second Bag Panel
- Repeat Bag Base and Flower Petals process to create a second panel.
Make sure your panels match in size and petal arrangement.
Assembly & Finishing
Leave Space for Bag Handles
- Count 8 sts on each side for handle placement; mark with stitch marker.
- Attach ring/handle using sc stitches through the bag and handle ring.
- Repeat for second side.

This step attaches your handle securely to the bag.
Joining Panels
- Slip stitch (or sc) panels together around the edge, leaving handle opening.
- Make sure to align petals and base evenly.
- Weave in all loose yarn ends securely.
Your flower bag panels are now firmly attached and ready for use.
Pattern Guidance (for Non-Pattern Readers)
If you find the pattern format confusing, just follow these steps:
- Start by making a circle using double crochets and increasing each round as instructed.
- Add a single crochet row before starting the flower sections.
- Make petals by joining new yarn, working double crochets, increasing for each petal, then adding slip stitch decorations.
- Make two panels in total (same process for both).
- Attach your handles by joining the bag edges using single crochet stitches.
- Sew or slip stitch the panels together around the edge, leaving space for the handles.
You begin the flower bag project by crocheting a round base using double crochet and increasing rounds, then edging with single crochet. Flower petals use double crochet, single crochet, and slip stitch techniques hooked into the front loops. The bag is assembled by slip stitching or single crocheting around the sides and attaching handles.
Leave a Reply