

Celebrate festive cheer with this Free Crochet Christmas Tree Pattern featuring classic holiday beauty charming ornaments and cozy seasonal decor.
The smell of cinnamon and the soft glow of Christmas lights make the holiday season feel extra special. Adding a little handmade decoration, like a cute crocheted Christmas tree, can bring even more warmth to your home. This Free Crochet Christmas Tree Pattern is a fun way to make a small, lovely tree that looks great on tables, shelves, or even as an ornament. Many people enjoy making this project because it’s simple and turns out beautiful—perfect for spreading holiday cheer.
This little tree has soft, layered branches that give it a nice, full look. It stands up well on its own, so you can place it anywhere you like. The shape is just like a real Christmas tree but made from yarn, which makes it both cozy and festive. You can use classic green yarn or try bright or sparkly colors to match your style. Adding tiny beads or a small star on top lets you give it your own special touch.
Free Crochet Christmas Tree Pattern

The pattern guides you clearly through each step, showing how to shape the tree and build the layers so it looks neat and balanced. Along the way, you’ll see tips that help make the stitches even and the tree stand tall.

Making this crocheted Christmas tree is a fun way to add a personal touch to your holiday decorations. It’s a cozy little project that brings both a sense of accomplishment and a dose of festive charm to your home.
Charming Granny Square Christmas Tree Pattern
Bring a touch of festive warmth to your holiday decor with this adorable Christmas tree. This design is a clever adaptation of the classic granny square, folded and stitched to create a 3D sculptural tree. It is a quick and satisfying project that makes for a perfect gift or a lovely addition to your own mantelpiece.
Skill Level & Terminology
- Skill Level: Beginner
- Terminology: This pattern uses standard US crochet terms.
Materials & Tools
- Yarn: 100% Acrylic, Size 5 (Bulky/Chunky)
- Green for the tree
- Brown for the trunk
- Crochet Hook: 3.5 mm
- Tools: Tapestry needle, scissors
- Optional: Hot glue for assembly, small star embellishment, silver pearls for decoration
Abbreviations List
| Abbreviation | Meaning |
|---|---|
| ch | Chain |
| st(s) | Stitch(es) |
| dc | Double crochet (called "high points") |
| sc | Single crochet |
| sl st | Slip stitch |
| MR | Magic ring |
Finished Size
- Adjustable based on the number of rounds worked.
- Typically fits comfortably in the palm of your hand.
Starting the Pattern
Before starting, ensure you are familiar with:
- Basic double crochet (dc) stitch
- Working into "spaces" (chain spaces) rather than individual stitches
- Magic ring (MR) technique
- Invisible join method that seamlessly starts each round by pulling yarn through back and front loops—avoiding visible turning chains
The Pattern Itself
The Granny Base (Foundation)
Round 1:
- Create a Magic Ring (MR).
- ch 1 (counts as first dc).
- Work 2 dc into the ring.
- ch 2 (corner space).
- Work 3 dc into the ring.
- ch 2.
- Work 3 dc into the ring.
- ch 2.
- Work 3 dc into the ring.
- Pull the yarn tail to close the magic ring tightly.

Summary: This forms your first round with four groups of 3 double crochets separated by ch 2 spaces forming the corners of your granny square.
Round 2
- ch 2 to start the round.
- Insert the hook through the back of the first stitch to pull the yarn tail toward the back of your work.
- Remove the hook, then insert it from the front into the first corner space (the ch 2 space), and pull yarn through.
- ch 1, sc, then ch 1 (this ch 1 counts as your first dc).
- Work 2 dc in the same corner space.
- ch 2 (corner space).
- Work 3 dc in the same corner space again.
- ch 1, move to the next corner, work 3 dc, ch 2, 3 dc.
- Repeat for all four corners, placing ch 1 between sides.
Summary: You are expanding the square by adding more double crochet groups and chain spaces while anchoring the beginning of the round invisibly.
Round 3
- Join as before, pulling the loop through the back and front.
- ch 1, sc, ch 1 (counts as first dc).
- Work 2 dc in the same space.
- ch 1.
- Work 3 dc in the side chain space.
- ch 1.
- Work the corner: 3 dc, ch 2, 3 dc in the next corner space.
- Repeat this side and corner sequence around the square until complete.
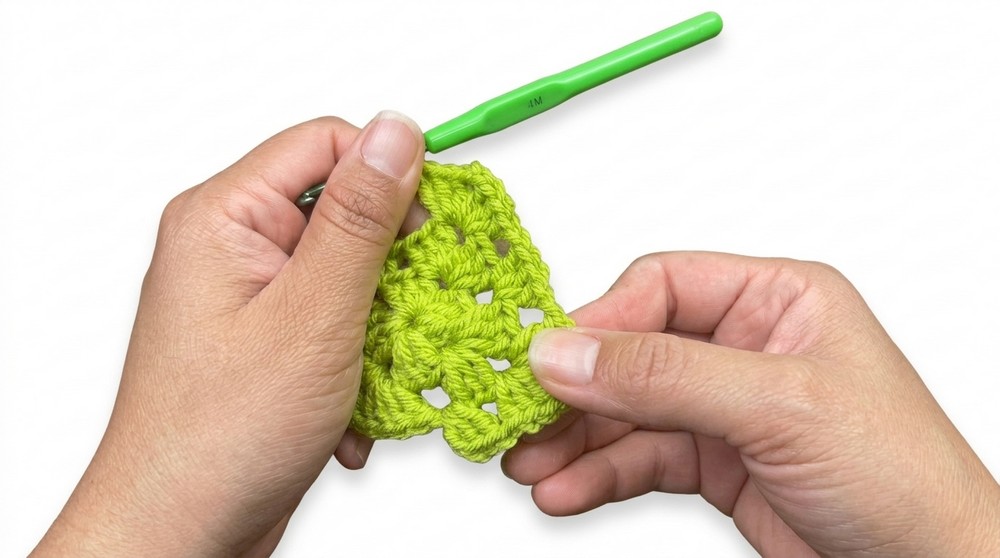
Summary: The granny square grows larger with added side groups and corner increases maintaining the square shape and size.
Round 4 and Beyond
- Join the round as before.
- Start with 3 dc using the sc + ch 1 join method.
- Work a corner: 3 dc, ch 2, 3 dc.
- Continue placing 3 dc in each side chain space separated by ch 1 chains.
- Insert 3 dc, ch 2, 3 dc in each corner space.
- Repeat this expansion sequence until you reach your desired tree size.
Summary: Continue growing your square with this established pattern to make your tree as small or large as you like.
Assembly & Finishing
Folding
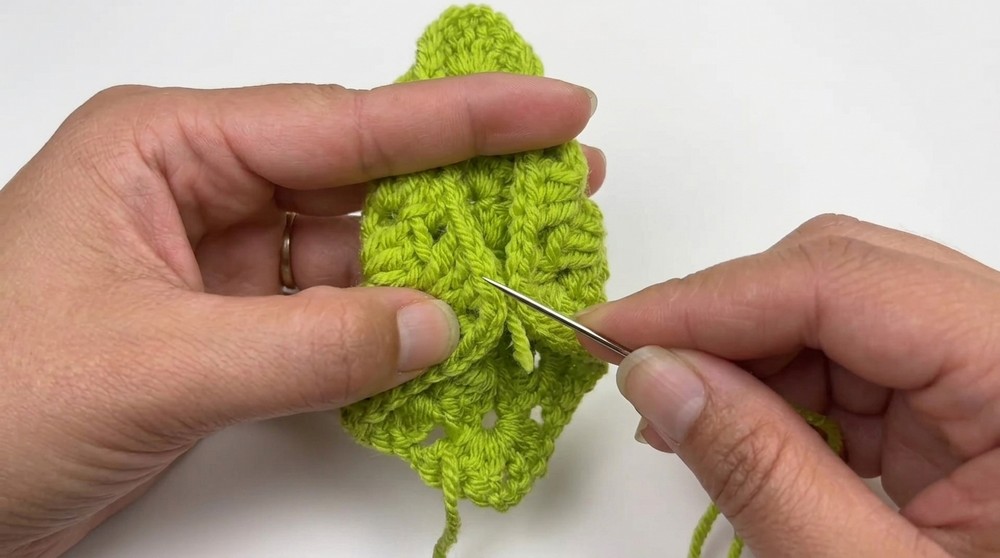
- Fold your completed granny square in half so two opposite corners meet.
- Then, fold the bottom corners upward to create a triangular tree silhouette.
Invisible Seaming
- Thread the long yarn tail left from the final round onto a tapestry needle.
- Start at the base and seam the edges together by picking up only the outermost loops on each side of the fold to create a clean seam.
- Seam all the way to the top tip for an invisible and neat finish.
The Trunk
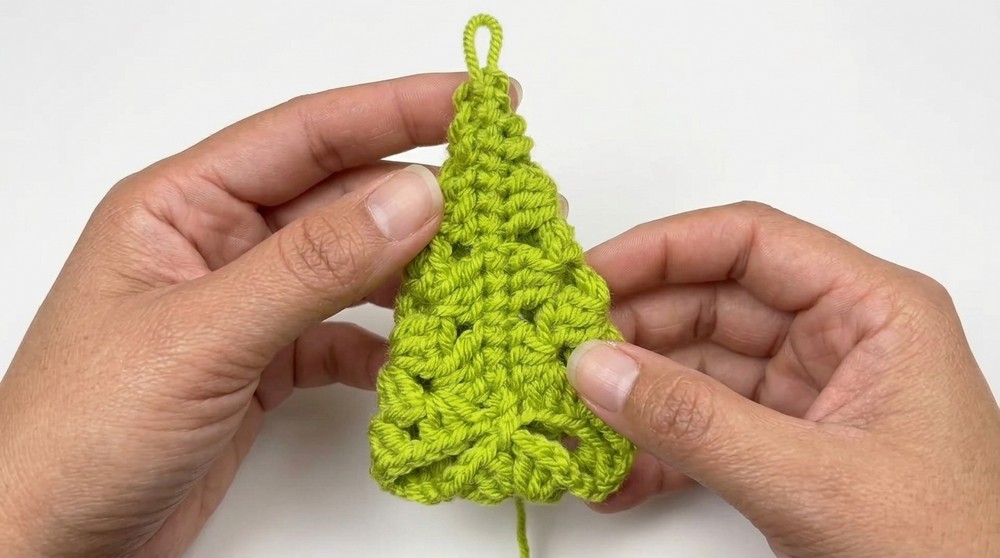
- Locate the center bottom base of the tree.
- Attach brown yarn.
- ch 3, work a group of 3 dc into the center space.
- ch 3, then finish with a sl st into the same space to anchor the trunk.
- Fasten off and weave in all ends.
Decoration
- Secure a small star to the top tip using a tapestry needle or glue.
- Optionally sew or glue silver pearls onto the “branches” for extra sparkle.
Summary: Folding and seaming transform your granny square into a neat 3D tree, and adding the trunk and decorations perfect the look.
Key Stitches Used
- Double Crochet (dc): The main building block forming the granny square.
- Chain (ch): Creates height and spaces for corners and sides.
- Slip Stitch (sl st): Used for finishing rounds and securing trunk pieces.
- Single Crochet (sc): Used at the start of rounds for joining and anchoring.
Expert Tips
- Tension: Keep tension consistent throughout rounds for an even, foldable fabric.
- Seaming: Pick up only outer loops to avoid bulky seams and keep the tree shape tidy.
- Customization: Continue increasing rounds as desired for a larger tree without cutting yarn after Round 4.
- Fabric Stiffness: Use a smaller hook than recommended on the yarn label to create a firmer fabric for better shape retention.
- Yarn Scraps: This project is ideal for using leftover yarn—try various greens or variegated yarn for a collection of unique trees.


Leave a Reply