

See this Crochet Granny Squares Pouch pattern that brings timeless charm and practicality together in a beautifully handmade accessory!
Bright patterns and timeless designs come together to offer a delightful and practical accessory for daily use. The Crochet Granny Squares Pouch Pattern provides functionality with a touch of handmade charm, making it ideal for storing smaller essentials like makeup, stationery, or crochet tools. Its compact size fits neatly into larger bags or serves as a stylish standalone accessory, while its sturdy structure ensures durability for regular use.
Chic and Functional Crochet Granny Squares Pouch Pattern

The beauty of this pouch lies in its versatility you can completely customize it with different colors, shapes, and styles to suit individual tastes, turning every creation into something truly unique. This pouch pattern showcases the charm of traditional granny squares in a refreshing way. While it’s designed to be practical, it doubles as an artistic expression, where each stitch tells a creative story.
It’s not only useful for keeping small items organized but also makes for a thoughtful handmade gift with a personal touch. The crocheted texture offers a vintage aesthetic that blends effortlessly into modern-day needs, creating an accessory that carries both utility and personality. Whether used at home, during travel, or gifted to loved ones, this pouch pattern is a rewarding project.
Introduction:
This pattern walks you through creating a beautiful and functional pouch using granny squares. Granny squares are a timeless crochet design, and this project combines simplicity and style, making it perfect for beginners. The pouch requires only two granny squares and can be customized with your favorite colors and materials.
1. Materials Needed
- Crochet hook (2mm used in the tutorial)
- Yarn (choose colors you prefer; multiple colors were used in the video)
- Yarn needle
- Scissors
- Zipper (approx. 12 cm or suitable for your pouch size)
- Felt for lining (optional)
- Markers for stitch placements (optional)

Step-by-Step Guide to Making the Granny Squares Pouch
2. Part One: Making the Granny Squares
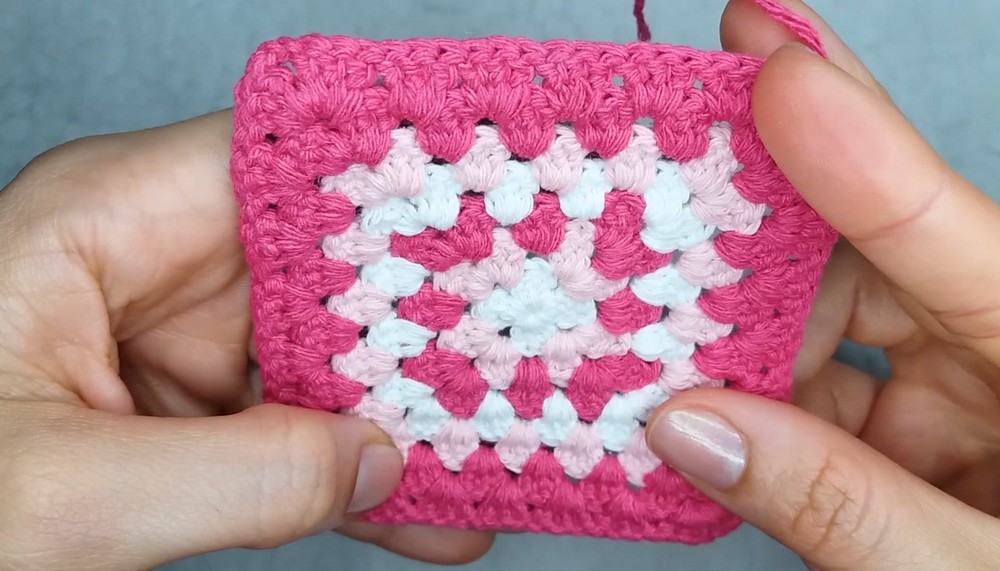
The granny squares form the base of the pouch. You will create two identical squares in this section.
Step 1.1: First Round of Granny Square
- Create a magic ring.
- Chain 2 (counts as first double crochet).
- Work 2 more double crochets into the magic ring to form the first group.
- Chain 2 for the corner.
- Repeat: Make 3 double crochets in the ring followed by 2 chains (repeat this process 3 more times to form 4 groups total).
- Close the magic ring tightly, then join with a slip stitch in the 2nd chain from the start. Chain 1 and cut the yarn.

Step 1.2: Second Round with Color Change
- Begin in any corner with the new color.
- Chain 2 (counts as first double crochet) and work 2 more double crochets in the same corner to form the first group.
- Chain 2, make another group of 3 double crochets in the same corner.
- In each corner: Work 1 group of 3 double crochets, chain 2, then another group of 3 double crochets.
- For the holes on the sides of the square: Only make 1 group of 3 double crochets.
- Repeat the process for all corners and sides, finishing with a slip stitch. Chain 1 and cut the yarn.
Step 1.3: Additional Rounds
- Begin in the opposite corner from where you ended the previous round, starting with the new color.
- Repeat the same corner sequence: 1 group + 2 chains + 1 group of double crochets.
- For each side hole: Work just one group of 3 double crochets without chaining in between.
- Continue adding rounds until you reach your desired square size. Seven rounds were used in the tutorial, completing the square with the same color for the last two rounds.

Step 1.4: Secure and Fasten Off
- Use a needle to secure the yarn ends (especially from the magic ring and color changes).
- Cut off any excess yarn for a neat finish.
3. Part Two: Assembling the Pouch
Step 3.1: Marking for the Zipper Area
- Decide which edge will form the bottom of the pouch.
- From the first corner chain, skip 8 stitches and mark the 9th stitch. Repeat this on both squares to mark where the zipper will be sewn.
Step 3.2: Adding Single Crochet Border
- Work single crochets around the granny square, inserting your hook only into the back loops of each stitch. This will create a clean finish.
- Fasten off while crocheting to secure any loose yarn.
- On reaching the marked stitch, chain 1 to secure and leave a long yarn tail to use for sewing the pouch assembly later.
Step 3.3: Creating the Second Granny Square
- Repeat the steps above to create and finish the second granny square, including the zipper marking.
Step 3.4: Sewing the Two Squares Together
- Align the zipper markings of both squares.
- Turn the pieces inside out for a clean finishing seam.
- With the long yarn tail, sew the sides of the squares together using whip stitches or your preferred sewing method. Leave the top part open for the zipper!
4. Part Three: Adding the Zipper
- Position the zipper at the opening, ensuring it fits snugly in the space.
- Using matching thread, sew the zipper onto the pouch. The stitches should be small and close to avoid disrupting the design while ensuring the zipper is secure.
- Test the zipper to ensure it opens and closes smoothly.

5. Optional: Adding Felt Lining
- Cut a piece of felt to the same size as your pouch.
- Use a whip stitch to sew the felt into place inside the pouch for a polished look and added durability.
- Ensure the felt is secured around the corners, avoiding interference with the zipper functionality.
Conclusion
Congratulations! You’ve completed your Crochet Granny Squares Pouch, a unique handmade project that is both stylish and functional. This pattern demonstrated how to create two granny squares, assemble them into a pouch, sew a zipper, and optionally add a felt lining for extra flair.



Leave a Reply