

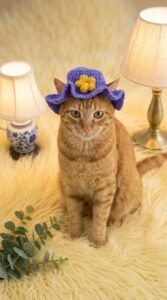
Brighten up your summer style with this charming crochet bucket hat pattern—fun, breezy, and perfect for sunny adventures.
Protecting your skin from the sun while staying stylish is a must during warm days, and a crochet bucket hat meets both needs effortlessly. This lightweight accessory provides excellent shade for your face, reducing the risk of sunburn while keeping you cool under the heat. Its breathable design ensures comfort, making it perfect for outings like picnics, beach trips, or casual city walks.
Effortlessly Cool Crochet Bucket Hat for Personal Flair

Versatility is one of its standout features you can match it with any outfit, from relaxed summer dresses to your favorite pair of jeans and a tee. Customizable in color and size, it allows for personalization to fit individual tastes and preferences. People adore this charming hat not only for its functionality but also for the unique aesthetic it brings to sunny-day fashion.
Additionally, crocheting this hat presents a rewarding activity for those who enjoy working with yarn. It caters to all skill levels and offers a wonderful way to unwind while creating something delightful and practical. Whether you keep it for yourself or gift it to someone special, the crochet bucket hat becomes an accessory that adds value in every sense style, comfort, and the satisfaction of having made something truly unique for warm-weather adventures.
Materials Needed
- Yarn: Brown for the base, white for edges, and yellow/white for daisies.
- Crochet hook.
- Stitch markers.
- Scissors.
- Yarn needle (for sewing and weaving ends).

Crochet Pattern Details
Step 1: Creating the Magic Ring and Row 1
- Begin with a magic ring.
- Make 9 half double crochets (HDC) into the circle.
- Place a stitch marker in the first stitch to keep track of rounds.
- Close the ring securely.

Note: The hat is worked in continuous rounds instead of joining each row.
Step 2: Increasing Stitch Counts (Rows 2–13)
Every row begins with a stitch marker in the first stitch and ends with an increasing stitch. Follow the sequence below:
- Row 2: Increase in every stitch (2 HDC in each stitch).
- Row 3: Alternate 1 HDC and 1 increase.
- Row 4: Alternate 2 HDC and 1 increase.
- Row 5: Alternate 3 HDC and 1 increase.
- Row 6: Alternate 4 HDC and 1 increase.
- Row 7: Alternate 5 HDC and 1 increase.
Continue increasing stitches for the following rows:
- Row 8: Alternate 6 HDC and 1 increase.
- Row 9: Alternate 7 HDC and 1 increase.
- Row 10: Alternate 8 HDC and 1 increase.
- Row 11: Alternate 9 HDC and 1 increase.
- Row 12: Alternate 10 HDC and 1 increase.
- Row 13: Alternate 11 HDC and 1 increase.
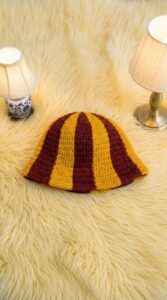
At the end of Row 13, the crown of the hat measures approximately 7 inches in diameter.
Step 3: Building the Body of the Hat (Rows 14–24)
- Transition to normal rows without increases.
- For 10 rows, work 1 HDC in every stitch.
- This forms the body of the hat, which measures approximately 2.5 inches.
Step 4: Creating the Brim (Rows 25–32)
The brim adds a charming flair to the hat, measuring approximately 3 inches. The stitch pattern slightly changes, introducing new increases where required:
- Row 25: Alternate 8 HDC and 1 increase.
- Row 26: Alternate 10 HDC and 1 increase.
For remaining stitches in Row 26, make 1 HDC in each stitch. - Row 27: Repeat Row 26.
- Row 28: Alternate 9 HDC and 1 increase.
- Row 29–30: Alternate 9 HDC and 1 increase; finish remaining stitches with 1 HDC.
- Row 31–32: Alternate 8 HDC and 1 increase; finish remaining stitches with 1 HDC.
- Final Row: Work 1 HDC in every stitch across the brim. Slip stitch into the marked stitch, then chain 1 and cut the yarn.

Step 5: Adding Decorative Edges
- Insert your hook into the last stitch from the brim.
- Attach the white yarn and make a slip knot.
White edge pattern:- 2 chains.
- 2 double crochets (DC) in the same stitch.
- Skip 1 stitch and make a slip stitch in the next stitch.
- Repeat until reaching the end of the row.
- Slip stitch into the first DC, chain 1, and cut the yarn.

Step 6: Making Daisies
- Use yellow yarn (grab 2-plies for a smaller daisy). Create a circle loop large enough for a flower.
- Secure the circle onto the hat surface by tying it from the wrong side or sewing.
- For petals, use white yarn (2-plies) and sew petals around the yellow circle. Secure ends at the back.

Step 7: Adding Ties
Customize the ties as follows:
- Flip the hat to the wrong side. Count 10 rows inward from the bottom edge and insert your hook.
- Attach brown yarn, make a slip knot, and chain 110 for the desired length.
- Creating the flower at the end of the tie:
- Skip 3 chains, and in the fourth chain, work 5 triple crochets (TRC).
- Slip stitch into the 3 skipped chains.
- Slip stitch into every chain along the tie until reaching the base.
- Create a second tie parallel to the first.
Step 8: Weaving Ends
Weave in all yarn tails securely using a yarn needle. This ensures a clean and polished finish.
Conclusion
Congratulations! You've completed your crochet summer hat! The result is a lightweight, stylish hat featuring a beautifully crafted brim, decorative ties, and adorable daisy embellishments. This pattern is highly customizable, allowing you to adjust colors, with optional additions like longer ties or alternate decorations.


Leave a Reply