

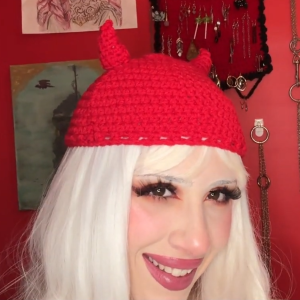
Hook up some colorful fun with this free crochet striped bucket hat pattern with easy enough for beginners and stylish enough to rock all season long.
Crocheting hats has always been a fun way for me to combine style and practicality, and recently I tried a project that quickly became a wardrobe favorite. The Free Crochet Striped Bucket Hat Pattern is a delightful and trendy accessory that’s perfect for adding a handmade touch to your outfits. This bucket hat is easy to make and uses colorful stripes to create a fresh, eye-catching look, making it an excellent choice for anyone who enjoys crafting wearable art.
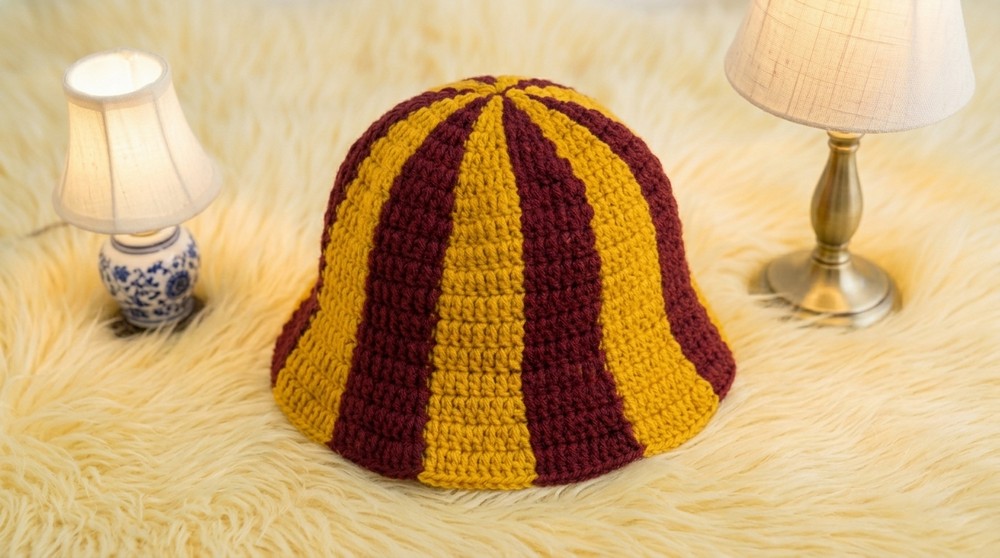
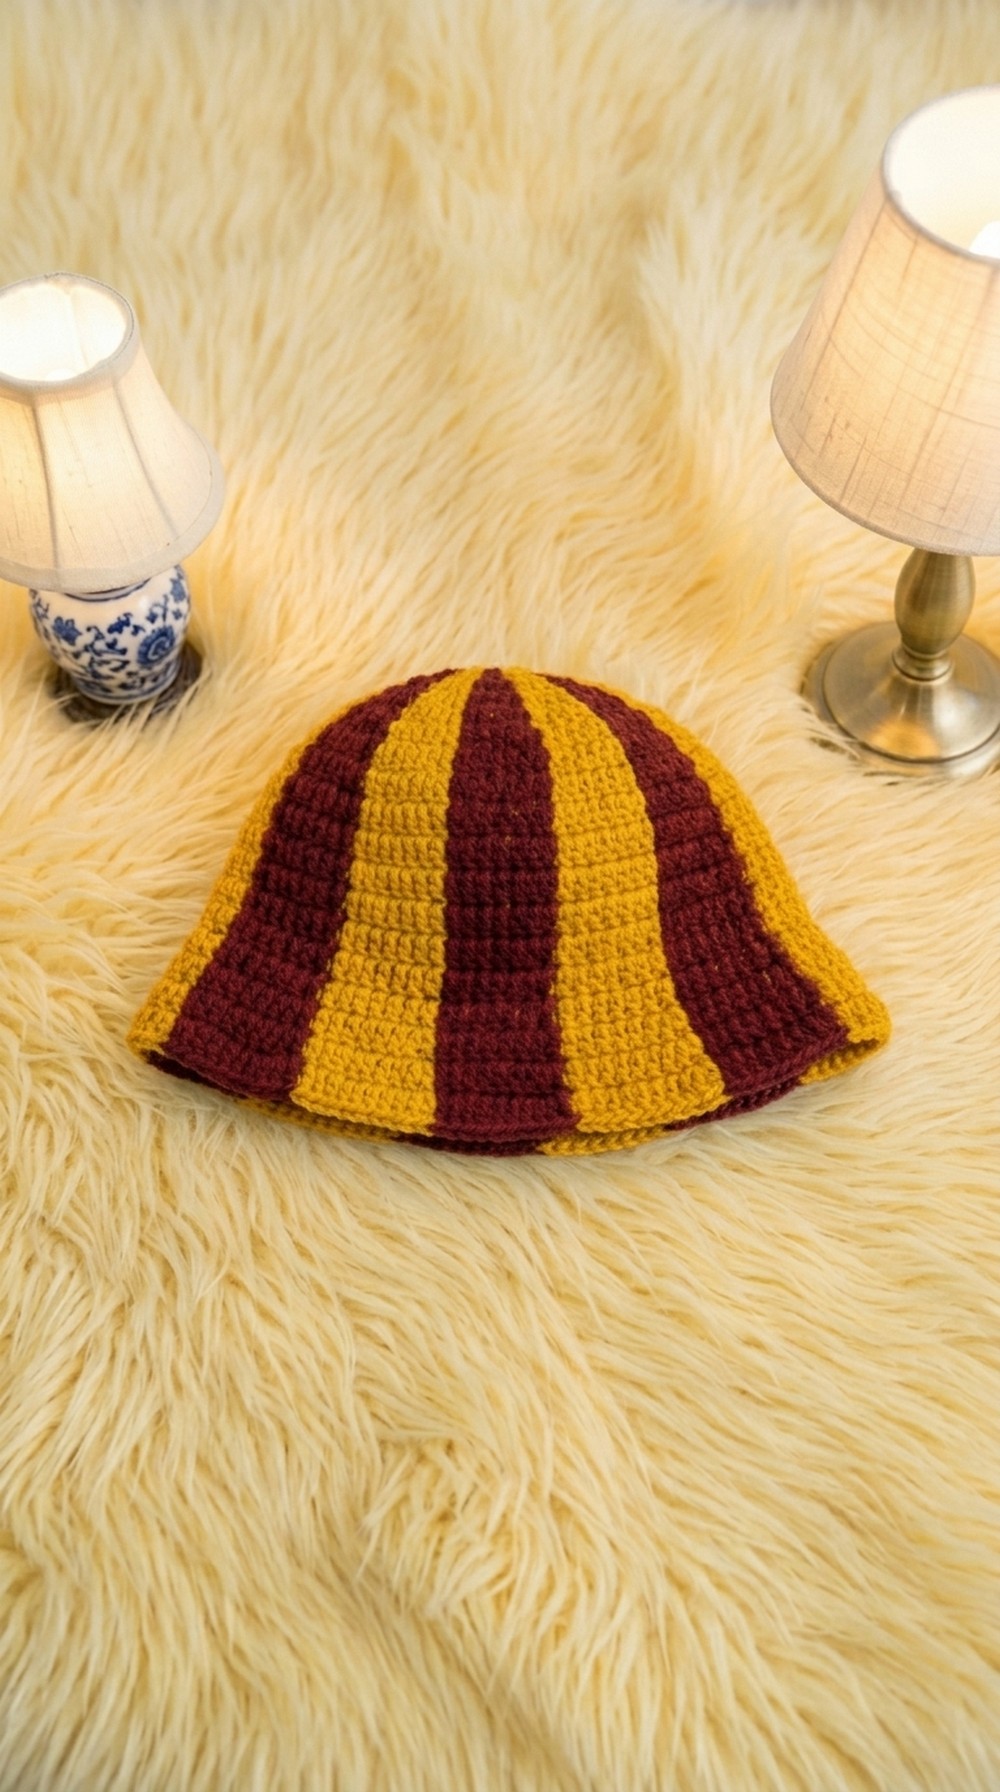
Free Crochet Striped Bucket Hat Pattern Perfect for Summer Fashion
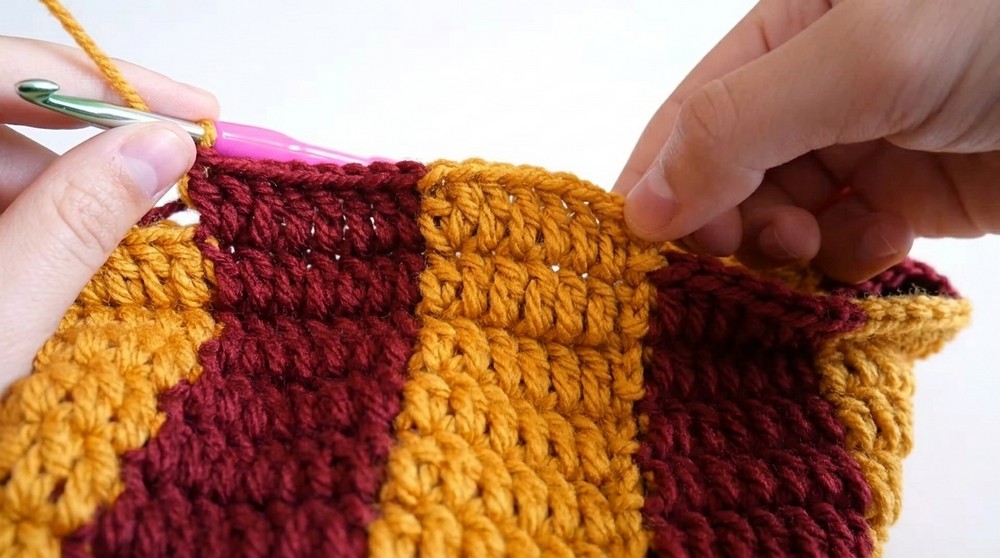
This striped bucket hat is charming with its neat, rounded shape and vibrant alternating colors that give it a playful yet stylish flair. The texture is smooth and slightly thick, providing a comfortable fit that keeps the sun at bay while offering a cozy feel during cooler days. Its classic bucket silhouette works well for a variety of face shapes and styles, making it highly versatile. The standout feature of this hat is the clever use of color changes and striped pattern, which brings in a modern twist to a timeless shape, appealing to all ages and fashion preferences.
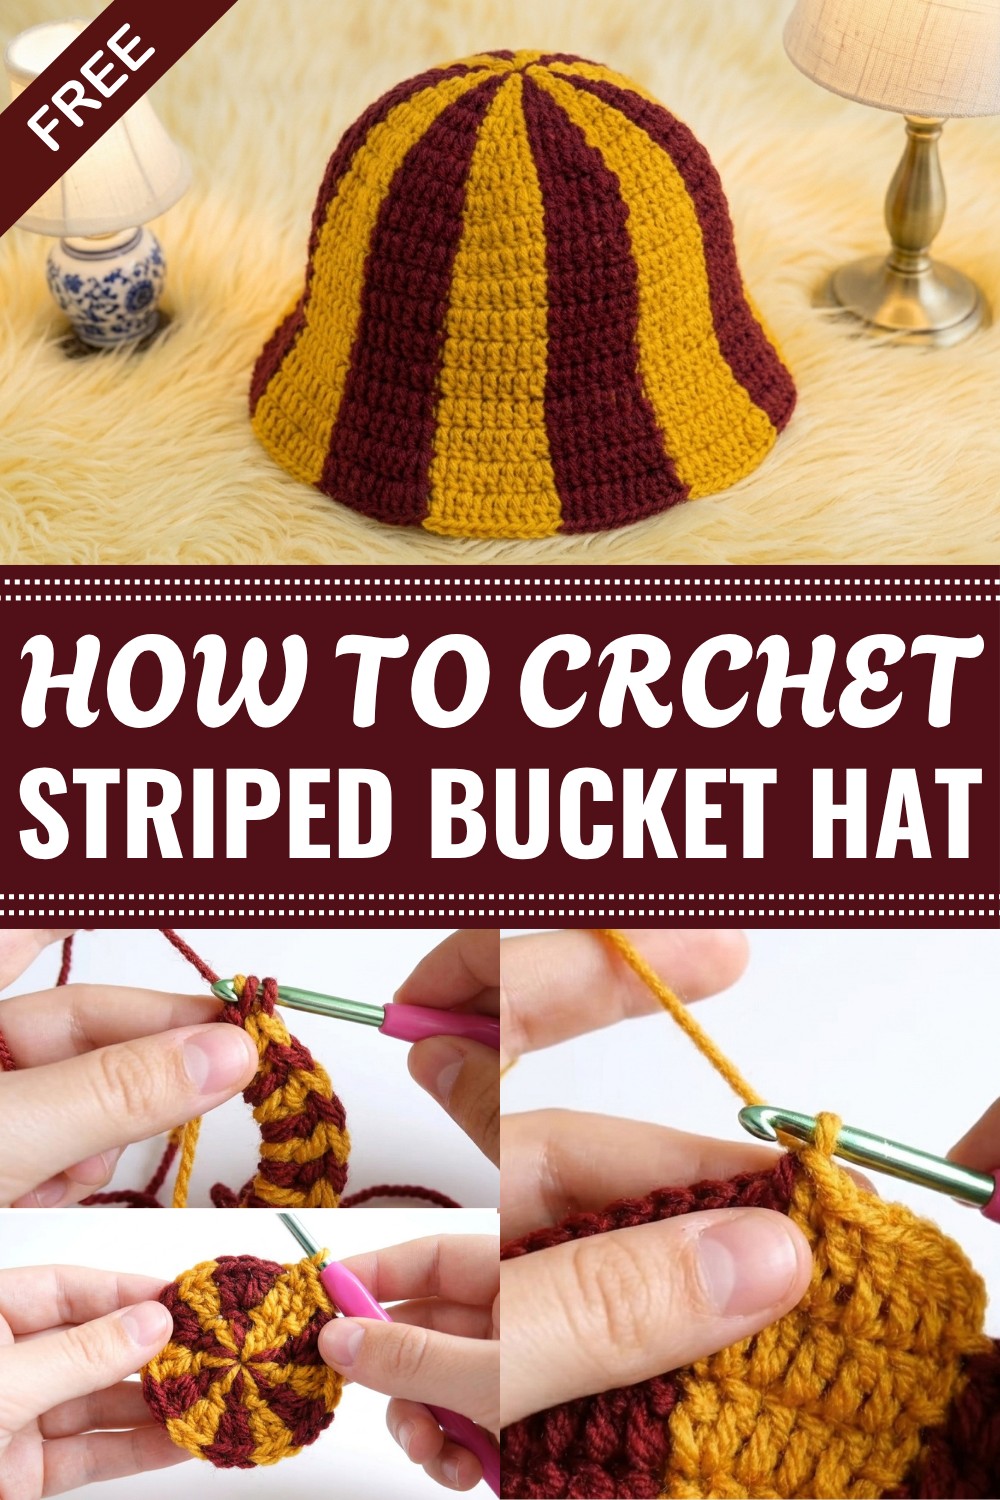
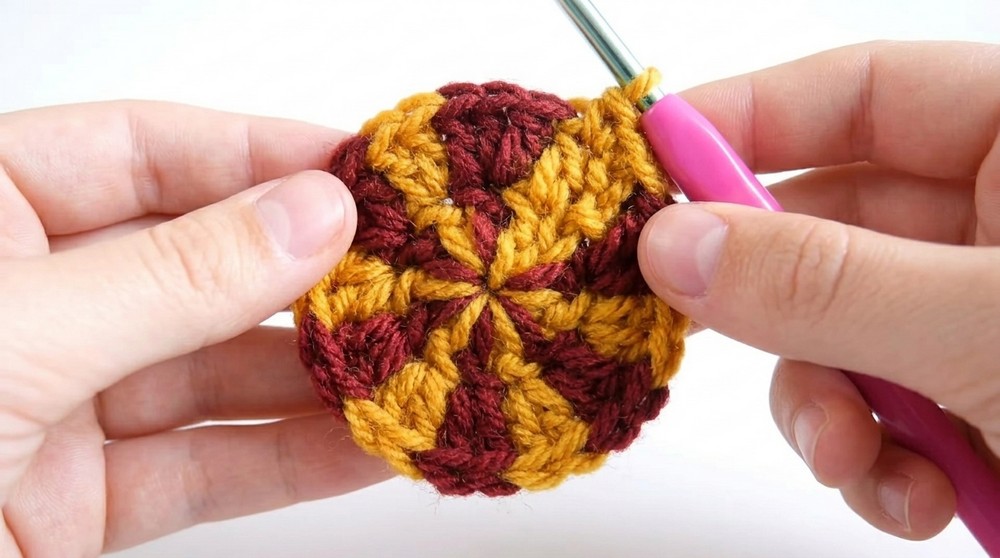
The hat is constructed starting from the top with a magic ring, gradually increasing stitches to form the crown, and then worked downward to create the sides. The pattern mainly uses double crochet stitches, often working in the front loop only to add texture and neatness. Color changes are skillfully incorporated to create the stripes, with yarn carrying techniques used to keep the work tidy and seamless. This project suits intermediate crocheters, especially those comfortable with managing color changes and stitch increases. With minor modifications, such as switching up the colors or adjusting the size, you can customize this bucket hat or make matching accessories like scarves or headbands.
This striped bucket hat is both fashionable and functional, ideal for personal use, gifting, or adding to a handmade collection. Its bold colors and classic design make it a standout accessory that'll brighten up any outfit while providing sun protection and warmth. If you’re looking for a rewarding crochet project that combines creativity and style, this pattern is a wonderful fit for your skills and interests.
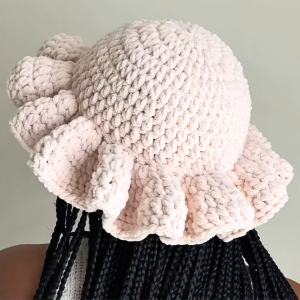
Two-Tone Spiral Bucket Hat Crochet Pattern
Before You Start
- This pattern creates a striking, color-changing bucket hat worked in rounds from the top down.
- The hat uses two colors, changed every other stitch, creating a spiral, striped effect.
- You must be comfortable with color changes within the same round.
- All increases and color changes are key to the design—keep yarn strands neat for the best result.
Pattern Notes
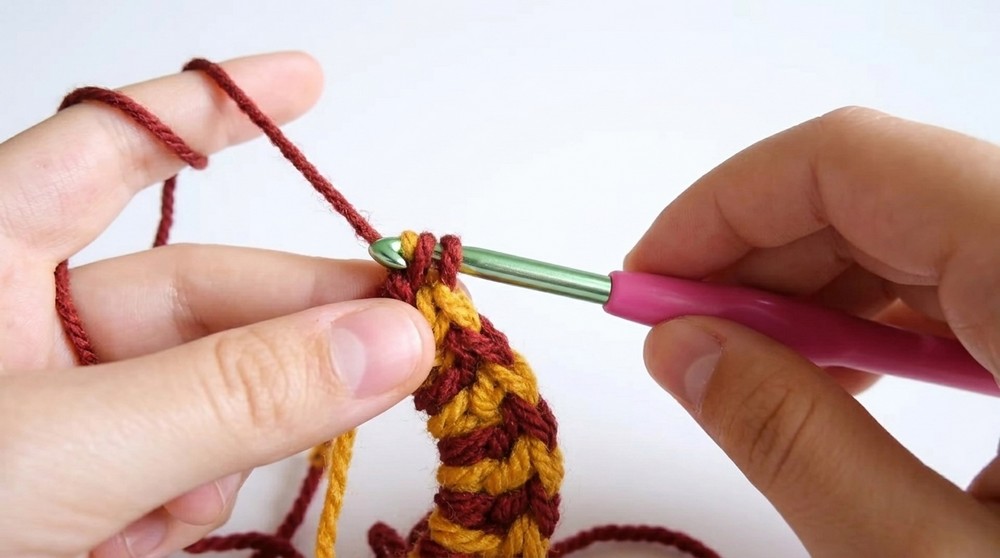
- Yarn is changed on the very last yarn-over of each relevant double crochet to create a consistent, alternating color effect.
- Begin each round with a chain 2 (counts as your first double crochet unless otherwise noted).
- Always finish your last double crochet of each color with the next color, carrying the unused color neatly along the inside of your work.
- For best results, pull your magic ring tight after the first round to close the center.
- When a round calls for increasing, work two double crochets in a stitch as directed, increasing as the pattern states.
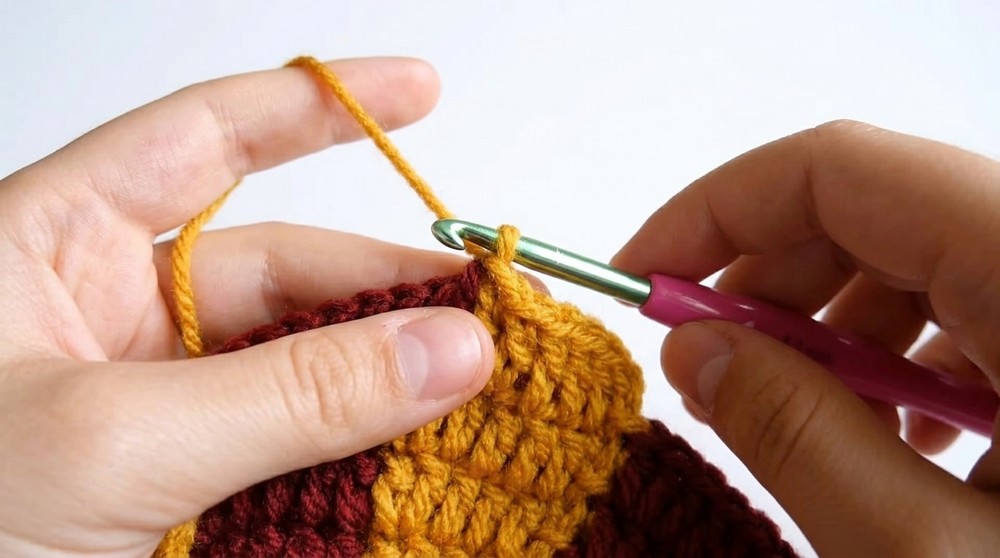
- When the pattern asks for ‘front loop only,’ insert the hook into the front loop of the stitch for a subtle ridge effect.
How I Made the Crochet Pattern?
- Used a magic ring for a neat, closed crown.
- Alternated two yarn colors for bold stripes, changing on the final yarn-over of each DC.
- Increased rounds methodically for a flat top, later switching to ‘no increase’ rounds for straight sides.
- Added front-loop-only rows to define the brim.
- Designed all instructions for comfort and adaptability—one size fits most.
Skill Level
- Advanced Beginner
Finished Size
- Height: Approx. 23 cm (9 in)
- Crown diameter: Fits average adult head (approx. 55–58 cm/21–23 in circumference)
- Easily adjustable by adding or subtracting a few rounds
Materials
- Two contrasting colors of worsted weight (size 4) or DK/light worsted yarn (see label for 4–5 mm hook suggestion)
- Sample uses burgundy ("A") and golden/yellow ("B")
- 4.5 mm crochet hook
- Scissors
- Yarn/tapestry needle
Measurements / Sizing
- Final crown diameter after increase rounds: approx. 17–18 cm (7 in)
- Hat length from top to end of brim: approx. 23 cm (9 in)
- If you need a larger or smaller circumference, adjust the number of increase rounds
Gauge
- 8 double crochets and 5 rounds = 5cm x 5cm (2" x 2")
- Check gauge after first seven rows; adjust hook size if needed.
Stitch Abbreviations
- ch = chain
- dc = double crochet
- sl st = slip stitch
- st(s) = stitch(es)
- FLO = front loop only
Special Stitches
- Double Crochet (dc): Yarn over, insert hook into stitch, yarn over, pull up a loop (3 loops on hook); yarn over, pull through two loops, yarn over, pull through two loops.
- Color Change: On final yarn-over of double crochet, swap to new color and finish stitch; carry unused color inside hat.
- Magic Ring: Loop yarn, crochet into ring then pull closed for a tight center (see video if needed).
- Front Loop Only (FLO): Insert hook only into the front loop of stitch instead of both loops, creating a subtle ridge.
The Pattern!
Crown
Round 1:
- With color A, make a magic ring. Ch 2 (counts as dc), 1 dc in ring but do not complete—on final yarn over, switch to color B and finish dc.
- Using color B, 1 dc in ring, finish last pull-through with A.
- Alternate colors, making a total of 12 dc, always changing color on the last step of each dc.
- Tighten ring; sl st with final color used into top of starting ch 2 to join.
- (12 dc; 6 of each color)
Round 2:
- Ch 2 (A), 1 dc (A) in same st, finish with B; 2 dc (B) in next st, finish with A; repeat (2 dc in each st, alternating colors, always changing on final pull-through).
- Repeat around, join with sl st in top of ch 2.
- (24 dc; 12 of each color)
Round 3:
- Ch 2 (A), dc (A) in next st, finish with B; 2 dc (B) in next st (inc), finish with A; dc (A) in next st, finish with B; continue alternating.
- (One dc, then two dc in next st; continue around alternating colors and always changing on final yarn over.)
- Join with sl st as before.
- (36 dc)
Round 4:
- Ch 2 (A), dc (A) in next st, dc (A) in next st, finish last with B; 2 dc (B) in next st, finish with A; dc (A) in next two sts, finish with B; repeat around.
- (Alternating: two singles, then increase, always color-change on last yarn over.)
- Join with sl st.
- (48 dc)
Round 5:
- Ch 2 (A), dc (A) in next 2 sts, dc (A) in next st, finish with B; 2 dc (B) in next st, finish with A; dc (A) in next three sts, finish with B; repeat pattern.
- (Three singles, then increase.)
- Join.
- (60 dc)
Rounds 6–7:
- Continue increasing as established: Each round adds one more single dc between increases.
- Row 6: 4 single dc, then increase.
- Row 7: 5 single dc, then increase.
- Always alternate colors every stitch.
At the end of Round 7, each color section should have 7 sts. The hat’s top will be ~17–18cm (7 in) across.
Body
Rounds 8–13: (No increases)
- Ch 2, dc in each st in established color pattern, always changing color after 7 stitches or as your spiraled sections align.
- Continue for a total of 6 rounds (or adjust for desired length).
- Keep color changes sharp and carry unused yarn inside.
Now you’ll have a tube shape. Each color strip spirals down the hat.
Brim
Round 14: (Front Loop)
- Ch 2 with color A.
- Dc FLO in each st around, maintaining color changes every 7 sts.
- Join as before.
Round 15 (Increase):
- Ch 2 (A), dc FLO in next 5 sts; 2 dc FLO in next st, repeat to end of color section (8 sts).
- Change color, repeat.
- At the end, each color section will have 8 sts.
Rounds 16–17:
- Ch 2, dc FLO in each st to last st of color section, 2 dc FLO in next st, repeat for each color. Each round adds one extra dc per section before increase. Round 16 = 9 sts then inc; Round 17 = 10 sts then inc.
The brim will flare naturally due to increases. Check fit and add another round if needed for a wide brim.
Last Round and Finish
Final Round:
- Ch 1 in chosen color.
- Sc in each st around, maintaining color pattern if desired or switch to a single color for a contrast edge.
- Join, fasten off, leave 20 cm / 8 in tail.
If you prefer a softer/firmer brim, you can block or steam the hat to shape.
Assembly & Finishing
- Weave in all yarn ends using a yarn needle, hiding them inside your work for neatness.
- Gently shape the bucket hat by blocking if required—steam or dampen and lay flat.
- Optionally, knot last color change securely before weaving in.
- Try on for fit; if brim is too floppy, starch lightly or add a round.
Solution of Problem
- If you run out of yarn on the last row: You can finish the round with the other color, or use any similar-weight scrap for the last stitches or edge.
- If your stripes don’t align: Double-check color changes are made on the last step of each stitch; always carry unused color inside for clean stripes.
- Hat too tight/loose: Adjust your hook size; add/remove one increase round at the crown to increase or decrease circumference.
What You Can Make With These Stitches
- Spiraling striped bucket hats in endless color combos
- Color-blocked beanies or berets
- Matching scarves or headbands
- Bold striped bags or pouches
- Baby hats, placemats, and more with simple double crochet colorwork
Conclusion
You’ve completed a vibrant, trendy, and comfortable two-tone bucket hat, using only double crochet and an easy color-changing method. By alternating colors and increasing methodically, you get a strong spiral/stripe effect that looks advanced but is firmly beginner-friendly. Adjust sizes, play with other color combos, and enjoy your new statement accessory!
If the written instructions seem hard:
Just alternate two colors, increasing every round as described, and always change color on the last yarn-over of each stitch. Work even (no increases) for the body, then increase again for the brim to finish!

Leave a Reply