

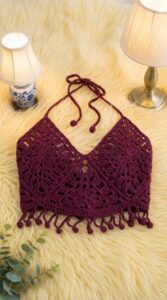
Master the art of crocheting a chic bikini top with this free pattern offering easy-to-follow steps for a beautiful custom fit perfect for summer.
Making a comfortable and stylish bikini top by hand is easier than you might think. This pattern lets you create a lightweight, breathable top that’s perfect for warm days at the beach, pool, or just relaxing outside. It’s designed with simple stitches that anyone can pick up quickly, even if you’re new to crochet.
What’s great about this design is the ability to choose your favourite colours. Whether you want something bright and bold or soft and subtle, you can mix yarns to match your style. The pattern also offers easy ways to adjust the size, so it fits kids, teens, and adults comfortably without any hassle.
Free Crochet Bikini Top Pattern With Detailes Guide

The main stitch used is the double crochet, which creates a strong yet flexible fabric. This means the top is not only sturdy but also lets air flow through, keeping you cool when the temperature rises. The shape and fit work well on their own or together with other handmade pieces like matching skirts or shorts.
Crocheting this bikini top is a rewarding project that lets you explore your creativity and end up with something unique and practical. It’s perfect for anyone looking to add a personal touch to their summer wardrobe, with clear steps to follow and plenty of room to customize colours and sizes. Whether you’re making it for yourself or as a gift, this pattern offers a simple way to enjoy crochet and create a beautiful piece made by hand.

XL/Large Size Crochet Bralette Pattern
How I Made the Crochet Pattern (Summary)
- Started with a chain base, sized to XL with measurements provided.
- Worked rows of single crochet for the cup, adding height and shaping.
- Created a shaped “triangle” (cup) by extending and working partial rows.
- Finished the top with a picot edge and worked a long neck strap.
- Crocheted the second cup in the same way and joined the two at the base.
- Added a bottom band with slight decreases, then continued to form the adjustable back closure/strap.
Pattern Notes
- The bralette is worked in two parts—the cups and the back band, both with adjustable length.
- The base and body are made entirely with single crochet for comfort, coverage, and a neat finish.
- All rows are worked flat (back and forth, turning at the end of each row).
- Picot edging and simple shaping ensure the bra provides good coverage and stays in place.
- Straps are worked directly from the cups and continued until desired length.
- Slight decreases are worked in the under-bust band for a better fit and support.
Skill Level
- Advanced Beginner to Intermediate
Finished Size
- Customizable. The base instructions provide a comfortable fit for XL (approx. bust 100–120 cm / 39–47")
- Adjustable for other sizes (S, M, L) by modifying base chain and number of rows.
Materials
- 4.0 mm crochet hook
- Double strand of fine/thin yarn (e.g., SilviaRumu brand); yardage depends on size, approx. 150–180g for XL.
- Stitch markers
- Scissors
- Measuring tape
- Yarn needle for finishing
Measurements / Sizing (Schematic)
- Base chain: 15 cm (25 chains for XL)
- Cup height (rows): 10 cm (17 rows)
- Cup extension (partial rows for shaping): 13 rows, total 29 rows after triangle is formed
- Strap length (neck): ~60 cm, adjustable
- Back band width: ~15 stitches (for XL; 10 for S/M)
- Back strap: to fit comfortably around your body (approx. 40-45 cm per side)
Gauge (and Stitch Pattern if applicable)
- Gauge: Roughly 16 sc and 17 rows = 10 x 10 cm in single crochet with double strand.
- Stitch pattern: Single Crochet (sc) and Picot (for edging).
Stitch Abbreviations
- ch – chain
- sc – single crochet
- sl st – slip stitch
- st(s) – stitch(es)
- dec – single crochet decrease (see Special Stitches)
- picot – (sc, ch 2, sl st in same sc)
Special Stitches
- Single Crochet Decrease (sc dec): Insert hook into next stitch, yarn over and pull up a loop (2 loops on hook), insert hook into next st, yarn over and pull up a loop (3 loops), yarn over, pull through all 3 loops.
- Picot Stitch: sc, ch 2, sl st into same sc to make a decorative point.
Before You Start
- Read the entire pattern thoroughly before beginning.
- This pattern is especially designed for XL/Plus sizes but can be easily adjusted for smaller or larger sizes.
- Use stitch markers if you're new to garment making.
- Have a measuring tape handy to check your fit as you crochet.
- We recommend trying on as you go, especially when making the straps.
The Pattern!
Cups (Make 2):
- Base Chain:
- Ch 25 (approx. 15 cm for XL).
(For other sizes: S = 15 ch; M = 20 ch; L = 22 ch)
- Ch 25 (approx. 15 cm for XL).
- Row 1:
- Sc in 2nd ch from hook and across. (24 sc)
- Chain 1, turn.
- Rows 2–17:
- Sc in each stitch across. (24 sc)
- Chain 1, turn at the end of each row.
(You should have a rectangle measuring about 10 cm high)
- Shaping the Cup:
- From Row 18 onward, start making the triangle:
- At the end of Row 17, sc 2 more into the last st.
- Ch 1, turn. Sc in each st across. Ch 1, turn.
- Repeat this process, working one fewer sc at each end, until you have 13 rows (total 29 rows from starting base).
- No increases except on the very first triangle row; work plain sc (24, 23, 22... down to 2 st).
- From Row 18 onward, start making the triangle:
- Edging (Picot):
- Sc along the finished side, working 6 sc, then one (sc, ch 2, sl st in same sc) for the picot, repeat: 5 sc, picot, 5 sc, picot, etc., all along the triangle edges.
- First Strap:
- At top corner of triangle, ch 1, turn. Sc 2, ch 1, turn, repeat for desired length (~60 cm for neck strap).
- Fasten off and weave in tail.

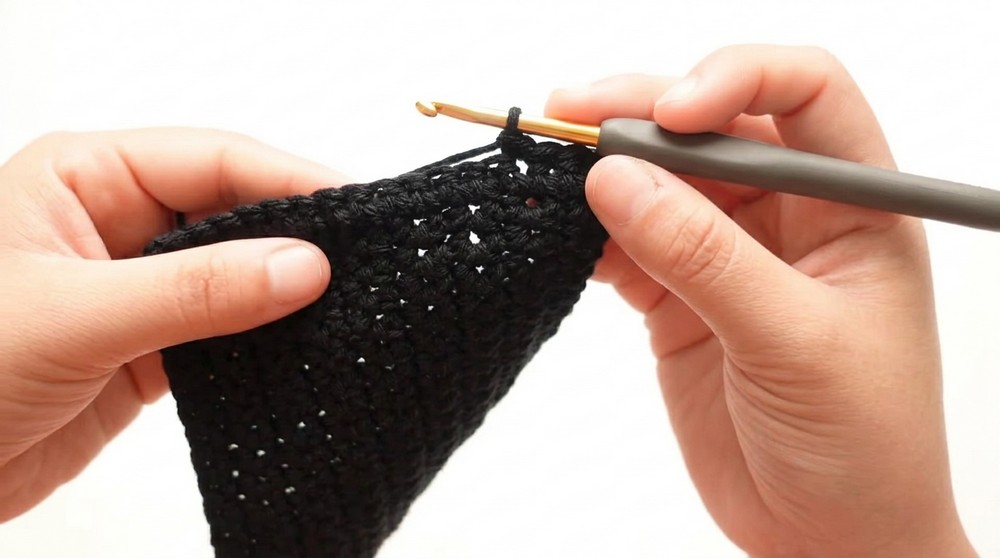
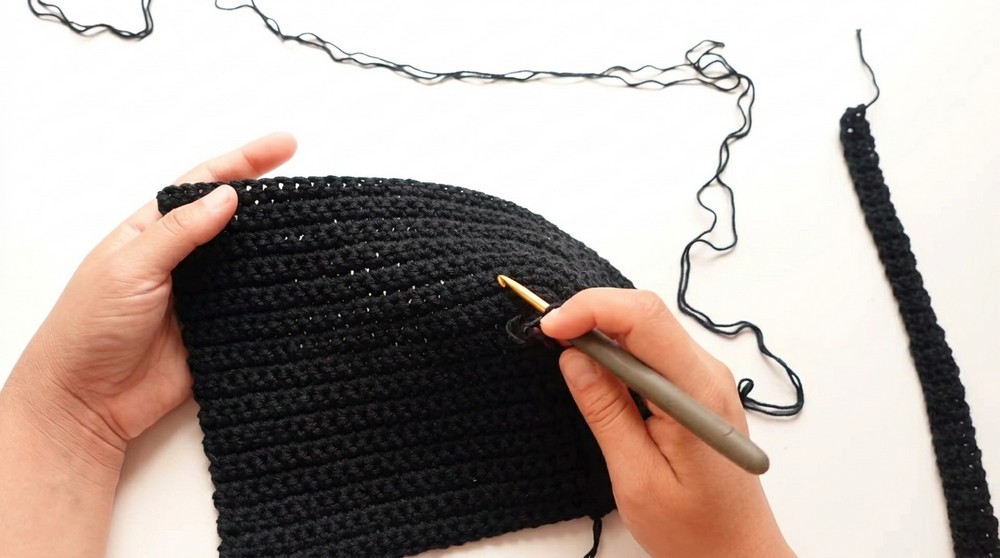
The cups are each worked as a rectangle, then shaped into a triangle by working partial rows. The edging and straps are added directly, keeping everything seamless for comfort.
Second Cup:
- Repeat all steps above for a matching second cup.
Joining Cups at the Base:
- Overlap the two cups as desired for coverage, join with sl st or sc across the bottom edge of 5 sts (for XL), so the cups sit stably together.
Joining is important for structure; be sure the right sides face outward and join where your bust naturally separates.
Under-Bust Band:
- Attach yarn at the base of the joined cups.
- Work across bottom: sc in each st, decreasing only once at each end (sc dec at beginning and end). (Creates a gently tightening band).
- Work two more rows of sc evenly (no more decreases), each time ch 1, turn at the end.
The under-bust band provides support and a little shaping for a great fit. Adjust the width as needed for your bust size and support needs.
Back Band/Strap:
- At the side of the under-bust band, attach yarn.
- Sc 15 (for XL) or 10 (for S/M) across, ch 1, turn.
- Continue working in sc. Every third row, decrease at each end (sc dec) to shape the band gradually.
- Repeat: 2 rows straight, 1 row with decreases at both ends, until only 2 sts remain.
- Then, continue straight over remaining 2 sts for 40–45 cm, or as needed for a comfortable tie.
- Finish off, weave in tails.

- Repeat for the other back side.
The back straps are tapered for comfort and flexibility. Make them as long as you like for tying or fastening at the back.
Assembly & Finishing
- Weave in all loose ends with a yarn needle.
- Block the cups very lightly if desired, especially if working with wool yarn.
- Try on the bralette and check fit. Adjust straps if necessary.
- Use ties or a decorative closure at the back for a secure fit.

What You Can Make Using These Stitches
- Crochet bralettes in any size.
- Bikini tops or crop tops.
- Camisoles or summer tanks.
- Lingerie and festival wear.
- Child-sized training tops (with appropriate adjustments).
- Decorative garment edges (with the picot stitch).
Congratulations!
You now have a detailed, customizable pattern for an XL or Large Brioche Bra Top with great support and a stylish look, complete with a pretty picot edge and comfortable straps. Adjust sizing by changing the base chain and row counts, and experiment with color or stitch detail for your own style.

Leave a Reply