

Learn to crochet halter tank top with this simple pattern, ideal for summer styling and perfect for handmade fashion enthusiasts.
Creating a breezy and stylish tank top for summer can be both fun and rewarding. One popular choice is a halter-style top that ties or fastens at the back, offering a flattering sleeveless look perfect for warm weather. By making small adjustments to the pattern, such as altering the length or strap design, you can easily turn this project into crop tops, beach cover-ups, or casual summer dresses, adding versatility to your handmade wardrobe.
Crochet Halter Tank Top Free Pattern With Simple Instruction
This tank top stands out with its light, airy texture and open stitch pattern that balances comfort and style. The shape gently contours the bust and waist, creating a sleek silhouette. Its halter neckline adds a touch of elegance and youthfulness, making it a fashionable option for casual outings or beach days. The delicate stitch work combined with a clean, simple design results in a garment that is both attractive and easy to wear.

Constructed mainly with double crochet stitches and chain spaces, this project is worked from the bottom up and involves shaping to fit the body through increases and decreases. It’s ideal for beginner to intermediate crocheters, offering a chance to practice garment construction without complex stitches or techniques. The pattern’s straightforward design makes it easy to customize according to personal style or fit preferences.
This halter tank top makes a thoughtful gift and a charming addition to any summer wardrobe. Its wearable appeal and decorative texture ensure it will be appreciated whether given to a friend or kept for yourself. For those seeking an enjoyable, stylish crochet project that combines practicality with creativity, this pattern is a wonderful choice to explore.
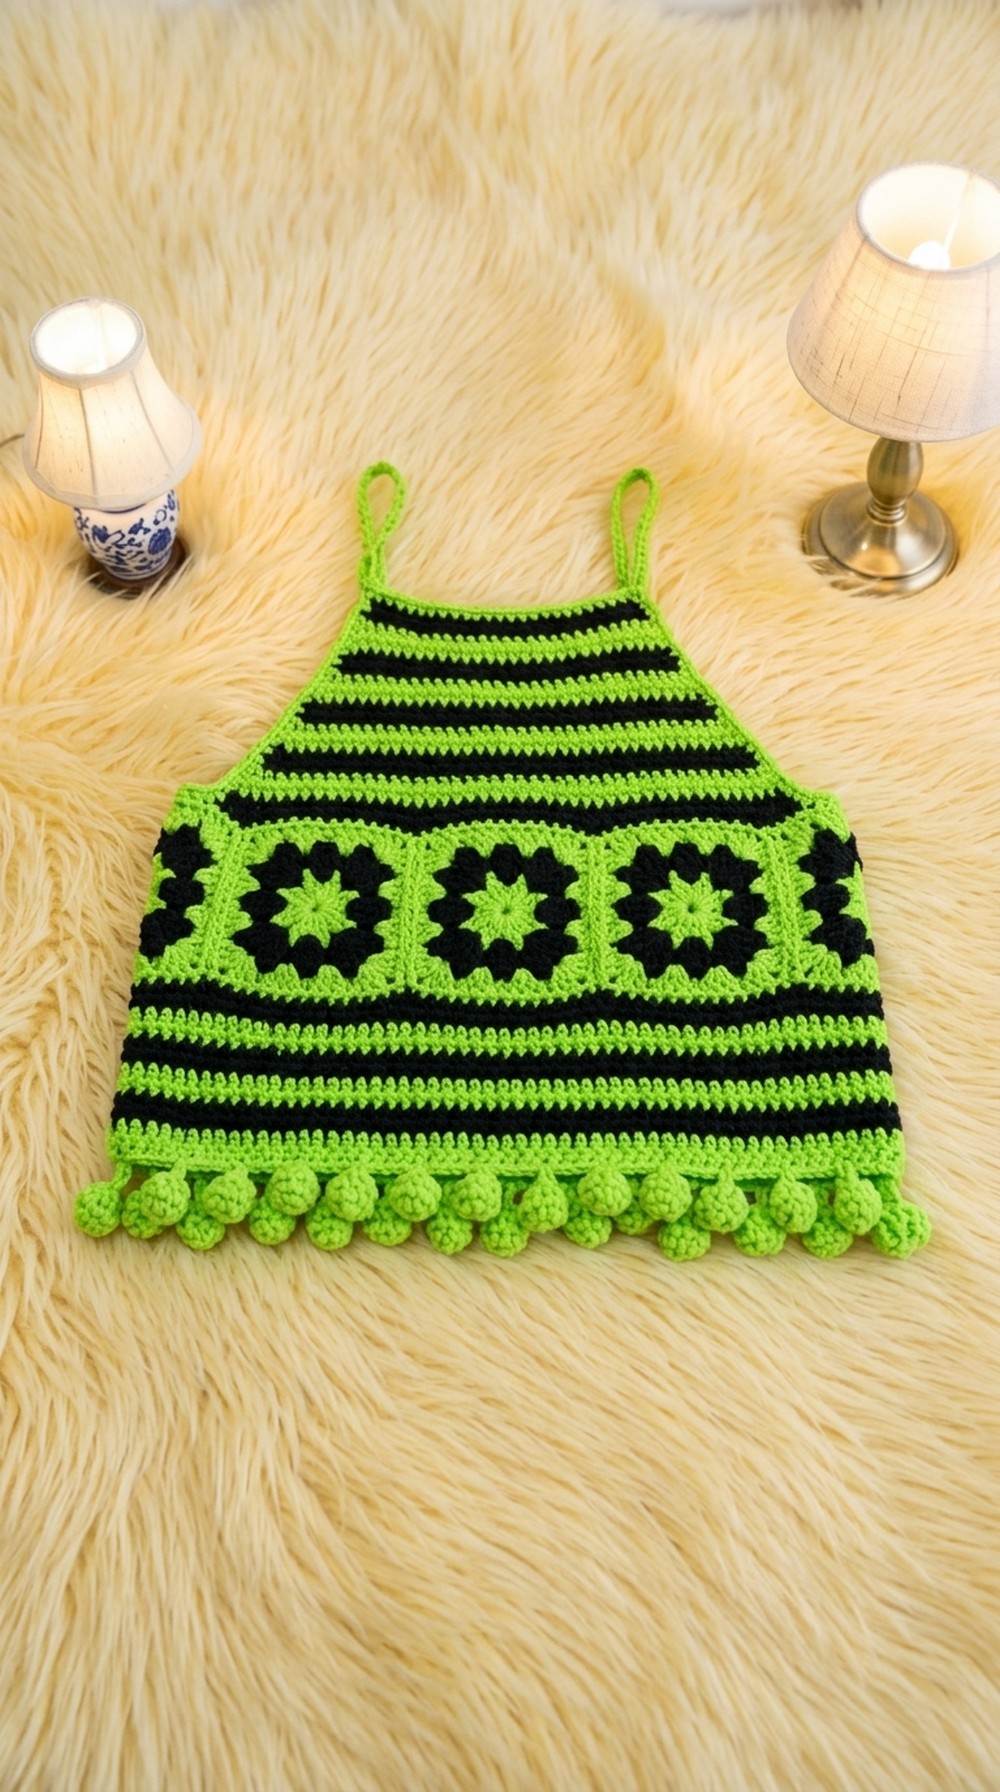
Crochet Granny Square T-Top Pattern
Before You Start
- Make sure you know how to work basic granny squares and crochet in the round.
- Read through the entire pattern for construction understanding.
- Gather all required materials before starting.
- Use a measuring tape to customize fit.
- Be prepared to weave in many ends, as top uses color changes and several separate squares.
Pattern Notes
- US crochet terms are used throughout.
- Top is modular: constructed with granny squares for main body, worked in joined rounds, then shaped with rows for the upper bodice, straps, and a decorative shell border.
- You can adjust the length and width by using more/less squares or by changing the yarn/hook size.
- The top ties at the shoulders with long crocheted straps and is easy to resize.
- Color changes and blocking may be necessary for the best look.
- Pattern is written for size large but is easily adjustable following the schematic notes.
How I Made the Crochet Pattern
- Designed modular granny squares, then joined them in a band.
- Worked the upper front and back with rows and repeated decreases for shape.
- Made long chains and rounds of single crochet for the shoulder ties.
- Worked in rounds from the joined squares for the lower body.
- Added a lacy shell edging as the finishing touch.
Skill Level
Adventurous Beginner / Intermediate
Finished Size
- Sample size Large (approx. bust 40–42 in / 102–107 cm)
- Customizable: Adjust square size or add/remove squares for perfect fit.
Materials
- “I Love This Yarn!” (or similar worsted/Aran, #4, 100% acrylic)
- Size 5.5 mm (US I-9) crochet hook
- Tapestry (darning) needle for sewing
- 2 stitch markers
- Scissors
Measurements / Sizing
- Each granny square: approx. 4 in (10 cm) across
- Front/back width: ~16 in (41 cm) (using 4 squares)
- Length (armpit to bottom): adjustable by number of rounds after joining and shell border.
Gauge
- 4 rounds of granny square motif: 4 in x 4 in (10 cm x 10 cm)
- Adjust hook/yarn to get gauge, or add/remove squares to resize.
Stitch Abbreviations
| Abbr | Meaning |
|---|---|
| ch | chain |
| sc | single crochet |
| hdc | half-double crochet |
| dc | double crochet |
| tr | treble (triple) crochet |
| ext dc | extended double crochet (see below) |
| sl st | slip stitch |
| st(s) | stitch(es) |
| sp | space |
Special Stitches
- Magic Ring: Wrap yarn into a ring shape, work stitches into center before tightening loop.
- Extended Double Crochet (ext dc): Yarn over, insert hook, yarn over and pull up loop (3 on hook), yarn over pull through one loop (ch made), yarn over pull through two, yarn over pull through two.
- Cluster (4-dc-tog): Yarn over, insert hook in st, yarn over and pull up loop, yarn over pull through 2, repeat into same st until 4 partial dc made (5 loops on hook), yarn over and pull through all loops.
- Decrease (dc2tog): Yarn over, insert hook in first st, yarn over pull up loop, yarn over pull through 2, (2 loops on hook), yarn over, insert hook into next st, yarn over pull up loop, yarn over pull through 2, yarn over pull through 3.
The Pattern
Granny Square Motif
Round 1 (color A):
- Magic ring, ch 2 (counts as first dc), 11 dc in ring. Pull closed (12 dc). Sl st to top of beg ch-2.
Round 2 (color B):
- Join new color with sl st to any dc.
- Ch 1, hdc in same st, hdc in same st (mark as first hdc), *2 hdc in next st; rep from * around. Join with sl st. (24 hdc)

Round 3 (color C):
- Skip 1 st, in next st: dc, ext dc, tr; next st: 3 tr; next st: tr, ext dc, dc; skip 1, sl st in next.
- Repeat this (petal) sequence four times around for 4 petals; join to base of first petal. Fasten off.
Round 4 (color D):
- Join with tr in center (middle tr) of any 3-tr group.
- In this st: (tr, ch 1, tr), ext dc in next st, dc in same, dc in next 2 sts, ext dc in next, in slip st: tr, (ch 1, tr); work as established around, always tr, ch 1, tr in centers (making corners), and dcs/ext dc between. Join with sl st to first tr. Fasten off and weave ends.

Each square should measure about 4 in (10 cm). Make as many as needed for desired width and body length. Sample uses 8 squares, 4 for front, 4 for back (adjust as needed for size).
Joining Squares
- With wrong sides together, use whipstitch or sl st method to join squares edge to edge:
- 4 squares for front, 4 squares for back, then 2 squares each for side panels under arms if extra width needed.
- Join into a round for main lower body.
- Weave in ends.

After joining, a “tube” of squares forms your bust/upper garment section. Adjust as needed for your body size and fit.
Upper Bodice (Front and Back), with Shaping
- From any marked center st at top middle of a square, attach yarn.
- Row 1: Ch 1, dc2tog (dec), dc in each st to last 2 sts before marker, dc2tog (dec at both ends).
- Turn, ch 1, repeat row until desired armhole depth (approx. 9 in/23 cm for size Large), changing colors every 2 rows or as desired.

Upper bodice is shaped with decreases at each side; repeat for both front and back. This creates deeper cut for the armholes and a fitted top.
Shoulder Ties/Straps
- With yarn still attached at corner, ch 100 (or length desired to tie comfortably over shoulders).
- Turn, working in back bumps: sc in 3rd ch from hook and in each ch across.
- Fasten off.
- Repeat for other strap.
These long straps allow for adjustable tie-shoulder style and are secured with firm single crochet.
Lower Body (Body Rounds)
- Turn top so joined squares' bottom edge is facing.
- In center of a square (at treble): Join yarn, ch 1, dc in same, dc in each st around (working through each stitch and in chain-spaces as needed; make sure to evenly space stitches for neat shape).
- When you reach a chain-space (where two squares join), work dc through both chain-spaces at once.
- Work in joined rounds, changing colors every round or as desired. Join each round with sl st to top of first dc. Turn at end of each round.
Continue working in rounds until you reach desired length (sample has 9 rounds after square band; adjust to fit).
Shell Border Edging
- With RS facing, join yarn; ch 5, then ch 3 more (counts as turning ch).
- Skip 2, in third ch from hook, 4-dc cluster, ch 1.
- Ch 3, 4-dc cluster in third ch from hook. Repeat this shell pattern across; join with sl st as described.
- If at end, and remaining sts are fewer than needed, simply skip as many as required to finish.
- Fasten off and weave in ends.

This gives a flowy, boho edge to the bottom of your top!
After Part Completion
After making all motifs, joining, and upper/lower body finishing, your granny square T-Top is ready to customize fit by adjusting the tie straps. The squares and shell border provide room for adjustments at every step.
Assembly & Finishing
- Weave in all loose yarn tails securely.
- Block top gently to square up motifs and neaten edges, if needed.
- Tie straps into bows or knots at shoulders.
- Optionally, add a bra lining or bandeau for modesty/support.
- Try on and adjust tie length as needed.
- Steam edges for best finish, being careful with acrylic yarn.
What You Can Make With These Stitches
- Crop tops, bralettes, or tank tops with motif variation.
- Granny square shrugs, cardigans, or dresses.
- Colorful summer bags or accessories.
- Blankets, pillows, and home decor with the square motif.
- Skirts or patchwork items using basic joining technique.

Leave a Reply