

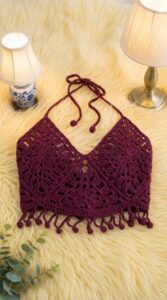
Learn how to create a stylish crochet bralette top with this easy summer pattern that's for girls and warm weather outfits.
Crochet tops have a special charm because they blend creativity with comfort. When you use a free crochet bralette top pattern, you get the chance to make a beautiful, handmade piece that stands out. This kind of pattern is easy to follow and lets you create a stylish and cute bralette that fits well and feels soft against the skin.
Free Crochet Bralette Top Pattern With Easy Steps
The free crochet bralette top pattern designs are usually delicate and airy, making them perfect for warm weather. The texture is often light and slightly open, which helps keep you cool while looking fashionable. Many patterns include pretty details like small flowers, lace shapes, or scalloped edges that add a lovely touch. The shape of the bralette is meant to be both supportive and flattering. It typically has a snug fit around the bust, with adjustable straps for comfort.

You can wear the crocheted bralette in many ways. It looks great as a top by itself during the summer or layered under a loose shirt, dress, or jacket for a casual, boho look. It's perfect for beach days, music festivals, or relaxed outings with friends. Many people also use these patterns to create gifts, as handmade clothes show care and thoughtfulness.
This project is great for beginners or anyone who loves to crochet because it doesn’t require complex stitches. If you enjoy crafting your own clothes and want to try something fun that helps express your personal style, these patterns are ideal. Plus, you can pick any color or yarn type to make your bralette truly unique and special.

Crochet Triangular Bralette – Step by Step Pattern
This easy, fully adjustable triangular bralette is the perfect introduction to wearable crochet. Designed in two pieces and joined at the base, it features decorative picot (peacock) edging and long ties for a custom fit around the neck and waist. It’s flattering, comfortable, and quick to construct. Change colors or add stripes for a custom look!
Skill Level & Terminology
- Skill Level: Confident Beginner
- Terminology: US Crochet Terms
You should be comfortable with magic ring, double crochet, slip stitch, foundation chains, and single crochet ribbing.
Materials & Tools
- Worsted weight or DK weight cotton yarn (100g – 150g for sizes S-M)
- 3.5mm – 4mm Crochet Hook (or size to obtain gauge)
- Scissors
- Yarn needle (for sewing/weaving in ends)
- Stitch marker (optional)
Gauge
- 7 dc x 4 rows = 2” x 2” (5 x 5 cm) with chosen hook after blocking
- Adjust hook size or tension as needed for your fit.
Abbreviations List
| Abbr. | Meaning |
|---|---|
| ch | chain |
| sc | single crochet |
| dc | double crochet |
| sl st | slip stitch |
| st(s) | stitch(es) |
| scbl | single crochet back loop |
| MR | magic ring/circle |
Special Stitch Instructions
- Magic Circle (MR):
Make a loop, insert hook, pull up a loop, ch 1 to secure, then crochet stitches into ring. - Picot Edging:
Ch 4, sl st into 1st ch made to form the “bump” at the edge. - Back Loop Only:
Work single crochet into the back strand of the stitch only, making ribbing.
Finished Size
- One size (fits S/M); to make larger or smaller, work more or fewer rows on the triangles, or increase foundation stitches for the ribbing.
- Each triangle: about 6–7” (15–18cm) tall after 12 rows.
- Band: approx. 2” tall
How to Start & Stitches Used
Begin with a magic circle for each bralette cup. The core of the design is built with double crochet increases at three points, creating a triangle. Side ribbing and ties use single crochet in back loops. Picots along the edge serve as both decoration and functional structure. Assembly is minimal—just join your finished triangles at the base with slip stitch.
Stitches You’ll Use:
- Double Crochet (dc)
- Single Crochet (sc)
- Slip Stitch (sl st)
- Chain (ch)
- Single Crochet Back Loop (scbl)
- Picot (ch 4, sl st in 1st ch)
The Pattern
Bra Cup (Make 2)
Row 1:
- Make a MR.
- Ch 2 (does not count as dc).
- Work 4 dc into ring.
- Ch 2 (creates first corner).
- 4 dc into ring.
- Ch 2, 4 dc into ring again. (You’ll have 12 dc, 3x [ch-2] corners)
- Pull ring tight to close.
- Ch 2, sl st to 1st dc to join.
End of Row 1.

You’ve now made the triangle’s base. All corners are created by (2 dc, ch 2, 2 dc) groups at each “point.”
Row 2:
- Ch 2 (does not count as dc).
- Dc in same st.
- Dc in next 3 dc.
- In ch-2 sp: 2 dc, ch 2, 2 dc.
- Dc in next 4 dc.
- Repeat [2 dc, ch 2, 2 dc] in next ch-2 sp.
- Dc in next 4 dc.
- Repeat [2 dc, ch 2, 2 dc] in last ch-2 sp.
- Sl st to 1st dc.

Rows 3–12:
Repeat Row 2 as follows:
- Ch 2 (does not count as dc), dc in same st and in each dc to ch-2 sp,
[2 dc, ch 2, 2 dc] in ch-2 sp (each tip), then continue dc in each dc, repeat for the next two sides, sl st to join. - Continue until you have 12 rows or reached desired cup size.
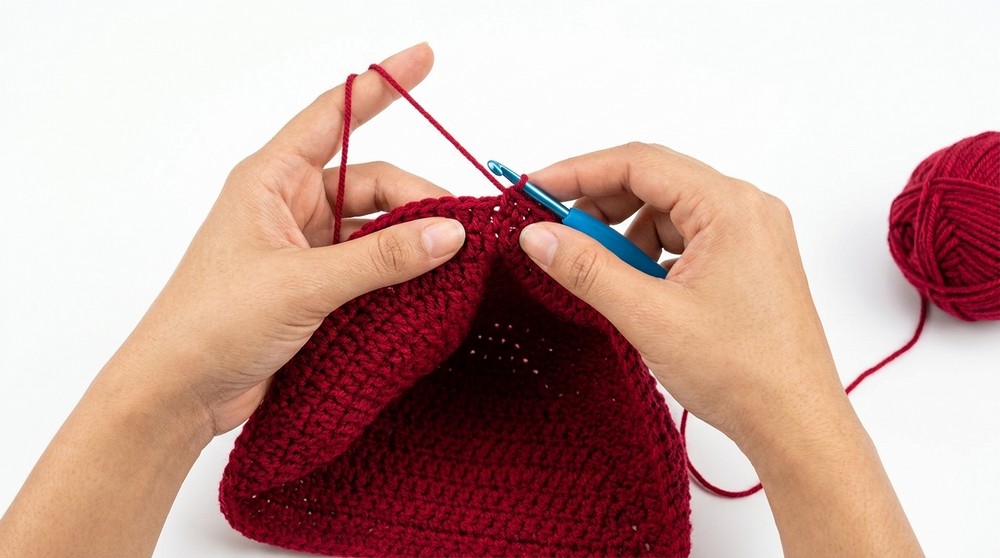
After 12 rows, you will have a large triangle cup. To alter the size, simply work more or fewer rows.
Fasten off.
Repeat for the second cup.
Picot Edging & Waist Ties
- Join yarn 4 sts after ch-2 sp (from a corner/tip of the triangle).
- Ch 1 to secure.
- Ch 4, sl st into same st (picot edge made).
- Sc in each of the next 3 sts.
- Repeat: [Ch 4, sl st in same st, sc in next 3 sts] around the triangle until you’re back to the start.
- When you reach a ch-2 sp, sc into ch-2 sp, ch 120 (waist tie), then continue picot edge as above along the next side.
- After finishing the chain, continue with [ch 4, sl st, and sc in next three] in each stitch (other triangle side).
- Repeat on each side: ch 120 for second tie at the opposite chain-2 sp.
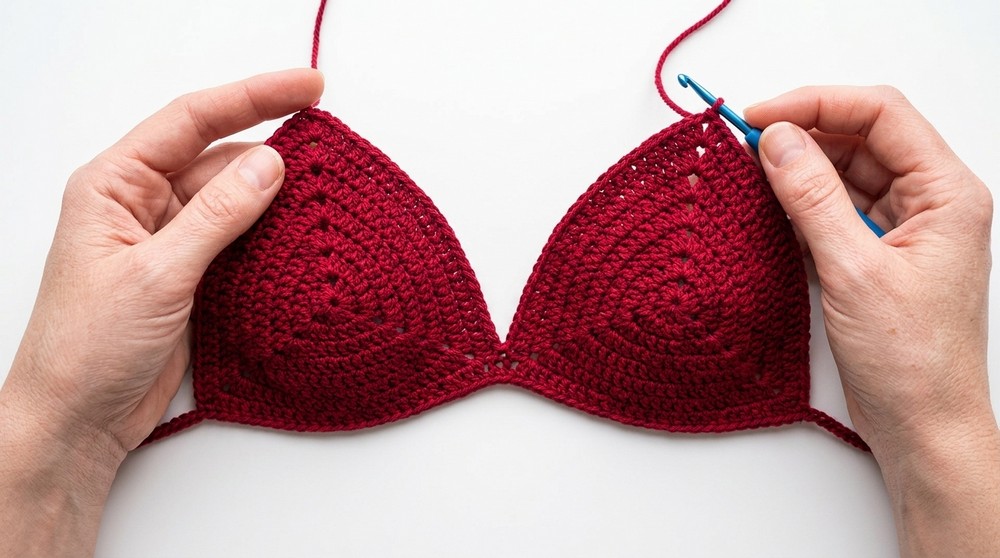
The picot and ties anchor your top and add a playful, lace-like edge.
Bottom Band/Ribbing
From the bottom edge,
- Starting at the last side, sc in next 7 sts along the lower edge (3 on one side of ch-2 sp, sc in ch-2 sp, 3 on other side of same ch-2 sp).
- Ch 1, turn.
- Work single crochet in BACK LOOP ONLY across 7 sts.
- Repeat Row (ch 1, turn, scBL across 7) for 27 rows (or until bottom band wraps comfortably around the underbust or half the cup).
- Fasten off.
- Repeat this ribbing for the second cup.
This band gives gentle stretch and a snug fit. Work more or fewer rows as needed for your body.
Assembly & Finishing
- Align two finished cups side-by-side.
- Join ribbing edges at base: With right sides facing, slip stitch or sew through back loops of both cups across the 27 band stitches to join securely.
- Weave in all yarn ends with a yarn needle.
- Block lightly, if preferred, for cup shape.
- When wearing, position joined band under bust, center seam at the bottom.
- Loop one picot tie over your neck/shoulders (these are the long chains at both corners of the bralette).
- Wrap lower ties around waist, securing with a bow or knot at the back.

The simple construction and easy assembly means this bralette is fast and highly customizable. You can tie the top in various ways for styling.
What Stitches Are Used in This Pattern?
- Magic Circle (MR)
- Double Crochet (dc)
- Picot (ch 4, sl st in 1st ch)
- Single Crochet (sc)
- Single Crochet Back Loop Only (scbl)
- Slip Stitch (sl st)

Leave a Reply