

Style your summer look with this free crochet halter crop top pattern that combines comfort and charm, offering a trendy addition to your handmade wardrobe.
Handmade items are always useful, and this crochet project is no exception. The free crochet halter crop top pattern creates a lightweight and breathable garment that’s perfect for warm weather. You can wear it to the beach, pair it with shorts for a casual day out, or layer it under jackets for a trendy look. Its versatility means it fits easily into various wardrobes and occasions.
Beautiful Crochet Halter Crop Top Pattern
This crop top features a delicate open stitch pattern that gives it an airy texture while maintaining just the right amount of coverage. The halter neckline adds a stylish and flattering touch, while the cropped length lends a youthful and fun vibe. Its shape gently hugs the upper body, and the simple yet elegant design makes it a standout piece for summer.

Constructed mainly using double crochet stitches combined with chain spaces, the project is worked from the bottom up, shaping the fabric to fit comfortably with increases and decreases. It’s suitable for beginners and those with some crochet experience, offering a chance to practice basic garment techniques without complexity.
Beyond being a practical addition to your wardrobe, this handmade halter crop top also makes a thoughtful, personalized gift. It’s wearable art that combines comfort with style and shows the care and creativity put into its making. If you want a fun, easy project that results in a useful and fashionable item, this pattern is a great fit for you.

Crocheted Summer Halter Top – Step-by-Step Pattern
Welcome to this easy and classic crochet summer halter top pattern! This top is worked flat in alternating double crochet and single crochet rows, with shaping achieved through simple decreases and skipped stitches. The final design features a structured front, a pretty shell edging at the neckline, and secure straps for both the neck and back. This pattern provides sizing instructions for a small (S), but chaining more or fewer stitches at the start will let you customize to your perfect fit.
Skill Level & Terminology
- Skill Level: Confident Beginner/Easy
- Terminology: US Crochet Terms
This pattern is approachable for beginners who are comfortable with the basic stitches and a few simple decreases. All stitches and techniques are clearly explained.
Materials & Tools
- Yarn: Light worsted or DK weight, approx. 100–150g (depends on length and size; the sample uses about 90 chains for the foundation for a size small).
- Hook: 3.5 mm crochet hook (or size needed to achieve gauge)
- Notions: Tape measure, scissors, yarn needle for weaving in ends.
Gauge
- 4" x 4" (10 x 10 cm) square: 16 stitches x 10 rows in double crochet (after gentle blocking).
- Note: For best fit, check your gauge and adjust hook size as needed before starting.
Abbreviations List
- ch – chain
- sc – single crochet
- dc – double crochet
- sl st – slip stitch
- st – stitch
- dec – decrease (see special stitch instructions)
- sk – skip
Special Stitch Instructions
Double Crochet Decrease (dc2tog):
- Yarn over, insert hook into first stitch, yarn over, pull up loop (3 loops on hook), yarn over, pull through 2 (2 loops remain), yarn over, insert hook into next stitch, yarn over, pull up loop (4 loops on hook), yarn over, pull through 2 (3 loops remain), yarn over, pull through all three loops.
Shell:
- [2 dc, ch 1, 2 dc] in the same stitch.
Finished Size
- Width: 22 inches (56 cm) at the chest (unstretched, fits most Small sizes)
- Length: Approx. 9.5 inches (24 cm) from neckline to hem
- Straps: Each neck strap ~80 ch, back strap ~200 ch
- Pattern is easily adjustable by altering initial chain or row counts.
The Pattern
Foundation Chain
- Ch 90 (or to desired chest width; stretch gently to check).
- You can increase or decrease chain count for other sizes, keeping even tension.
For beginners: To start this project, you will crochet a base chain that fits the width across your bust or underbust. You can adjust this by measuring yourself or using a tape measure.
Body Rows
- Row 1:
- Dc in 3rd ch from hook and in each ch across (88 dc).
- Turn your work.
- You have created your base fabric. This row gives stability and length to the top.
Repeat Decrease and Alternating Row Section:
- Row 2 (Decrease Row):
- Ch 2 (counts as first dc).
- Dc2tog (next two sts).
- Dc in each st across until 3 sts remain.
- Dc2tog (next two sts).
- Dc in last st.
- Turn.
- Row 3 (Single Crochet Shaping):
- Ch 1, turn.
- Sk first st.
- Sc in each st across to last st.
- Sk last st.
- Turn.
- Row 4:
- *Ch 2 (counts as dc), dc2tog next two sts, dc in each until 3 sts remain, dc2tog next two sts, dc in last st. Turn.
- Row 5:
- *Ch 1, sk first st, sc in each st to last st, sk last st, turn.
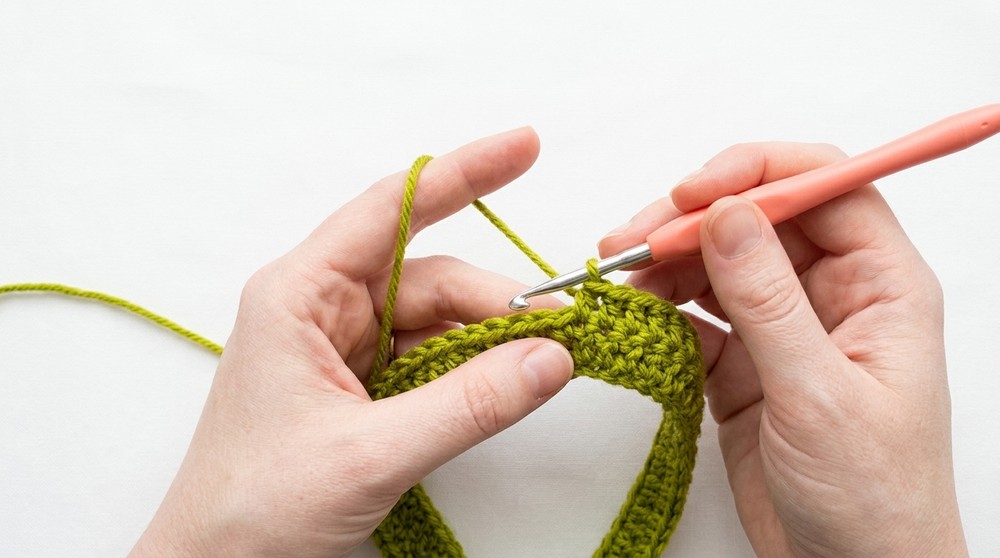

Continue alternating rows of double crochet with decreases at both ends, and rows of single crochet skipping the first and last stitch, until you have made 32 rows total (or desired length; piece measures about 9.5 inches in sample).
This creates a gentle trapeze shaping that fits closely at the bust and tapers at the top.
Pattern Note:
- Always begin double crochet rows with a chain 2, then decrease. End with a dc2tog and finish with a dc.
- For single crochet rows, always skip the first and last stitch to maintain shaping.
After 32 rows or your desired length, you will notice the top taking on a classic halter shape with tapered sides. If you do not wish to count rows, simply continue the established decrease pattern until you're happy with the length.
Neck Straps and Shell Edging
- Neck Strap:
- From the last row, ch 80 (for each strap; adjust length as preferred).
- Sc in each ch back to starting edge.
Straps will allow you to tie the halter behind your neck for a secure and adjustable fit.
- Shell Edging at Neckline:
- From end of first strap, sl st to next st at the top edge.
- *Sk 2 sts, (2 dc, ch 1, 2 dc) in next st (shell made), sk 2 sts, sl st in next st; repeat from * across the neckline.
- Continue across the tapered edge until you reach the point for the second strap.
- Second Strap:
- Ch 80, sc back along chain.
- Fasten off.


This decorates the neckline with simple shells and integrates the straps in the same round for a clean finish.
After this step, the front of your top is fully edged with shells and equipped with two neck straps!
Back Strap
- Back Strap:
- At the hem, attach yarn to fifth row of double crochet on one underarm edge.
- Ch 200 (adjust for your fit), then weave/crochet through to opposite side, attaching at fifth row of double crochet.
- Fasten off and weave in all ends.
This creates an adjustable corset-style or tie-back for a flexible fit and secure closure.
Assembly & Finishing
- Weave in all loose yarn ends using the yarn needle.
- Lightly block the top if desired to smooth out the fabric and align the shells.
- Adjust strap lengths to your comfort and tie securely behind neck and back.
- If desired, add tassels or beads to strap ends for extra style.

About the Pattern
This top begins with a foundation chain that fits your bust; you then alternate between rows of double crochet (with decreases at both edges) and single crochet (skipping the first and last stitch) to create shaping. The shell stitch edge and crocheted straps are added seamlessly as you work the neckline, followed by a long, adjustable back strap.
What Stitches Are Used in This Pattern?
- Double Crochet (dc): For foundation and shaping rows.
- Single Crochet (sc): For shaping and structure.
- Slip Stitch (sl st): For joining and neckline shells.
- Chain (ch): For foundation, straps, and shell edge.
- Double Crochet Two-Together (dc2tog): For decrease shaping.
- Shell Stitch: Used in the neckline edge for a delicate feminine look.

Leave a Reply