

Create beautiful holiday decor with a Crochet Christmas Tree Pattern that is perfect for adding warmth and creativity to your festive celebrations.
A cute little decoration can make any room happy during Christmas. A Crochet Christmas Tree is a soft, small tree made with yarn. It looks like a green tree with tiny colorful balls and a star on top. You can make it big or small and put it on a table, shelf, or hang it on a real Christmas tree.
Beautiful Crochet Christmas Tree Pattern for Cozy Festive Decor
The tree is soft and squishy because it is made from yarn. You can use your favorite colors like green, white, blue, or even rainbow! You can also add pretty beads or buttons as decorations to make it shine.
To make the tree, a simple stitch called single crochet is used. This stitch keeps the tree strong and in shape. You can make it taller with more rows or add branches by making small triangles and joining them.

Crochet Christmas Trees can be used in many ways. You can use them as table decorations, gifts for friends and family, ornaments to hang on your big Christmas tree, or even as keychains or toys. They make your home look festive and bring happy feelings during the holidays.
Kids love them because they are soft and safe to play with, and adults enjoy their pretty, handmade look. You can also make many trees to create a cute, small forest for your holiday decorations.
In short, a cute Crochet Christmas Tree is a soft, colorful decoration that can be any size. It’s easy to make, fun to use, and brings Christmas happiness to your home.
Crochet Christmas Tree Ornament Pattern
Bring the joy of handmade holiday décor into your home with this delightful Crochet Christmas Tree Ornament! This quick, beginner-friendly project will add warmth and festive cheer to your celebrations. Perfect for tree trimming, adorning gifts, or brightening up your windows, this charming ornament is a creative way to use up yarn scraps and personalize your holiday decorations. Follow this comprehensive step-by-step pattern and create your very own crochet tree ornament, complete with a wooden bead trunk, sturdy pick, and hanging cord.

Quick Overview Of Pattern
- Project Structure: Worked flat in a single strip, then shaped into a tree and secured on a pick with a bead base and attached hanging cord.
- Construction Style: Crochet a foundation chain; first section slip stitches for fine tip, then single crochets for the body, finished with half double crochets for the tree’s base. The strip is then folded and assembled into a tiered tree shape.
- Fit & Silhouette: The result is a spiral, tiered miniature Christmas tree—sturdy and easy to hang.
- Time Required: Under an hour for most crafters.
- Customization: Personalize with color, add beads, sequins, or bows for extra charm!
Notes
- The project is worked as a long foundation chain and a single return row with different stitches to create natural shaping.
- Tension is not critical; adjustments in size can be made by changing yarn weight or hook size.
- Be creative with leftover yarns for a unique look.
- Quick to make, ideal for gifts or decorations.
- This pattern is written in U.S. crochet terminology.
Skill Level
Beginner–Easy: Basic understanding of crochet stitches (slip stitch, single crochet, half double crochet), chaining, and working into chains. Suitable for all skill levels, including advanced beginners.
Materials
- Yarn: Small amount of #4 medium weight yarn in your chosen color (green is classic)
- Crochet Hook: 5.0 mm
- Notions:
- 1 wooden bead (for the tree trunk)
- 1 sturdy plastic, sandwich, or bamboo pick (about 4" / 10cm)
- Hot glue gun (for attaching bead)
- Scissors
- Hanging cord or ribbon (for the loop)
Measurements / Sizing
- Tree Height: ~4–5" / 10–12 cm (excluding hanging loop)
- Tree Width: Varies with how you fold/assemble, approx. 3–3.5"/8cm at widest
Gauge
- Gauge is not critical for this project. Keeping stitches even will help the final ornament keep its shape and appear neat.
Stitch Abbreviations
- MR – Magic Ring
- ch – Chain
- sl st – Slip Stitch
- sc – Single Crochet
- hdc – Half Double Crochet
Special Stitches
- No special or advanced stitches required.
- All stitches are explained in the pattern steps below.
1. Foundation Chain
- Step 1: Begin with a slip knot.
- Step 2: Ch 110.
This will be the only row of your tree. Take care not to twist your chain.
2. Row 1
- Slip Stitches:
- Begin in the second chain from your hook.
- Sl st in each of the next 10 ch. (This shapes the narrow tip of the tree.)
- Single Crochets:
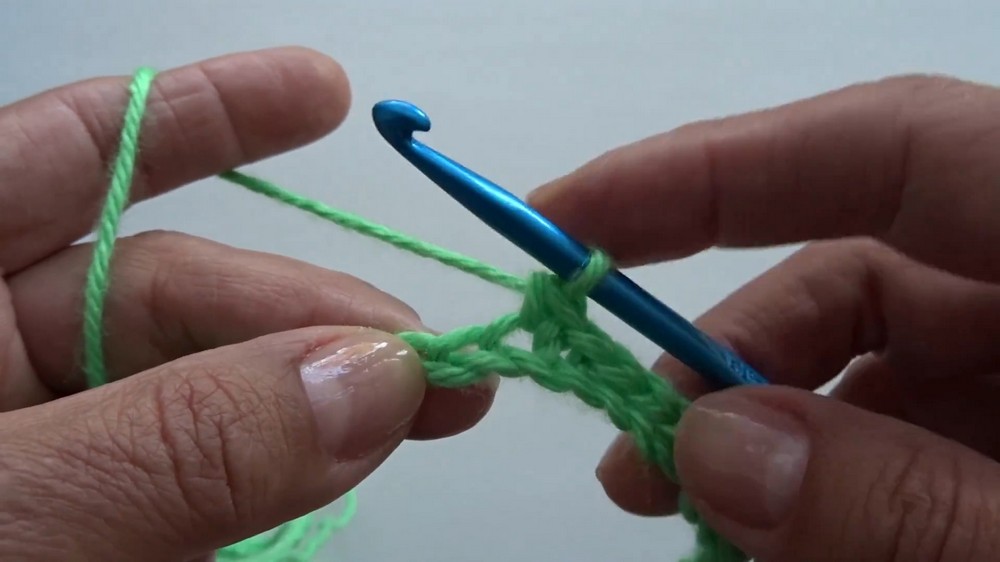
- Sc in each of the next 80 ch.
Insert your hook into the next chain, yarn over, pull through, yarn over, pull through both loops. - After working 80 sc, you’re near the broader base of the tree.
- Half Double Crochets:
- Hdc in each of the last 19 ch.
Yarn over, insert hook into ch, yarn over, pull through, yarn over, pull through all three loops on hook. - If you have a chain or two more or less, that’s fine—consistency is less important than the look.
- When you finish the last hdc, ch 1, and cut the yarn, leaving a tail to weave in.
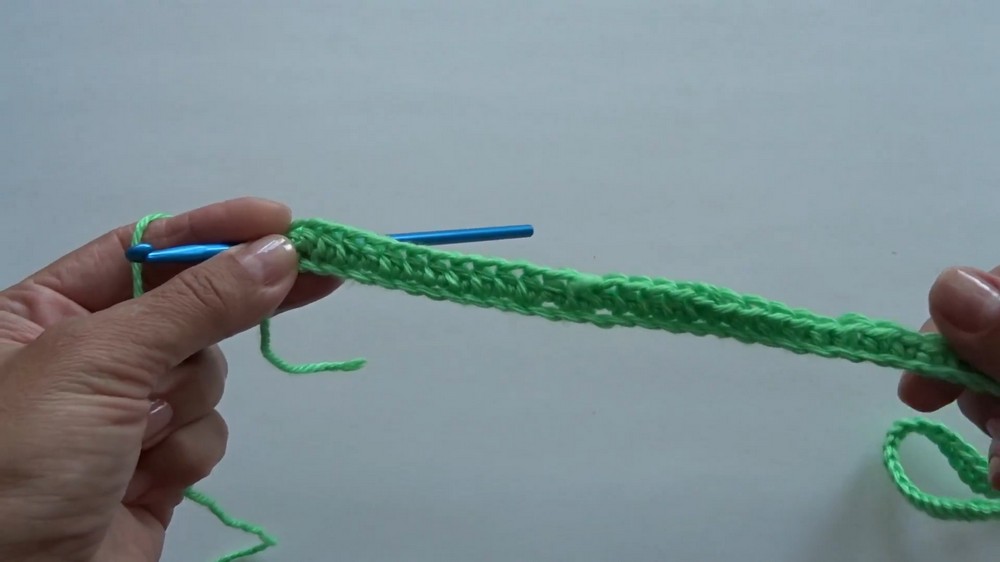
Your strip should measure about 22–24 inches (56–61 cm).
3. Assembly & Shaping
Forming the Tree Shape
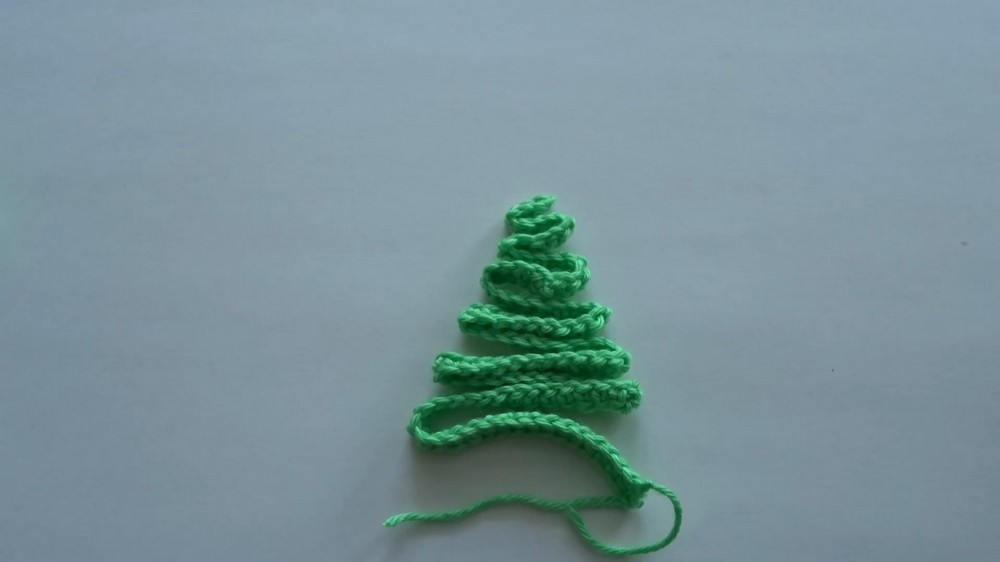
- Step 1: Place the strand with the slip stitches at the top (tree tip), hdc stitches at the bottom (tree base).
- Step 2: Begin folding your strip back and forth in layered rows (like a ribbon tree), with each new row slightly longer than the one above it.
- Step 3: Adjust rows so you get the classic Christmas tree triangular look—shortest at the top, longest at the bottom.
- Step 4: Play with the folds to create even layers and a pleasing silhouette.
4. Inserting the Pick
- Step 1: Use any plastic, sandwich, or bamboo pick (around 4 inches).
- Step 2: From the top (tree tip), insert the pick down through the center, “threading” it through each layer of the tree.
- Step 3: Try to poke through all layers as symmetrically as possible. Adjust so the pick is well-centered.
5. Attaching the Bead (Tree Trunk)
- Step 1: Grab your wooden bead.
- Step 2: Place a bit of hot glue around the center opening of the bead.
- Step 3: Slide the bottom end of the pick into the bead’s hole so that the bead sits snugly on the tree base and the end of the pick is hidden inside the bead.
- Step 4: Hold and let the glue cool/harden. For extra security, add another dab of glue on the other side where the pick meets the bead.
6. Hiding Yarn Tails
- Step 1: Bring both yarn tails (the ends from where you started and finished crocheting) up to the top back of the tree.
- Step 2: Using your hook, insert through the top layer behind your last row/fold and pull one tail to the back. Repeat for the second tail on the other side.
- Step 3: Once both tails are at the back or top, knot them together tightly to secure the tree shape.
- Step 4: Trim excess yarn.
7. Adding the Hanging Cord
- Step 1: Cut a length of decorative cord or ribbon. (6–8 inches is a good starting length.)
- Step 2: Tie the ends into a tight knot to form a loop.
- Step 3: Attach the cord loop securely to the tree tip. You can do this by tying through the slip stitch tip or using your crochet hook to pull the loop through.
- Step 4: To hide the knot, create a decorative bow or tuck the knot under a layer.
- Step 5: Adjust your hanging loop to the desired size.
Assembly & Finished Size
- Fluff and adjust layers for evenness.
- Use the pick for structure; bead forms a neat base for your “tree trunk.”
- Hanging loop makes it easy to display on a branch or attach to a gift.
Approximate Size: 4–5" / 10–12 cm tall
Width: 3–3.5" / 7–8 cm at base

Conclusion and Ending Words
Congratulations! You’ve created a charming crochet Christmas tree ornament that’s perfect for adding a handmade touch to your festive celebrations. This pattern is great for using up leftover yarn and can be customized with beads, ribbons, or sparkly yarns to suit your style. Display your adorable trees on the Christmas tree, use them as gift toppers, or gift them to family and friends for a special handmade treat.
Thank you for joining in on this creative holiday project—may your season be merry, bright, and filled with the warmth of handmade crafts!




Leave a Reply