

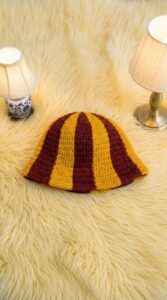
Polish your look with a Prada-inspired crochet bucket hat, combining high-fashion elegance with trendy, artistic flair in one standout accessory.
A well-chosen accessory can elevate any outfit, and the Prada-inspired crochet bucket hat does just that with ease. This stylish piece combines comfort and function, offering lightweight breathability while protecting you from the sun. Its intricate crochet design brings texture and individuality, making it a versatile addition to both casual and semi-formal looks. From beach outings to a relaxed city vibe, this hat adapts effortlessly to different occasions.
Trending Crochet Bucket Hat Pattern You Can Make

Beyond aesthetics, its practicality shines through. The hat provides ample coverage to shield your face on sunny days without feeling heavy or stuffy, and its durable, soft material ensures it holds up for repeated use. It’s more than a fashion statement its functionality makes it a reliable piece in any accessory collection.
What truly sets this hat apart is its alignment with the growing trend of sustainable, timeless fashion. Its handmade charm and thoughtful design mean you’re investing in quality that lasts. Whether you’re dressing up an everyday ensemble or adding a polished touch to your vacation wardrobe, this crochet bucket hat makes a statement of creativity, versatility, and style in a single accessory.
Introduction
The Prada-inspired crochet bucket hat is an elegant and functional accessory. It is perfect for beginners due to its simple pattern structure and repetitive stitches. This guide outlines the step-by-step process for creating this stylish bucket hat. We'll focus on key techniques like creating chains, double crochet (DC), half-double crochet (HDC), and increasing stitches. The final result is a customizable hat that can be adapted to a range of sizes and color combinations.
Materials Needed:
- Tools:
- Tape measure
- Scissors
- Crochet hook (4.25 mm)
- Tapestry/turning needle
- Stitch markers
- Yarn:
- Number 4 medium-weight yarn.
- Acrylic yarn is also an option for increased texture and sturdiness.
You can use your favorite colors—natural tones or even vibrant patterns—for personality.

Step-by-Step Instructions
1. Creating the Foundation Ring
- Start with a slip knot.
- Chain 4 to form a foundation ring.
- Join the last chain to the first using a slip stitch. This forms the initial ring.

2. Round 1: Establish the Base Stitches
- Chain 2 (does not count as a stitch).
- Create 12 double crochets (DC) into the ring.
- Use a stitch marker on the first DC for reference.
- Slip stitch into the first DC to close the round.
3. Round 2: Double Crochet Increase
- Start with chain 2.
- Create 2 DC in each stitch around the ring.
- This doubles the stitch count from 12 to 24 stitches.
- Slip stitch to the first DC to complete this round.
4. Round 3: Introduce Alternating Increase
- Chain 2 and create:
- 1 DC in the first stitch.
- 2 DC in the next stitch (increase).
- Repeat the pattern: 1 DC, 1 increase until the end.
- Total stitches: 36 DC.
- Join the last DC to the first with a slip stitch.
5. Round 4: Wider Increase Pattern
- Chain 2 and create:
- 1 DC in each of the next 2 stitches, then increase (2 DC in the same stitch).
- Repeat this pattern: 1 DC, 1 DC, increase around the ring.
- Total stitches: 48 DC.
- Slip stitch to join.

6. Rounds 5-6: Continue Increasing
Round 5:
- Pattern: 1 DC in each of the next 3 stitches, then increase.
- Total stitches: 60 DC.
Round 6:
- Pattern: 1 DC in each of the next 4 stitches, then increase.
- Total stitches: 72 DC.
7. Round 7: Half Double Crochet (HDC Transition)
- Work half double crochets (HDC) instead of DC stitches for this round to adjust the hat size.
- Pattern: 1 HDC in each of the next 5 stitches, then increase.
- Total stitches: 84 HDC.
Note: If you'd like a larger hat, continue using double crochet stitches instead of HDC for this round.
8. Round 8: Back Loop Only HDC
- Chain 1 and work HDC into the back loop only in every stitch.
- Repeat for all 84 stitches.
- This creates a distinct boundary to separate the crown from the sides.
9. Round 9-14: Create the Triangle Pattern
Round 9:
- Chain 4 and turn.
- Skip the next stitch, then work 1 DC in the next stitch.
- Pattern: Chain 1, Skip 1, 1 DC in the next stitch around the hat.
Round 10:
- Mark the 17th chain space as the starting point for the triangle pattern.
- Begin creating triangular shapes by working 1 DC directly into adjacent chain spaces, narrowing with each round.
Rounds 11-14:
- Continue the triangular section by decreasing the stitch count in each round until the triangular portion completes.

10. Rounds 15-18: Final Adjustment and Brim
- For Round 15, switch to front loop stitches and begin building the brim:
- Pattern: 1 DC in the next 5 stitches, then increase.
- From Rounds 16-18, transition to working 1 DC in each stitch, no increases, to build out the brim evenly.
11. Round 19: Finishing Touches
- Finish the hat with a round of single crochet stitches in every stitch.
- Slip stitch into the first single crochet and cut the yarn.

Conclusion
Your Prada-inspired crochet bucket hat is now complete! You can personalize it by using different yarn colors or adding embellishments like a logo, ribbon, or beads. The hat combines style and practicality, making it an excellent choice for both warm and cool weather, as well as a perfect project for crochet beginners.

Leave a Reply