

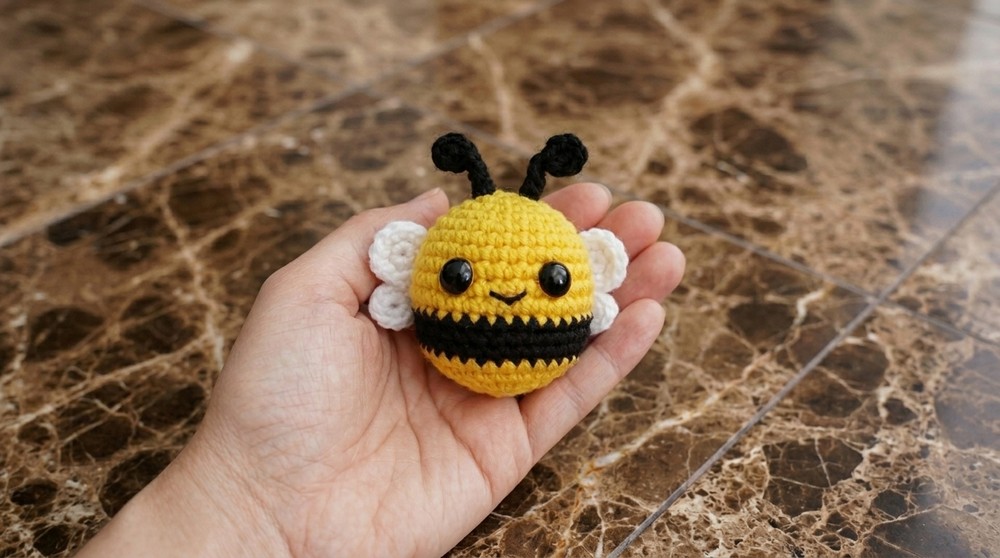
Make a cute little crochet bee with this free and simple amigurumi pattern that is easy to follow and fun to make for everyone.
Sometimes, making amigurumi can feel hard, but the free crochet bee pattern is easy and fun for anyone to try. This cute little bee has bright black and yellow stripes and small wings that make it look friendly. The stitches are tight, so the bee feels soft but stays firm and keeps its shape well.
The style is simple and sweet, perfect for beginners or anyone who wants a quick project. You can make the bee bigger or smaller by using different yarns or hook sizes. A small bee can be a nice keychain, and a bigger one looks great on a shelf or in a baby’s room. The bee is made mostly by crocheting in circles, using simple single crochet stitches.
Mini Free Crochet Bee Amigurumi Pattern For Decor

I designed this bee to remind us of how important and busy real bees are. Using smooth yarn like cotton or acrylic helps the colors stand out and keeps the bee looking neat without any fuzz.
This little bee is a lovely gift idea for birthdays, baby showers, or springtime. You can also make it special by adding little details like antennae or a tiny flower. Have fun making this sweet little bee and enjoy bringing it to life!
Crochet Honeybee Amigurumi Pattern – Beginner Friendly
Pattern Notes
- Worked in continuous rounds primarily using single crochet (sc).
- Color changes are integral: yellow for the top and bottom parts of the body, black for the middle stripe, white for the wings, and black for antennae.
- Includes wire insertion in antenna for stiffness (optional).
- Eyes are attached using 8 mm safety eyes.
- Smile is embroidered with black cotton thread.
- Requires attention to stitch counts and use of stitch markers to mark rounds.
- Assembly involves attaching antennae and wings neatly with a sewing needle.
- Pull tight the magic ring to close openings properly.
- Crochet with medium tension for firm amigurumi shape.
- Recommended to watch full tutorial video to avoid missing any stitch.
Skill Level
Beginner to Intermediate
Prerequisites:
- Magic ring (MR) technique
- Single crochet (sc)
- Increasing and decreasing single crochet stitches (inc, dec)
- Color change in rounds
- Basic embroidery for smile
- Simple sewing and attachment
- Use of stitch markers
Materials
- Medium-weight yarn in:
- Yellow (top and bottom of body)
- Black (middle body and antennae)
- White (wings)
- 0.4 mm thick wire (approx 9 cm, optional) for antenna stiffness
- 8 mm safety eyes
- Black cotton thread for smile embroidery
- Swing needle for sewing and embroidery
- 5 mm crochet hook
- Yarn needle
- Scissors
- Stitch markers

Measurements / Sizing
- Finished honeybee size: approximately 4–5 inches long (body length).
- Wingspan about 3–4 inches wide.
- Size may vary according to yarn and tension.
Gauge
- Not critical for amigurumi but roughly 21 single crochets = 4 inches.
- Use suitable tension to achieve firm fabric maintaining shape.
Stitch Abbreviations
| Abbreviation | Description |
|---|---|
| ch | chain |
| sc | single crochet |
| inc | increase - 2 sc in one stitch |
| dec | decrease - single crochet 2 sts together |
| sl st | slip stitch |
| MR | magic ring |
| st(s) | stitch(es) |
Special Stitches
- Magic Ring (MR): Adjustable loop that allows working the first round of stitches tightly in a ring.
- Increasing (inc): Work two single crochets in one stitch to widen round.
- Decreasing (dec): Crochet two stitches together to reduce stitch count and shape.
The Crochet Pattern
Antennae (Make 2)
- Cut a 9 cm length of 0.4 mm wire (optional for stiffness).
- Make a magic ring with black yarn.
- Chain 1; pass the wire through this first chain.
- Work 5 single crochets into the magic ring around the wire (do not count the chain as sc).
- Tighten the magic ring to close opening. Adjust wire ends so they are equal.
- Join last stitch to the first with a slip stitch.
- Turn work and, starting from the side with the wire, sc 5 stitches, pulling loop through both layers (crochet around wire).
- Make 4 sc stitches using this technique.
- Fasten off leaving a long loop to attach antenna later.
- Repeat to make the second antenna.

Body and Head Construction
All body and head rounds are worked continuously in rounds unless otherwise noted. Attach stitch marker at the start of each round for tracking.
Round 1
- Start with a yellow magic ring.
- Chain 1, then work 6 sc into the ring.
- Do not join with slip stitch; continue rounds in spiral.
Round 2
- Sc in same stitch as joining chain — counts as first sc of round.
- Inc (2 sc) in each stitch around (total 12 sc).
- Place stitch marker on first sc.
Round 3
- (1 sc, inc) — repeat six times around for 18 sts.
- Move stitch marker to first sc.

Round 4
- (1 sc, inc, 1 sc) — repeat six times (24 sts).
Round 5
- (3 sc, inc) — repeat six times (30 sts).
Attach Antennae at Rounds 2 and 3
- Pull the antenna loops through stitches of rounds 2 and 3.
- Knot and tighten wires securely.
Continue Body Rounds
Round 6
- Sc in each stitch around (30 sts).
Round 7
- Sc in each stitch around (30 sts).
Round 8
- (2 sc, inc, 2 sc) — repeat six times (36 sts).
Round 9 & 10
- Sc in each stitch around (36 sts).
Change to Black Yarn (Middle Stripe)Round 11
- Sc in each stitch around (36 sts).
Begin Decreasing
Round 12
- (2 sc, dec, 2 sc) — repeat six times (30 sts).
Round 13
- Sc in each stitch around (30 sts).
Change to Yellow Yarn (Bottom Part)
Round 14
- Sc in each stitch around (30 sts).
Round 15
- (3 sc, dec) — repeat six times (24 sts).

Round 16
- (1 sc, dec, 1 sc) — repeat six times (18 sts).
Stuff the Body Firmly
- Before closing the final rounds, stuff amigurumi firmly with fiberfill to hold shape.
Final Decreases and Closing
Round 17
- (1 sc, dec) — repeat six times (12 sts).
Round 18
- Dec six times around (6 sts).
- Join with slip stitch and fasten off, cut yarn leaving a long tail.
- Use swing needle to pull yarn through last stitches; pull tightly to close.
Attach Safety Eyes
- Attach 8 mm safety eyes between rounds 8 and 9.
- Place first eye, then count five stitches and place second eye; eyes should be 5 stitches apart.

Embroider Smile
- Using black cotton thread and embroidery needle, stitch a small smile below eyes.Wings (Make 2 Large, 2 Small)
Small Wings
- Magic ring with white yarn.
- Chain 1, work 8 sc in magic ring.
- Tighten ring and join with slip stitch.
- Chain 1, sc in next stitch.
- Fasten off leaving a loop to sew wings.
- Make a second small wing identically.
Large Wings
- Magic ring with white yarn.
- Chain 1, work 6 sc in magic ring.
- Tighten ring and join with slip stitch.
- Chain 1, work 2 sc in same stitch (increase).
- Make 1 sc in each of next 5 stitches (12 sts total).
- Fasten off leaving loop for joining.
- Repeat for the second large wing.
Attach Wings
- Attach the two large wings between rounds 7 and 8 on each side using swing needle and yarn loop.
- Attach two small wings between rounds 8 and 9 on each side symmetrically.
Assembly & Finished Size
- Antennae wires inserted through rounds 2 and 3, knotted tightly.
- Safety eyes securely attached between rounds 8 and 9, spaced 5 stitches apart.
- Smile embroidered neatly below eyes.
- Wings attached on either side as specified.
- Body firmly stuffed with fiberfill to maintain shape.
- Finished honeybee approximately 4–5 inches long by 3–4 inches wingspan.
- Stitch markers used throughout for accurate round tracking.
- Tail ends woven and secured for neat finish.
Quick Overview of Pattern
This pattern provides a comprehensive, beginner-friendly, step-by-step guide to crochet an adorable honeybee amigurumi. You will learn to create the honeybee’s body, wings, and antennae, completing this charming miniature suitable for gifts, decorations, or collectibles. The pattern emphasizes clear stitch instructions, color changes, and assembly tips, ensuring even first-time crocheters can successfully master this project.
Final Notes
This honeybee amigurumi, designed with careful color changes and structured shaping, results in a charming and sturdy piece perfect for beginner crocheters wishing to advance to amigurumi techniques. For best results, follow the video tutorial alongside this pattern, ensuring every stitch and round is accounted for.

Leave a Reply