

Add fun in your collection by using this free crochet teddy bear pattern with simple instructions, making soft and charming toys everyone will adore.
Making a soft and cuddly toy is always a fun and rewarding project. This free crochet teddy bear pattern is a perfect way to create a sweet handmade friend that can bring comfort and joy. With a few simple tweaks like adjusting the yarn colors or adding little details, you can also create other stuffed animals like bunnies, puppies, or even little monsters, making this pattern really versatile for various creative ideas.
Free Teddy Bear Crochet Pattern With Cute Details
The teddy bear made from this pattern is adorable and charming. It has a round head, plump body, and little ears that give it a classic teddy bear look. The texture is soft and smooth, perfect for snuggling, thanks to the close, tight crochet stitches. The shape is well-defined and balanced, making the bear sturdy but huggable. Simple facial features like button eyes and an embroidered nose add to its sweet style, with the option to dress it up with scarves or hats to match different seasons or moods. This teddy bear stands out because of its lovable appearance and high-quality handmade feel.
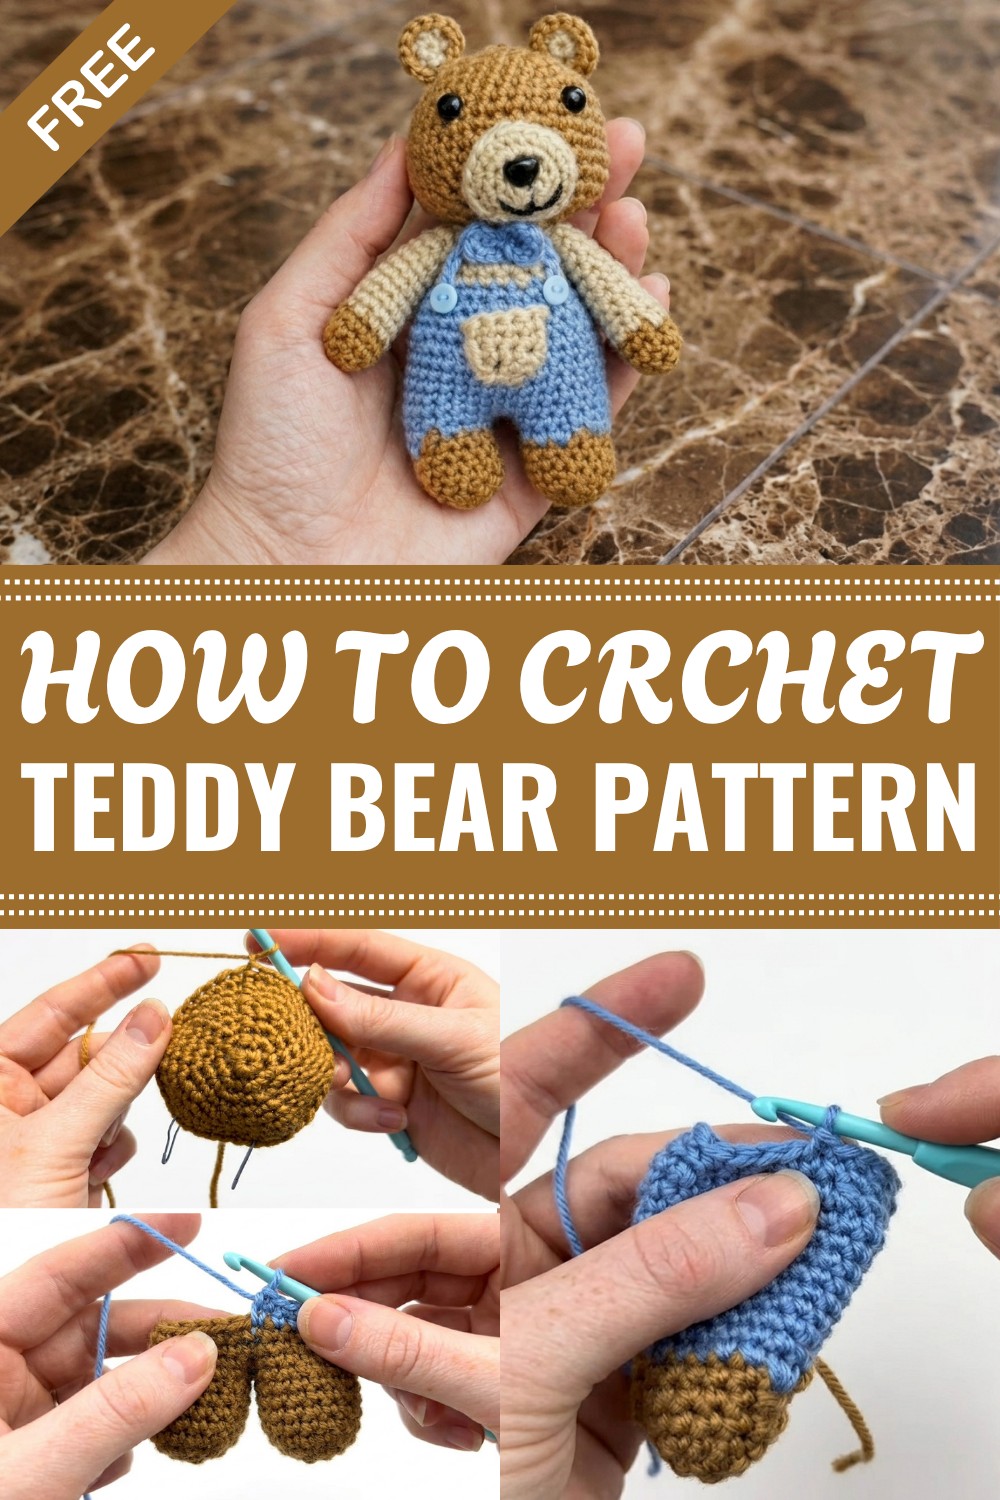
This project is great for beginners or those with some basic crochet experience. The main stitch used is single crochet, worked mostly in rounds. This helps keep the shape even and firm while making it easy to follow along. Working in rounds also builds skills that are useful for many other crochet amigurumi projects.
This free crochet teddy bear pattern creates a wonderful gift for children or anyone who loves cute handmade toys. It’s also a great decoration for nurseries or a collectible for crochet lovers. If you enjoy simple, heartwarming projects that result in something special, this teddy bear is a perfect choice to try. It’s fun, easy, and sure to bring smiles wherever it goes.

Pattern Notes
- This pattern is worked in continuous rounds unless otherwise stated. Use a stitch marker to track the beginning of each round.
- The teddy bear’s features (eyes, nose, arms) are securely sewn or fastened using provided safety pieces for durability.
- Color changes are incorporated smoothly to create distinct parts such as ears, nose, and clothing.
- Assembly instructions ensure your pieces are joined tightly with well-hidden seams.
- Optional modifications can make your bear unique; feel free to customize colors and facial expressions.

Unique Teddy Bear Crochet Kit by Loops & Threads
Skill Level
Intermediate Beginner / Easy Intermediate
Basic crochet knowledge required: single crochet (sc), slip stitch (sl st), chain (ch), increase, decrease, magic ring (circle).
Materials
- Loops & Threads Teddy Bear Crochet Kit (includes yarn colors and crochet hook)
- Tapestry needle for sewing pieces together and embroidery
- Stitch markers (or scrap yarn/thread)
- Fiberfill stuffing
- Safety eyes and nose pieces included in the kit
- Scissors
Measurements / Finished Size
- Height: Approximately 10 inches (25 cm) tall when assembled
- Head diameter: ~4 inches (10 cm) at widest point
- Body width: ~3.5 inches (9 cm)
- Leg length: ~3.5 inches (9 cm)
- Note: Finished size varies slightly depending on individual tension
Gauge
Not critical for this pattern due to amigurumi construction; however:
- Approximately 12 sc stitches = 2 inches (5 cm)
- Row height: ~1 inch (2.5 cm)
Make sure to keep a tight gauge to maintain bear’s structure and prevent stuffing from showing.
Stitch Abbreviations
- ch = chain
- sc = single crochet
- sl st = slip stitch
- inc = increase (2 sc in same stitch)
- dec = decrease (sc two stitches together)
- MR = magic ring (magic circle)
Special Stitches
Magic Ring (MR):
Wrap yarn over first two fingers to form an “X,” insert hook under the first loop, over the second, yarn over, pull through, yarn over again and pull through loop on hook. Pull tail to close ring tightly.
Crochet Pattern
Head
- Round 1: Using brown yarn, create MR and work 6 sc inside the ring. Pull the tail tight to close.
- Slip stitch to first sc.
- Round 2: Ch 1, 2 sc in each stitch around — 12 sts. Place stitch marker after first two sc of this round.
- Slip stitch to join, ch 1.
- Round 3: 1 sc, 2 sc in next st repeat around — 18 sts. Place stitch marker on the first single crochet of the round.
- Slip stitch to join, ch 1.
- Round 4: 2 sc, inc repeat around — 24 sts.
- Join, ch 1.
- Round 5: 3 sc, inc repeat around — 30 sts.
- Slip stitch, ch 1.
- Round 6: 4 sc, inc repeat around — 36 sts.
- Slip stitch, ch 1.
- Round 7: 1 sc in each st around — 36 sts.
- Slip stitch, ch 1.
- Round 8: 14 sc (this row is where eyes are placed, mark the 14th stitch for eye placement).
- Place safety eyes at marked positions.
- 6 sc, place another stitch marker at 6th stitch after eye row.
- 16 sc, slip stitch, ch 1.
- Round 9: 1 sc in each stitch — 36 sts.
- Slip stitch, ch 1.
- Round 10: 5 sc, inc, repeat once (total 7 sts before next inc), inc — 42 sts.
- Slip stitch, ch 1.
- Rounds 11 & 12: 1 sc in each stitch — 42 sts each.
- Slip stitch, ch 1.
- Round 13: 5 sc, dec repeat; 36 sts.
- Slip stitch, ch 1.
- Round 14: 4 sc, dec repeat; 30 sts.
- Slip stitch, ch 1.
- Round 15: 3 sc, dec repeat; 24 sts.
- Slip stitch, ch 1.
- Round 16: 2 sc, dec repeat; 18 sts.
- Slip stitch, ch 1.
- Round 17: 1 sc in each stitch — 18 sts.
- Finish off and leave tail for sewing.


Eyes
Attach safety eyes into the space between marked stitches from round 8, secure with included safety backs.
Ears (Make 2)
- With light tan yarn, MR and 6 sc into ring; tighten.
- Join with sl st to first sc. Change color to brown yarn.
- Chain 1, then 2 sc in each stitch around — 12 sts.
- Slip stitch and chain 1.
- Leave a tail for sewing.
Nose
- Using light tan yarn, make slip knot, ch 2.
- Into second chain from hook, 4 sc. Join.
- Round 2: 2 sc in each sc around — 8 sts. Join.
- Round 3: 2 sc in each sc around — 16 sts. Join.
- Round 4: 1 sc in each sc — 16 sts.
- Embroider nose details using black thread and tapestry needle in a sideways triangle shape. Tie securely on the back side.
Legs and Body
- Using dark brown yarn, MR and 6 sc, tighten ring.
- Join, ch 1.
- Round 2: 2 sc in each st — 12 sts. Join.
- Round 3: 1 sc in next 2 sts, inc repeat — 16 sts.
- Join, ch 1.
- Round 4: 1 sc around, then 3 decreases spaced evenly to 13 sts.
- Round 5: 1 sc around — 13 sts, switch to blue yarn in last stitch.
- Round 6: 1 inc, 4 sc repeat — 16 sts.
- Round 7: 11 sc; join legs by single crochet — 16 sts total.
- Rounds 8-15: Single crochet around both legs and body to form overalls – 16 sts per round.
- Stuff legs and body with fiberfill as you go.
- Round 16: 5 sc, dec repeat — 13 sts.
- Round 17: 1 sc around — 13 sts.
- Round 18: 4 sc, dec repeat — 10 sts.
- Round 19: 1 sc around; switch to light tan yarn for shirt.
- Rounds 20-23: Single crochet shaping the shirt with decreases as instructed until finished; fasten off with short tails sewn into body.


Bow Tie
- Using blue yarn, slip knot, ch 4.
- Work 2 double crochets (dc) in 4th chain from hook, ch 3, sl st in same chain (first bow side).
- Ch 3, 2 dc in same chain, ch 3, sl st in same chain (second bow side).
- Chain 1, fasten off leaving tail for attaching.
Suspenders (Make 2)
- Slip knot, ch 13, ch 1, fasten off.
- Attach suspenders to body later as instructed.
- With tan yarn, slip knot, ch 2.
- Work 4 sc in second chain from hook.
- Chain 1, turn.
- Rounds 2-4: 1 sc in each of 4 stitches; chain 1, turn each row.
- Fasten off leaving tail for sewing to body front.
Assembly & Finishing
- Stuff head firmly and insert safety eyes as positioned earlier.
- Attach nose with secure stitching onto face.
- Sew ears onto head using tails left earlier; position for a natural look.
- Sew arms to body top edge; for stationary arms push yarn through arm and body to secure position or leave loose for movable arms.
- Attach pocket onto front center of body, sew edges leaving pocket open.
- Sew suspenders on front and back of pants; add small button details.
- Attach bow tie at collar area using yarn tail.
- Sew head to body, checking that bear faces forward. Use slip stitches to secure evenly around neck.
- Weave in all ends neatly inside body.
- Slightly stuff arms and finish stuffing body if needed.
Finished Size Recap
- Approximately 10 inches (25 cm) tall
- Well-shaped round head with dome top
- Soft, fully stuffed body and legs
- Distinct clothing features with suspenders, bow tie, and pocket
- Securely attached eyes, nose, ears, and limbs
Summary
Create an adorable cuddly teddy bear with this detailed crochet pattern based on the popular Loops & Threads Teddy Bear Kit. This pattern guides you through each step from crafting the head, ears, nose, body, legs, and outfit accessories, to assembling a charming bear perfect for gifting or decorating. The chunky yarn and basic stitches make it accessible to intermediate crocheters and determined beginners.




Leave a Reply