

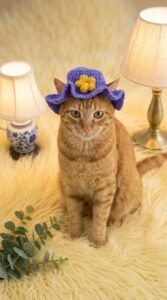
Bring charm and comfort to your wardrobe with this cute crochet cat ear hat pattern that's as fun to make as it is to wear.
Cold weather accessories don’t have to be dull—they can be playful, stylish, and functional all at once. The crochet cat ear hat is a perfect example, bringing warmth and character to chilly days. Its charming design, complete with whimsical cat ears, adds a fun yet fashionable touch to any outfit. Made with soft, comfortable yarn, it’s ideal for keeping your head and ears snug during frosty mornings or outdoor adventures.
Stylish Crochet Cat Ear Hat Pattern For Winter Fashion

This cuddle-ready hat offers more than just aesthetic appeal; it’s easy to personalize with a variety of colors, letting you match it to your unique style. Sized to fit both adults and children, it’s a versatile project with timeless appeal. Whether it’s a thoughtful handmade gift or a playful addition to your wardrobe, this hat ticks all the boxes for warmth, comfort, and creativity.
Beyond its functionality, making the cat ear hat is an enjoyable way to refine your crochet skills. The design suits beginners but also offers enough detail to keep seasoned crocheters engaged. With its delightful blend of practicality and flair, this hat is more than just an accessory it’s a statement piece that’s sure to spread smiles and cozy vibes wherever it’s worn.

1. Materials Required
- Hooks:
- 4.5 mm hook (preferred by Creator due to her loose tension).
- Optionally, 6.5 mm hook for the chain foundation (helps ensure the chains match tension with double crochet stitches).
- Yarn: Size 4/medium weight yarn (e.g., Loops and Threads Soft Classic).
- Additional Tools: Scissors, tapestry needle, and measuring tape.
2. Recommended Stitch Knowledge
This tutorial is best suited for those with basic crochet skills. You should already know:
- Slip knot
- Chain stitch
- Double crochet
- Slip stitch
- Weaving ends
Step-by-Step Guide
3. Starting the Hat
- Begin with making a basic slip knot using your first color (e.g., black).
- Use a 6.5 mm hook to crochet 55 chain stitches. If your chain tension is already smooth, stick with the 4.5 mm hook.
- Lay the chains flat and ensure they measure 23 inches. Adjust chain count if needed.

4. First Row
- Switch to your 4.5 mm hook.
- Skip the first two chains (as double crochet is “two chains tall”).
- Double crochet into the third chain from the hook.
- Continue double crocheting across until the end of the chain row.
- Verify measurements:
- Length: Your first row should now measure 22 inches long (slightly shorter due to skipped chains being incorporated).
- Height: Each row should measure approximately 1.5–2 cm tall.
- Adjust rows based on these numbers.
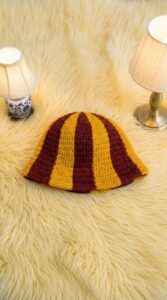
5. Repeat Rows with Color Changes
- To add stripes, alternate between colors (e.g., black and gray). Chain two, turn your work, and crochet another row.
- Continue alternating colors for 11 rows total:
- Measurement after 11 rows: 7–7.5 inches tall.
- Optionally, adjust row count if your hat isn’t reaching the desired size.

6. Assembling the Beanie
- Fold the rectangular panel in half with the ends aligned.
- Slip stitch along the side to join the edges:
- Match stripes and slip stitch carefully so the seam is neat.
- Avoid tight stitching to maintain stretch and avoid shortening the hat.
7. Closing the Top
- Turn your work to align the top opening.
- Slip stitch across the top seam while leaving the bottom open.
- Cut the yarn and secure with fastening off.
8. Weaving in Ends
- Tip: Knot some of the loose ends, then use a tapestry needle to weave over the knots.
- Focus on securely fastening the inside seam since it won’t be visible.

9. Finishing Touches
- Flip the hat right side out. Pop out the corners for the "cat ears."
- Check for fit: The hat should stretch smoothly over the head. With wear, it will contour better to your head shape.

Special Features
- Customizable Design: Creator method enables creators to craft a range of beanies by adjusting yarn colors, hook sizes, chain lengths, and row counts.
- Versatility: The hat is stretchy and can fit snugly while shaping to your head over time.
- Scale of Difficulty: Intermediate (basic crochet knowledge is necessary).
Tutor’s Suggestions
- Tension Adjustments:
- Use a larger hook for tighter chain tension and smaller hook for loose tension.
- Crocheters with differing tension should measure each row to ensure accuracy.
- For Oversized Look:
- Add one more inch to the brim and a few extra starting chains.
- Adjust the rows for a larger feel while maintaining fit.
- Material Adjustments: Yarn thickness may vary even within the same weight category—adjust chains and rows accordingly.
Uses
- Everyday wear
- Gifts
- Custom creations for sale
Tip
When measuring your stitches and rows, lay them flat without scrunching to ensure accurate dimensions. This helps with fit and prevents the hat from being uneven.
Conclusion
With clear step-by-step instructions, viewers can create cat ear beanies in varying sizes, styles, and colors while tailoring the design to their preferences. This versatile project is great for personal use or selling handcrafted items—perfect for crochet enthusiasts looking to advance their skills.

Leave a Reply