

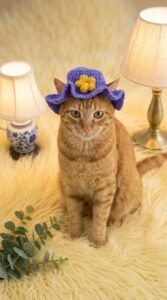
Spice up your style with the Crochet Granny Skull Bucket Hat pattern a funky, fun design that’s perfect for turning heads and spreading smiles!
Granny squares have long been a beloved symbol of crochet traditions, but the Crochet Granny Skull Bucket Hat takes that heritage to a bold and funky new level. This unique pattern combines the charm of vintage crochet with a modern, edgy twist, featuring skull motifs that add character to your wardrobe. Perfect for self-expression, this hat isn’t just an accessory it’s a statement. Whether you're dressing up for Halloween, looking for a whimsical addition to your everyday outfits, or gifting something memorable to a friend, this hat fits the bill.
Crochet Granny Skull Bucket Hat Pattern Perfect For Gift

Made from soft and durable yarn, it offers practicality with its snug fit, warmth, and standout style. The inclusion of the iconic granny square pattern makes it approachable for both seasoned crocheters and beginners aiming to try something adventurous. The design is versatile, allowing for customization in colors to suit your personality.
Plus, the fact that the pattern is completely free makes it accessible to everyone a major plus for those wanting to add flair without breaking the budget. Functional yet fun, the Crochet Granny Skull Bucket Hat is more than a pattern; it’s a gateway to individuality and creativity in every stitch.
Introduction
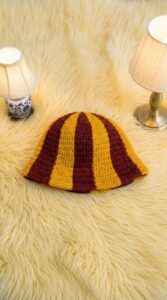
The Crochet Granny Skull Bucket Hat pattern is a wonderful project for those who love to mix classic crochet techniques with a modern, edgy design. This hat is made by creating multiple skull granny squares and then joining them together to form a stylish and unique bucket hat. Here’s a detailed guide on how to crochet each part of the hat, from the skull motifs to the final assembly.
Materials Needed
- 5 mm crochet hook
- Yarn of choice

Instructions
1. Creating the Skull Motif
- Start with a Slip Knot and Foundation Ring:
- Chain 4 and join with a slip stitch to form a ring, or you can use a magic circle if preferred.
- Chain 2.

- Round 1:
- Double crochet 9 times into the center of the ring.
- Chain 5, double crochet into the center again, chain 3, double crochet into the center, chain another 5.
- Slip stitch into the first double crochet (Not the chain) to close the round.
- Round 2:
- Chain 1 and single crochet into the first double crochet.
- Single crochet into the next 8 double crochets.
- In the next chain-5 space, make 6 double crochets.
- Slip stitch into the chain-3 space, chain 1, double crochet into the chain-3 space, chain 1 again, double crochet into the same space, chain 1, slip stitch back down into the chain-3 space.
- Single crochet into the next chain-5 space and make 6 single crochets.
- Slip stitch into the first single crochet and tie off your yarn.
2. Creating the Base of the Hat
- Attaching Yarn to Skull Motif:
- Attach the yarn to the second single crochet stitch.
- Chain 3 (counts as the first double crochet).
- Base Round 1:
- Double crochet into the same stitch, chain 3, double crochet twice more into the same stitch (this forms the first corner).
- Double crochet into the next stitch.
- Half double crochet into the next 3 stitches.
- Double crochet into the next stitch, then create the second corner (2 double crochets, chain 3, 2 more double crochets).
- Double crochet into the next stitch.
- Half double crochet into the next 3 stitches.
- Double crochet into the next stitch, then create the third corner.
- At the bottom of the skull (where the teeth are), make 3 single crochets.
- Double crochet into the next stitch and form the fourth corner.
- Double crochet into each stitch around the rest of the square.
- Slip stitch into the top of the initial chain-3 to join.
- Base Round 2:
- Chain 3 and form corners (2 double crochets, chain 3, 2 more double crochets).
- Double crochet into each stitch until the next corner.
- Follow the same corner formation pattern around the square.
- Continue to double crochet into each stitch, join with a slip stitch at the end.
- Optional Round 3:
- Single crochet around each stitch, placing 3 single crochets in each corner chain-3 space.

3. Joining the Squares
- Square Arrangement:
- Lay out your 5 squares in a "T" or plus sign shape with right sides facing downward.
- Begin joining squares using a slip stitch seam, working into the back loops of each stitch.
- Joining Procedure:
- Attach yarn with a slip stitch and join the squares to form the top of the hat.
- Seam the side stitches to create the cylindrical shape of the hat.

4. Creating the Brim
- Brim Round 1:
- Chain 3 and double crochet 3 times into each stitch around.
- Slip stitch to join the round.
- Brim Round 2:
- Chain 3 and continue to place 3 double crochets in each stitch around.
- Slip stitch to join.

Conclusion
You have successfully created a Crochet Granny Skull Bucket Hat! This unique pattern allows you to blend traditional granny squares with a modern twist. Each skull motif adds an edgy detail to your hat, and the floppy brim offers a fun, stylish flair.


Leave a Reply