

Pocket adorable ocean fun with this Free Crochet Turtle Keychain Pattern featuring tiny shell cute little flippers and playful everyday charm.
Charming accessories have a way of brightening up everyday items, and the Free Crochet Turtle Keychain Pattern turns a simple keyring into an adorable statement piece. This little turtle is not only a fun project to work on but also adds a touch of personality to your keys, bag, or backpack. Crafting this delightful amigurumi keychain brings joy as you stitch together a compact, textured turtle that’s both cute and practical.
The finished keychain features a rounded turtle shell with a lovely mix of stitches that create a soft yet sturdy texture, perfect for withstanding daily use. Its petite size makes it lightweight and easy to carry, while the detailed shell and tiny legs add charming character. The shape is perfectly balanced—not too bulky—making it a lovely addition to your accessories without adding extra weight.
Crochet a Turtle Keychain Pattern to Add Charm to Your Keys

Customization is one of the many perks of this project. You can play around with different yarn colors, replicating a natural turtle shell or choosing vibrant hues for a more whimsical look. Adding small embroidered eyes or a little smile brings even more personality to your turtle friend. The pattern suits beginners looking for a manageable, quick project and intermediate crocheters eager to refine their amigurumi skills.
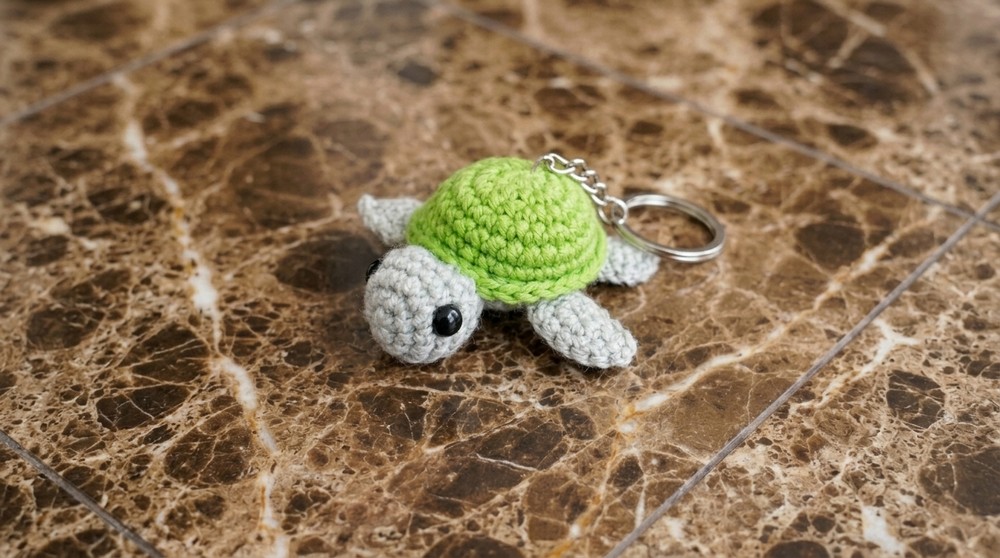
As you work on the Free Crochet Turtle Keychain Pattern, you’ll get comfortable with basic amigurumi techniques like crocheting in the round, increasing and decreasing stitches, and assembling small parts. The experience helps improve precision and patience while offering a rewarding result to treasure or gift. It’s a perfect project to cozy up with, adding a handmade touch to everyday essentials while slowly building your crochet confidence.
Crochet Turtle Keychain Pattern
Introduction
This detailed pattern will guide you through crocheting a cute little turtle keychain approximately 6 cm in size. The design uses basic crochet stitches to create a lovable little turtle with a textured shell and movable limbs. You’ll learn to crochet each part separately and assemble them into an adorable amigurumi keychain.
Skill Level & Terminology
- Skill Level: Beginner to Intermediate
- Terminology: US crochet terms
Materials & Tools
- Yarn in green (shell color) and beige (body color) or colors of your choice
- Crochet hook suitable for yarn thickness (5 mm used here)
- Yarn needle
- Stitch marker or contrasting thread
- Scissors
- Lighter (for yarn end sealing)
- Safety eyes, 5 mm
- Stuffing (fiberfill)
- Keychain ring or lobster clasp
Gauge
Work with consistent tension; gauge is flexible. Finished turtle measures approximately 6 cm in diameter.
Abbreviations List
- ch = chain
- sc = single crochet
- inc = increase (2 sc in one stitch)
- dec = decrease (crochet 2 stitches together)
- sl st = slip stitch
- MR = magic ring (adjustable ring)
- flo = front loop only
Special Stitch Instructions
- Magic Ring (MR): Enables a tight, hole-free start for rounds, especially when beginning in the round.
- Working in Front Loops Only (flo): Insert your hook only into the front loop of each stitch to create a surface texture or shaping.
- Invisible Decrease: Crochet two stitches together carefully to maintain smooth shaping with minimal gaps.
Finished Size
The crocodile will measure approximately 6 cm from shell top to bottom.
Pattern
Part 1: Shell (in green yarn)
Round 1:
- Create a magic ring (MR).
- Work 8 single crochets (8 sc) into the ring. Tighten and place marker.

Round 2:
- Make 8 increases (2 sc in each stitch), total 16 stitches.
Round 3:
- Repeat the magic ring closure securely with a knot to prevent opening.
- Work sequence: (1 sc, 1 inc) around, total 24 stitches.
Round 4:
- Work 3 sc, 1 inc sequence around, total 30 stitches.
Round 5 :
- Work 1 sc in each stitch around (no increases or decreases), maintain 30 stitches.
Round 6:
- Work 1 sc in each stitch around (no increases or decreases), maintain 30 stitches.
Round 7:
- Work 1 sc in each stitch through the front loops only (flo), total 30 stitches.

Summary:
The shell is worked in rounds beginning from a tight magic ring with increasing rounds to expand the circle, finishing with textured front loop single crochet rounds.
Part 2: Shell Bottom Edge (beige yarn)
Round 8:
- Change to beige yarn.
- Work 1 sc in each stitch around the bottom edge (from the last round), 30 stitches total, crocheting into the back loops of the rounds below.
Round 9:
- Sequence (3 sc, 1 dec) around, decreasing the stitch count appropriately with decreases done through front loops, total 24 stitches.
Round 10:
- Sequence (2 sc, 1 dec) repeat around. Total 18 stitches.
Round 11:
- Sequence (1 sc, 1 dec) repeat around. Total 12 stitches.
Round 12:
- Sequence 1 dec repeat around. Total 6 stitches.
Finishing Shell Bottom:
- Cut yarn leaving a tail.
- Use tapestry needle to pull yarn through remaining stitches, close tight with an invisible knot.
- Stuff the shell gently with fiberfill (not too full to maintain the shape).
Summary:
The bottom of the shell is worked in beige yarn to complement the green shell, using decreases to shape the base, then closed and lightly stuffed.
Part 3: Head (beige yarn)
Round 1:
- MR, 6 sc into ring, tighten.
Round 2:
- Make 6 increases (12 stitches).
Round 3:
- Work (1 sc, 1 inc) around to get 18 stitches.
Round 4:
- Work 1 sc in each stitch over 3 rounds (no increases or decreases), 18 stitches each round.
Round 5:
- Work 1 sc in each stitch over 3 rounds (no increases or decreases), 18 stitches each round.
Round 6:
- Work 1 sc in each stitch over 3 rounds (no increases or decreases), 18 stitches each round.
Round 7:
- 1 sc, 1 dec repeat around, 12 stitches remaining.
Round 8:
- 1 sc, 1 dec repeat around, 8 stitches remaining.
Round 9:
- 1 dec repeat around, 4 stitches remaining.
Finishing Head:
- Stuff head with fiberfill.
- Close with yarn needle by weaving through front loops and pulling tight.

Summary:
The head is a small rounded ball worked from a tight magic ring, increasing to size and then decreasing to form the neck, finished stuffed and closed tightly.
Part 4: Legs and Arms (Make 4)
Round 1:
- MR, 6 sc into ring.
Round 2:
- Make 6 increases (12 stitches).
Round 3:
- (1 sc, 1 inc) repeat around, 18 stitches.
Round 4:
- Work 1 sc in each stitch for two rounds, maintaining 18 stitches each.
Round 5:
- Work 1 sc in each stitch for two rounds, maintaining 18 stitches each.
Finishing:
- Close with slip stitch leaving yarn tail.
- Stuff lightly.
Summary:
Legs and arms are small tubes, starting from a magic ring and expanding to a wider circumference, then maintaining sizing without shaping.
Part 5: Assembly of Eyes and Facial Details
- Attach 5 mm safety eyes between rounds 4 and 5 on the head, spaced 7 stitches apart. Fit with washers securely from behind.
- Embroider nostrils and mouth with yarn or black embroidery thread.
Assembly & Finishing
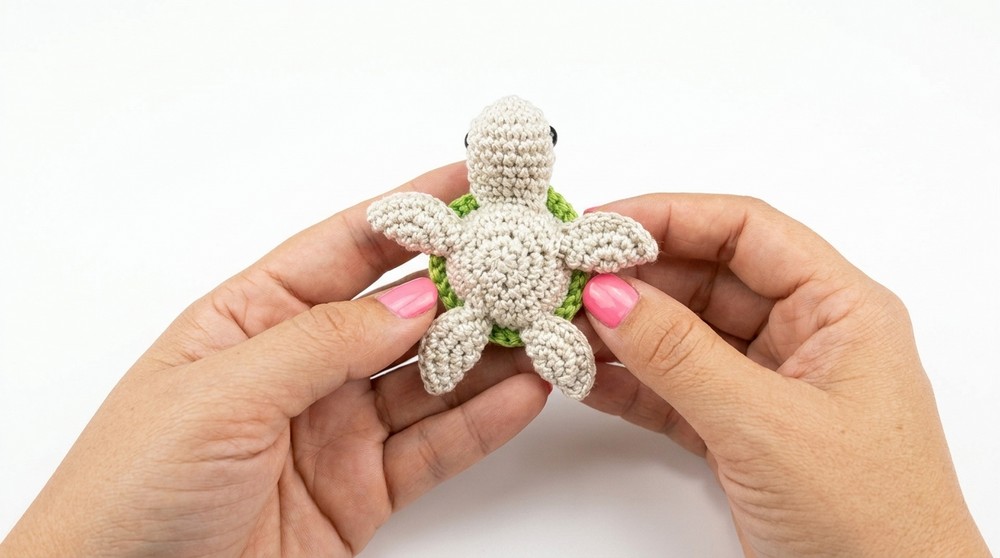
- Join the head to the shell: Sew head firmly onto the smaller opening of the beige shell bottom.
- Attach limbs: Sew arms and legs evenly spaced around bottom edge of the shell.
- Secure loose ends: Weave in all tails inside the turtle to prevent unraveling.
- Blush cheeks (optional): Apply a light pink blush or fabric paint to cheeks for added cuteness.
- Add keychain: Attach keyring or lobster clasp securely to the top of the shell.
Summary for Quick Readers
- Start the shell with green yarn using a magic ring; expand and texture it with single crochet stitches worked in the front loops.
- Use beige yarn to work the shell’s bottom with decreasing rounds to form the rounded base.
- Crochet head, arms, and legs separately in beige then assemble.
- Add eyes, sew parts together, and attach keyring.
Stitches Used
- Magic ring (MR)
- Single crochet (sc)
- Increase (inc)
- Decrease (dec)
- Front loop only (flo)
- Slip stitch (sl st)


Leave a Reply