

Create a colorful Free crochet fish pattern inspired by river life which is ideal for adding unique designs and vibrant charm to your handmade projects.
When I first came across the Free Crochet Fish pattern, I was immediately drawn to its playful charm and versatility. This small amigurumi-style project is perfect for creating adorable little fish that add a splash of whimsy to your crochet collection. The design features a smooth, rounded body with gentle ridges mimicking fish scales, making each piece feel wonderfully tactile. Its compact, slightly oval shape fits nicely in your hand, perfect as a keychain, a baby’s toy, or a cute stash-busting project.
Free Crochet Fish Pattern With Adorable Design
This pattern suits crocheters who have some basic experience working in rounds and want a quick yet satisfying project. It comes with options to customize the size by simply changing your yarn weight or hook size, allowing you to create anything from tiny charms to plush décor. The construction mainly involves single crochet stitches in continuous rounds, with simple color changes to highlight the fins and tail. I’ve found that using a smooth, slightly firm cotton yarn really brings out the stitch definition, enhancing the fish’s texture and shape.

The inspiration behind this pattern comes from childhood memories of watching fish swim gracefully in rivers and ponds. I wanted to capture that fluidity and friendliness in a small toy. These little fish make wonderful gifts for kids, ocean lovers, or anyone who appreciates handmade treasures. Don’t hesitate to experiment with bright colors or even mix and match patterns to make your own underwater crew.
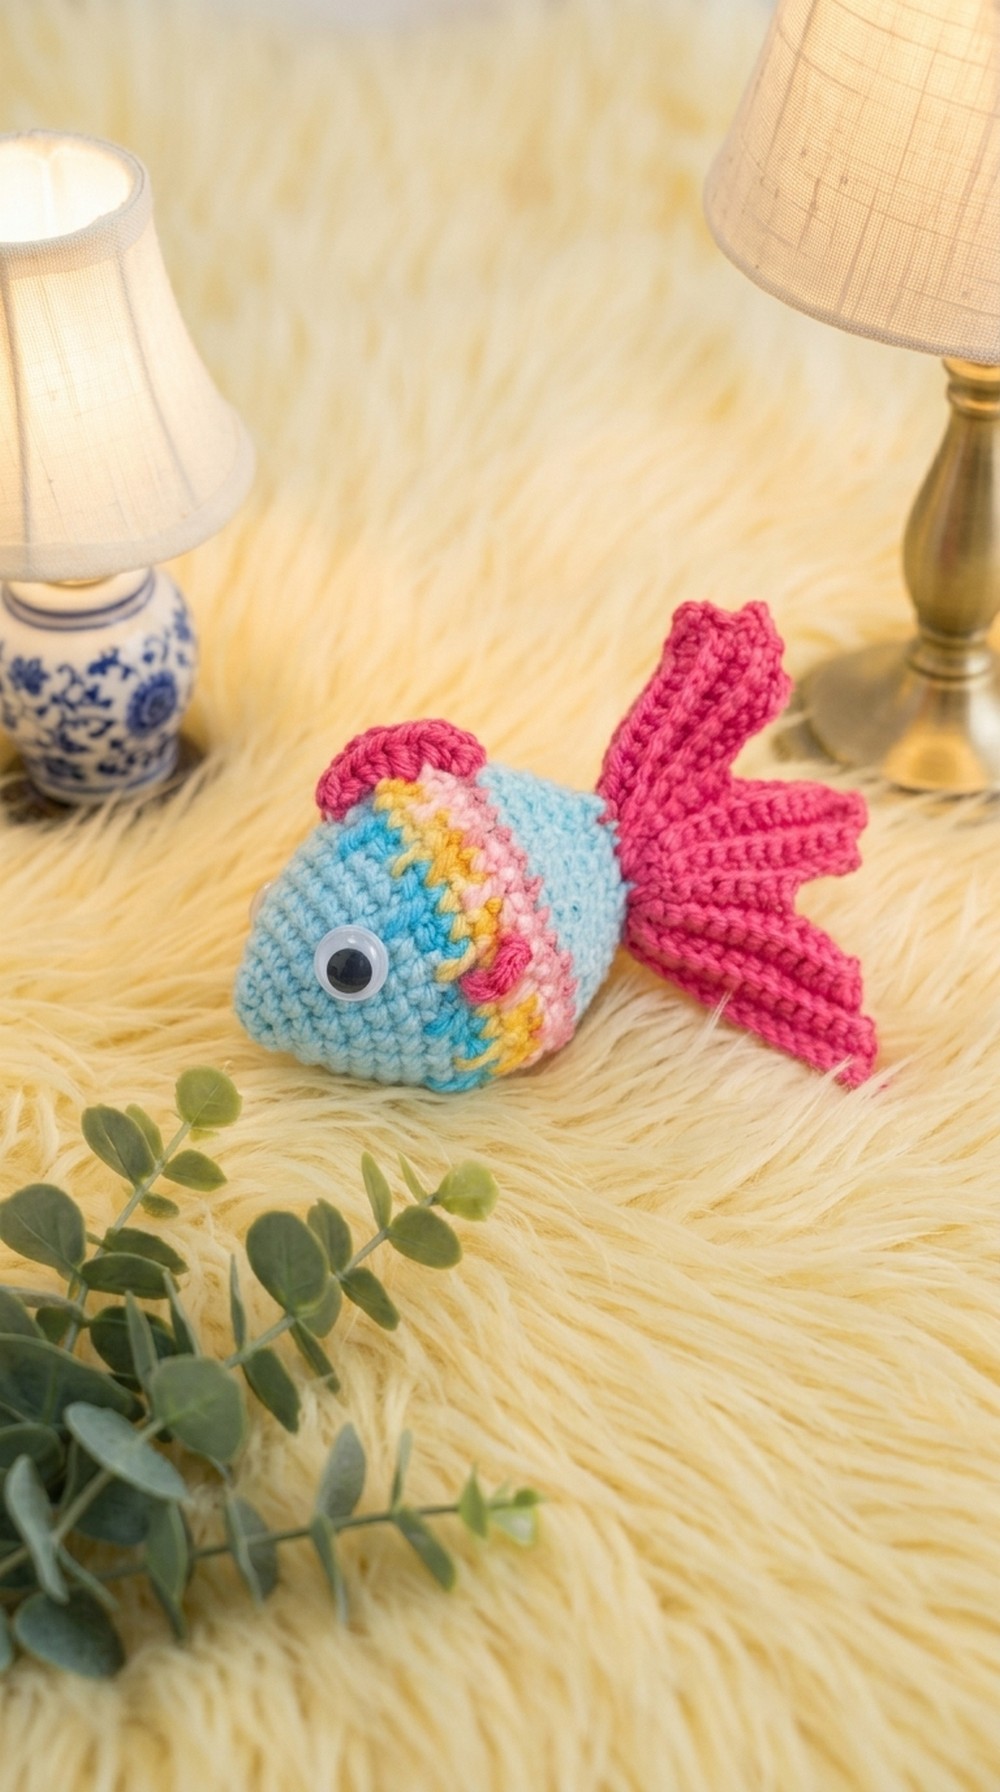
Colorful Crochet Fish – Step-by-Step Pattern
Create these adorable and vibrant crochet fish as playful amigurumi keychains or cheerful decorations for your home! Worked in the round with bright acrylic yarn, these little fish feature a plump striped body, sculpted tail, and whimsical fins. Attach safety eyes or beads, and hang them in a DIY “aquarium” or use them as keyrings for a splash of color in your daily routine. This pattern is written with beginners in mind, featuring simple stitches, clear color changes, and detailed tail and fin shaping.
Pattern Notes
- The body is crocheted in spiraling rounds (amigurumi style); use a stitch marker to keep track of rounds.
- Color changes are incorporated for stripes and tail; fasten off and weave in ends as you go to prevent tangling.
- The tail is worked flat and sculpted directly onto the body, with additional shaping by turning rows and changing stitch counts.
- Fins are crocheted directly onto the body or sewn separately for variety.
- Eyes are glued or sewn on (using safety eyes, black beads, or embroidery).
- The fish can be made in any color combination or weight of yarn for different sizes.
Skill Level
Advanced Beginner
Skills needed: working in rounds, color changing, basic increases and decreases, working flat for tail, attaching parts, simple hand sewing.
Materials
- Worsted Weight Acrylic Yarn (assorted brights: body/tail/fin colors as desired)
- 3.0–3.5 mm crochet hook (adjust for yarn weight)
- Stuffing (polyester fiberfill)
- Small safety eyes or black beads, or black embroidery thread
- Yarn needle (for assembly and weaving in ends)
- Scissors
- Silicone glue (optional, for attaching eyes)
- Keyring/fishing line/nylon thread (for keychain or hanging)
- Decorative items: Glass container, stones, mini shells (for display)
Measurements
- Finished fish approx. 8–10 cm (3–4") in length (excluding hanging string).
- Tail: approx. 4–5 cm wide.
- Fin: approx. 2–3 cm each.
Gauge
- Not critical. Stitches should be firm so stuffing does not show.
Stitch Abbreviations
| Abbreviation | Meaning |
|---|---|
| ch | chain |
| sc | single crochet |
| inc | increase (2 sc in 1 stitch) |
| dec | decrease (sc 2 together) |
| sl st | slip stitch |
| st(s) | stitch(es) |
| BLO/FL | back/front loop only |
| rnd | round |
Special Stitches
- Magic Ring: Make a loop, work stitches into ring, pull tight.
- Invisible Decrease (dec): Insert hook into front loops of next two sts, yarn over, pull through both, then yarn over and pull through both loops on hook.
The Crochet Pattern
1. Fish Body
With Color 1 (main body color):
- Rnd 1: Make a magic ring, 6 sc in ring, pull tight (6).
- Rnd 2: inc in each st around (12).
- Rnd 3: [sc 1, inc] repeat 6 times (18).
- Rnd 4: sc in each st (18).
- Rnd 5: [sc 2, inc] repeat 6 times (24).
- Rnd 6: sc in each st (24).
- Rnd 7: [sc 3, inc] repeat 6 times (30).
- Rnd 8: inc in first st, sc 14, inc in next st, sc 14 (32).
- Place stitch marker for round starts as needed.
- Switch colors as desired for stripes.
- Rnd 9: Color change (to 2nd color).
- At base of stitch (see video), work sc into base of the st (to shape ridges for stripes), then [sc 3, sc into base, sc 3], repeat 8 times (32).
- Rnd 10: (Change stripe color if desired)
- Repeat: 2 sc, sc into base of next st, 3 sc, repeat around. (32)
- Rnd 11: Continue: sc into base, 3 sc, repeat 8 times (32).
- Rnd 12: (Change stripe color) sc into base, 3 sc, repeat 8 times (32).
- Rnd 13: 2 sc, sc into base, 3 sc, repeat 7 times, end with sc into base, 2 sc (32).
- Rnd 14: (Switch back to main body color) [sc 3, dec] repeat 6 times, sc 2 (26).
- Rnd 15: sc in each st (26).
- Rnd 16: dec, [sc 2, dec] repeat 6 times (19).
- Lightly stuff body here.
- Rnd 17: sc in each st (19).
- Rnd 18: [sc 1, dec] repeat 6 times, sc 1 (13).
- Rnd 19: sc in each st (13).
- To close: Align the opening flat, sc through both sides (6 times across), closing flat (creates tail base). Fasten off.


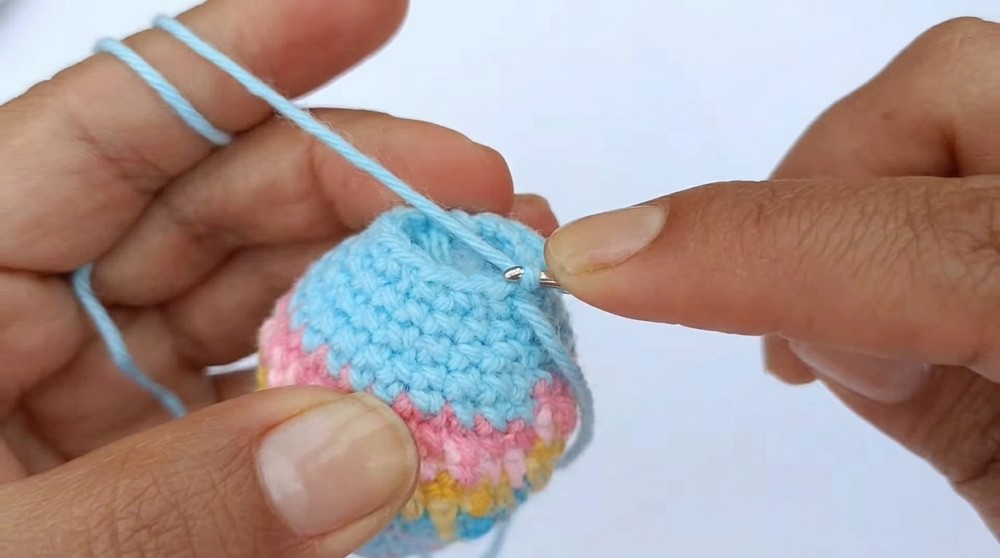
2. Tail Fin (Directly Attached, worked Flat)
With chosen tail color:
- Insert hook into first stitch at tail base.
- Row 1: Ch 15, starting in 2nd ch from hook, sc in each ch back to tail base (14). Sl st in next st.
- Row 2 (BLO): Ch 1, turn, sc 13 back (13). Sl st in tail base.
- Row 3 (BLO): Ch 1, turn, sc 12. Sl st in tail base.
- Continue: Repeat with decreasing rows and sl st in base—(11 sc next row, then 10, etc.) for gradual tapering.
- Add short rows & pointy lobes as in transcription for realistic tail. Work some short rows, chains, and turns to make asymmetric edges and points for a wavy, realistic shape.
- Bind off, weave in end.
3. Top and Side Fins
Top Fin (worked into body, above tail):
- Join bright color to round 13, near the center back.
- Ch 1, sc, next round below: 2 sc in same st, next round (lower): hdc and dc in same st, next round: dc and hdc in same st, next round: hdc and sc in next st.
- Ch 1, sl st to secure, fasten off, weave ends.
Side Fins (Make Two):
- On either side of body, join color at round 10.
- Ch 2, dc in same st, ch 2, sl st in same st. Fasten off.
- Repeat on other side, matching for symmetry.
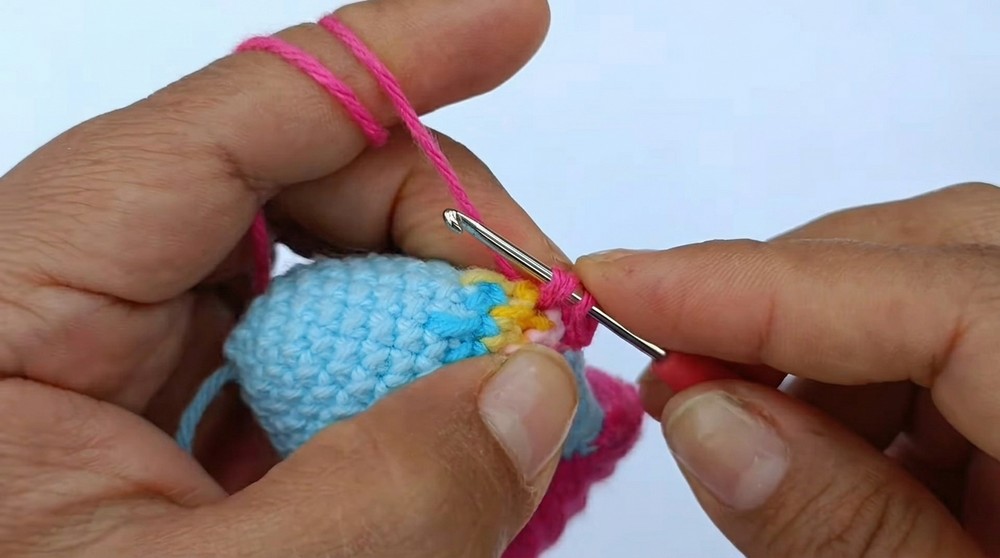
4. Eyes
- Glue or sew small round eyes or beads onto both sides of head, placed on round 5, about five stitches in from the snout, evenly aligned across fish.
- Alternatively: Use 6 mm safety eyes, or embroider with black yarn.
- Optional: Embroider a little smile or eyelid with black, if desired.
Assembly & Finished Size
- Weave in all yarn ends neatly, using a yarn needle.
- Stuff body firmly, but do not overstuff—shape to be oval/plump.
- Attach hanging string (keyring or nylon thread): sew or loop through center back/top.
- Place fish in decorated glass bowl with stones, shells, and plants, or add a keychain ring for functional use.
- Finished length approx. 8–10 cm (3–4").

Quick Overview for Beginners
- Crochet an oval body with single crochet rounds and increases. Add stripes by changing colors.
- Flatten the tail base, work rows of single crochet for a flowing tail.
- Add fins on top and both sides directly into the body.
- Attach, glue, or sew eyes in place. Add stuffing and secure all ends.
- Decorate as a keychain or display in a mini aquarium setup.
Tips for Success
- Stuff body gradually as you go for a smooth shape.
- Pull color changes tightly and weave in ends for neat stripes.
- Work the tail in gradually shorter rows for a shaped, natural finish.
- Match both side fins in placement for a balanced look.
- If using as a keychain, reinforce the hanging point for durability.
- Have fun with color combinations for a bright, playful result.

Leave a Reply